
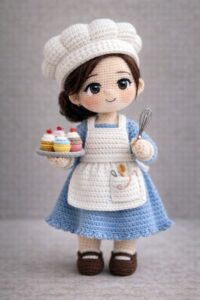
Create a charming handmade chef doll with this amigurumi cook crochet pattern, designed to combine personality, structure, and professional-looking details. This project guides you through shaping a stable body, adding realistic culinary accessories, and achieving a polished finish with techniques that improve balance and durability. Perfect for kitchen décor, gifts, or themed collections, this amigurumi cook brings creativity and warmth to every stitch.
Master the Art of the Amigurumi Cook
Bring a touch of culinary charm to your crochet collection with this delightful **amigurumi cook** project. Whether you are a seasoned pro or an intermediate maker looking for a rewarding challenge, this pattern is designed to guide you through every stitch. This chef doll isn’t just a toy; she is a character full of personality, featuring a classic pleated skirt and a signature “Toque” hat that stands tall with professional flair.
Innovative Techniques for Stability
What sets this **amigurumi cook** apart is the attention to structural detail. To ensure your doll can handle a busy kitchen, this pattern utilizes the “Cavity and Spigot” system for joining the head and neck. This specialized method provides incredible stability, preventing the “wobbly head” effect common in taller dolls. You will also learn how to create a voluminous, textured hairstyle using a base cap and individual curls, resulting in a high-quality finish that looks beautiful from every angle.
Perfect for Gifting and Decor
Crocheting your own **amigurumi cook** is the perfect way to celebrate a food lover or add a whimsical touch to your kitchen decor. Complete with a mini rolling pin and a mint-green apron, she is ready to whip up some imaginary treats. If you encounter any inconsistencies while working through the rounds, please let us know in the comments so we can continue to provide the best crafting experience possible.
Project Sheet: Chef Doll
Before you begin crocheting your **Chef Doll**, please review this technical information to help you prepare your workspace.
General Information
* **Difficulty Level:** Intermediate – Beginner (requires knowledge of basic stitches and color changes).
* **Estimated Time:** 12 to 15 hours (depending on individual skill and pace).
* **Finished Size:** Approximately 10.5–11 inches / 27–28 cm (using recommended materials).
Materials Needed
To ensure your **Chef Doll** looks just like the image, we suggest using **Sport weight (#2)** cotton yarn:
* **Cotton Yarn (50g ≈ 125m):**
* Skin Color (Light Beige): 60 g
* White (Blouse and Hat): 50 g
* Chestnut/Brown (Hair): 70 g
* Dusty Rose (Skirt): 40 g
* Mint Green (Apron and Scarf): 25 g
* Light Brown (Clogs and Rolling Pin): 25 g
* **Hook:** 2.25 mm (or size needed to achieve a firm tension).
* **Safety Eyes:** 12 mm.
* **Stuffing:** 150–180 g of polyester fiberfill.
* **Extras:** Yarn needle, stitch markers, scissors, and a bit of blush for the cheeks.
Guide to useful tools for crocheting
Abbreviations (US Terms)
We will use the following standard nomenclature to make the pattern easy to follow:
* **MR:** Magic Ring.
* **ch:** Chain.
* **sc:** Single crochet.
* **hdc:** Half double crochet.
* **dc:** Double crochet.
* **sl st:** Slip stitch.
* **inc:** Increase (2 stitches in the same base stitch).
* **dec:** Decrease (sc 2 together).
* **FLO:** Front Loop Only.
* **BLO:** Back Loop Only.
* **[ ] x … :** Repeat the sequence the indicated number of times.
Section 1: The Shoes
The shoes are crocheted in light brown and worked in a spiral from the sole upward. Make 2 identical pieces.
Sole
Round 1: Chain 7 (6 working chains + 1 turning chain). Starting in the second chain from the hook: 4 sc, 3 sc in the last chain. Continue along the other side of the foundation chain: 3 sc, 1 inc in the last available stitch. [12 sc]
Round 2: 1 inc, 3 sc, 3 inc, 3 sc, 2 inc. [18 sc]
Round 3: (1 sc, 1 inc), 3 sc, (1 sc, 1 inc) × 3, 3 sc, (1 sc, 1 inc) × 2. [24 sc]
Round 4: (2 sc, 1 inc), 3 sc, (2 sc, 1 inc) × 3, 3 sc, (2 sc, 1 inc) × 2. [30 sc]
Upper Part of the Shoe
Round 5 (BLO): Crochet 30 sc using only the back loop of each stitch. [30 sc]
Round 6 and Round 7: Crochet 30 sc through both loops as usual. [30 sc]
Round 8 (Instep): Crochet 9 sc, 6 consecutive decreases across the front area, 9 sc. [24 sc]
Round 9 (Instep): Crochet 8 sc, 4 consecutive decreases across the front area, 8 sc. [20 sc]
Round 10: Crochet 8 sc, 1 decrease at the front, 10 sc. [19 sc]
Round 11: Crochet 8 sc, 1 decrease at the front, 9 sc. [18 sc]
Fasten off and cut the yarn on the first shoe. On the second shoe, do not cut the yarn so you can continue directly with the socks/legs. Stuff the toe and sole firmly.
Section 2: The Legs and Socks (Make 2)
Sock Shaft
Round 12 (BLO): With white yarn attached to the shoe, crochet 18 sc using only the back loops (BLO). [18 sc]
Rounds 13 to 17: Crochet 18 sc through both loops as usual for 5 rounds. [18 sc]
Folded Sock Edge (Into the FLO of Round 12)
With the sole facing upward, attach white yarn to the front loops of Round 12.
Crochet (2 sc, 1 inc) × 6 around. Join with 1 sl st to the first stitch, fasten off, and hide the yarn tail. [24 sc]
Leg Length (Skin Color)
Round 18 (BLO): Attach skin-colored yarn to the back loop of Round 17. Crochet 18 sc in BLO. [18 sc]
Rounds 19 to 35: Crochet 18 straight sc in a spiral for 17 rounds. [18 sc]
Stuff the foot, ankle, and leg firmly as you progress.
**Leg 1 (Left):** On Round 35, crochet 1 sl st, cut the yarn leaving approximately 10 cm, and fasten off.
**Leg 2 (Right):** On Round 35, do not cut the yarn. Crochet 2 or 3 additional sc until the hook is positioned at the inner side.
Joining the Legs (Beginning of the Body)
From Leg 2, chain 3. Join with 1 sc to the inner side of Leg 1.
Crochet 18 sc around Leg 1, including the joining stitch. Crochet 3 sc along one side of the chain, 18 sc around Leg 2, and 3 sc along the other side of the chain.
**[42 sc at the end of Body Round 1]**
Section 3: Hips and Waist
This section begins by joining the two legs completed in the previous section.
Each leg has 18 available stitches. The joining is done by keeping both legs facing each other and using 3 chain stitches as separation between them.
Work in a spiral and use a stitch marker to indicate the beginning of each round.
Joining the Legs and Shaping the Hips
Round 1: Take the first leg and crochet 18 sc around it. Chain 3 and join with 1 sc to the first stitch of the second leg. Continue crocheting 17 sc around the second leg. Crochet 3 sc along the other side of the initial 3 chains. Total: 42 sc.
Round 2: Crochet 42 sc. Total: 42 sc.
Round 3: Crochet 42 sc. Total: 42 sc.
Round 4: Crochet 42 sc. Total: 42 sc.
These four rounds form the hip area. Maintain firm and even stuffing in both legs and add stuffing to the joining area as the work progresses.
Shaping the Waist
Round 5: Crochet (5 sc, 1 dec) × 6. Total: 36 sc.
Round 6: Crochet 36 sc. Total: 36 sc.
Round 7: Crochet 36 sc using only the back loop of each stitch (BLO). Total: 36 sc.
This BLO round leaves the front loops free on the outside of the piece. These loops will later be used to attach the yarn and crochet the skirt.
Round 8: Crochet (4 sc, 1 dec) × 6, working through both loops. [30 sc]
Stuff the hip and waist area progressively, making sure the piece maintains a proportionate shape and that the waist does not become excessively rigid.
Do not close or fasten off the piece. The 30 stitches from Round 8 remain available to continue with the next section.
Section 4: Torso, Neck, and Spindle
This section begins directly on the **30 stitches remaining from the previous section**.
The torso is crocheted in skin color and worked in a spiral, keeping the body as one continuous piece. The shape gradually narrows from the waist toward the neck.
Use a stitch marker to indicate the beginning of each round.
Torso
Round 1: Crochet (4 sc, 1 inc) × 6. [36 sc]
Round 2: Crochet 36 sc. [36 sc]
Round 3: Crochet 36 sc. [36 sc]
These three rounds maintain the width of the waist and begin to form the lower torso area.
Round 4: Crochet (4 sc, 1 dec) × 6. [30 sc]
Round 5: Crochet 30 sc. [30 sc]
Round 6: Crochet 30 sc. [30 sc]
Round 7: Crochet 30 sc. [30 sc]
These rounds form the main part of the torso.
Round 8: Crochet (3 sc, 1 dec) × 6. [24 sc]
Round 9: Crochet 24 sc. [24 sc]
Round 10: Crochet 24 sc. [24 sc]
Round 11: Crochet (2 sc, 1 dec) × 6. [18 sc]
Round 12: Crochet 18 sc. [18 sc]
The upper part of the torso is reduced to 18 stitches to begin forming the neck.
Neck and Spindle
The spindle will be a narrow extension of the torso that will later allow the head to be attached.
Round 13: Crochet (4 sc, 1 dec) × 3. [15 sc]
Round 14: Crochet 15 sc. [15 sc]
Round 15: Crochet 15 sc. [15 sc]
Round 16: Crochet 15 sc. [15 sc]
Round 17: Crochet 15 sc. [15 sc]
Round 18: Crochet 15 sc. [15 sc]
Round 19: Crochet 15 sc. [15 sc]
Round 20: Crochet 15 sc. [15 sc]
These eight rounds form the neck and spindle. Keep the work straight, without increases or decreases.
Stuff the torso progressively as you work. The lower part should be firm to provide stability, while the upper area should be stuffed evenly without deforming the neck.
Section 5: The Skirt
The skirt is crocheted in pink and worked directly into the front loops that were left free in Round 7 of Section 3.
The skirt is crocheted from the waist downward, in a spiral. Increases are made every 2 rounds to create a gradual flare.
Skirt
Round 1: With pink yarn, insert the hook into the first available front loop of Round 7 of Section 3. Crochet 1 sc in each of the 36 front loops around = 36 sc.
Round 2: Crochet 36 sc = 36 sc.
Round 3: Crochet (5 sc, 1 inc) × 6 = 42 sc.
Round 4: Crochet 42 sc = 42 sc.
Round 5: Crochet (6 sc, 1 inc) × 6 = 48 sc.
Round 6: Crochet 48 sc = 48 sc.
Round 7: Crochet (5 sc, 1 inc) × 8 = 56 sc.
Round 8: Crochet 56 sc = 56 sc.
Round 9: Crochet (6 sc, 1 inc) × 8 = 64 sc.
Round 10: Crochet 64 sc = 64 sc.
Round 11: Crochet (7 sc, 1 inc) × 8 = 72 sc.
Round 12: Crochet 72 sc = 72 sc.
Round 13: Crochet (8 sc, 1 inc) × 8 = 80 sc.
Round 14: Crochet 80 sc = 80 sc.
This progression produces a gradual increase in width, with increases only every two rounds and without concentrating them in any particular area.
Skirt Finishing
Round 15: Crochet (1 sc, skip 1 stitch, 5 dc in the next stitch, skip 1 stitch) × 20 = 120 stitches.
Section 6: The White Blouse/Jacket
The blouse/jacket is crocheted in white and worked in rows back and forth.
The garment has a circular shape and is assembled around the chest. The opening visible in the center corresponds to the separation between the two ends of the piece, where the three decorative buttons will later be placed.
The piece begins with 41 chains to obtain 40 stitches in the first row.
Jacket Body
Row 1: Chain 41. Starting in the second chain from the hook, crochet 40 sc and turn the work. [40 sc]
Row 2: Crochet 40 sc and turn the work. [40 sc]
Row 3: Crochet 40 sc and turn the work. [40 sc]
Row 4: Crochet 40 sc and turn the work. [40 sc]
Row 5: Crochet 40 sc and turn the work. [40 sc]
Row 6: Crochet 40 sc and turn the work. [40 sc]
Row 7: Crochet 40 sc and turn the work. [40 sc]
Row 8: Crochet 40 sc and turn the work. [40 sc]
Row 9: Crochet 40 sc and turn the work. [40 sc]
Row 10: Crochet 40 sc and turn the work. [40 sc]
At the end of Row 10, a rectangular piece measuring 40 stitches wide by 10 rows high is formed.
The two ends of this piece will be the edges of the jacket opening. Do not join them together.
Collar Lapels
The lapels are worked over the stitches corresponding to the upper ends of the piece. Each lapel will have 3 rows.
First Lapel
Row 1: Crochet 8 sc over the 8 stitches at the upper end of the piece and turn the work. [8 sc]
Row 2: Crochet 8 sc and turn the work. [8 sc]
Row 3: Crochet 8 sc. [8 sc]
Fasten off and hide the yarn tail.
Second Lapel
Repeat the same 3 rows over the 8 stitches at the opposite upper end of the piece.
The two lapels face each other toward the central opening and form the visible collar shown in the reference.
Decorative Buttons
The jacket has 3 decorative buttons.
Sew the three buttons onto one of the edges of the opening, spacing them vertically and evenly.
The buttons do not function as a closure; they are used solely as a decorative element.
Sew the jacket to the body using invisible stitches.
Section 7: Hands, Arms, and Puffy Sleeves
This section includes the two hands with their thumbs, the 10-stitch arms, and the white puffy cup-style sleeves.
Each arm is worked separately in skin color and in a spiral. The sleeves are made separately in white and are subsequently placed over the arms and sewn to the jacket shoulders.
Hand and Arm (Skin Color – Make 2)
Round 1: Form a magic ring and crochet 6 sc. [6 sc]
Round 2: Crochet 6 inc. [12 sc]
Round 3 and Round 4: Crochet 12 straight sc in each round. [12 sc]
Round 5 (Thumb Formation): Crochet 4 sc, 1 3-dc bobble stitch made with 3 incomplete dc into a single base stitch, 7 sc. [12 sc]
Round 6 (Wrist Adjustment): Crochet (4 sc, 1 dec) × 2. [10 sc]
Rounds 7 to 18: Crochet 10 sc in each round for 12 straight rounds. [10 sc]
Stuff the hand and lower half of the arm progressively. Leave the upper half unstuffed to facilitate movement and insertion into the sleeve. Cut the yarn and fasten off.
Puffy Cup-Style Sleeves (White – Make 2)
Round 1: Form a magic ring and crochet 12 sc. [12 sc]
Round 2: Crochet (1 sc, 1 inc) × 6. [18 sc]
Rounds 3 to 5: Crochet 18 straight sc in each round for 3 rounds. [18 sc]
Round 6: Crochet (1 sc, 1 dec) × 6. [12 sc]
Rounds 7 to 9: Crochet 12 straight sc in each round for 3 rounds. [12 sc]
Fasten off and hide the yarn tail. Insert the skin-colored arm inside the white sleeve, leaving the hand cleanly exposed. Sew the upper edge of the sleeve to the jacket shoulder using invisible stitches.
Section 8: Tie Strap and Light Green Apron
The apron is worked in light green and consists of a tie strap that wraps around the waist and a gathered front panel. The lower edge of the panel is finished with a row of small fans.
Tie Strap
Work in rows back and forth.
Row 1: Chain 81. Starting in the second chain from the hook, crochet 80 sc. [80 sc]
Row 2: Crochet 80 sc and turn the work. [80 sc]
Row 3: Crochet 80 sc and turn the work. [80 sc]
Row 4: Crochet 80 sc. [80 sc]
Fasten off and hide the yarn tails.
The strap must be able to wrap around the waist and leave two free ends for making the bow.
Preparing the Gathering
Before beginning to crochet the apron panel, note that its 36 upper stitches will later be joined to only 18 center stitches of the tie strap.
This means that the panel will be constructed with 36 stitches along its upper edge, but when sewn in place, 2 stitches of the panel will be distributed over each stitch of the strap.
This difference between 36 stitches and 18 stitches is what will create the gathering along the upper edge.
Mark the 18 center stitches of the tie strap. These will be the stitches onto which the panel will later be sewn.
Front Apron Panel
Work in rows back and forth, beginning at the upper edge.
Row 1: Crochet 36 sc. [36 sc]
Rows 2 to 5: Crochet 36 sc in each row and turn the work. [36 sc]
Row 6: Crochet (4 sc, 1 dec) × 6 and turn. [30 sc]
Rows 7 to 12: Crochet 30 sc in each row and turn the work. [30 sc]
Fan Stitch Lower Edge
Row 13: Crochet (1 sc, skip 1 stitch, 5 dc in the next stitch, skip 1 stitch, 1 sc) × 6. [42 stitches]
Fasten off and hide the yarn tail.
Joining the Panel and Creating the Gathering
Place the 36-stitch upper edge of the panel over the 18 previously marked center stitches of the tie strap.
Sew by distributing exactly 2 stitches of the panel over each stitch of the strap.
Do not stretch the panel while sewing. The difference between the 36 stitches of the panel and the 18 stitches of the strap will cause the fabric to gather evenly, forming the upper gathering of the apron.
The ends of the tie strap must remain free so they can wrap around the waist and form the bow.
Section 9: The Ears and Head
The head is constructed in skin color, beginning at the crown and working toward the base. It is worked in a spiral, and the stitch count always increases in multiples of 6 until reaching a maximum diameter of 60 stitches.
From 60 stitches, progressive decreases are made until reaching 18 stitches. The final 18 stitches are maintained for 7 identical rounds to form the lower cavity of the head, which will later be joined to the neck.
Head
Round 1: Form a magic ring and crochet 6 sc. [6 sc]
Round 2: Crochet 6 inc. [12 sc]
Round 3: Crochet (1 sc, 1 inc) × 6. [18 sc]
Round 4: Crochet (2 sc, 1 inc) × 6. [24 sc]
Round 5: Crochet (3 sc, 1 inc) × 6. [30 sc]
Round 6: Crochet (4 sc, 1 inc) × 6. [36 sc]
Round 7: Crochet (5 sc, 1 inc) × 6. [42 sc]
Round 8: Crochet (6 sc, 1 inc) × 6. [48 sc]
Round 9: Crochet (7 sc, 1 inc) × 6. [54 sc]
Round 10: Crochet (8 sc, 1 inc) × 6. [60 sc]
Maximum Diameter
Rounds 11 to 14: Crochet 60 sc in each round for 4 rounds. [60 sc]
These rounds maintain the maximum diameter of the head. Place the safety eyes between Rounds 15 and 16 with an approximate spacing of 9 to 10 stitches.
Reduction Toward the Base
Round 15: Crochet (8 sc, 1 dec) × 6. [54 sc]
Round 16: Crochet (7 sc, 1 dec) × 6. [48 sc]
Round 17: Crochet (6 sc, 1 dec) × 6. [42 sc]
Round 18: Crochet (5 sc, 1 dec) × 6. [36 sc]
Round 19: Crochet (4 sc, 1 dec) × 6. [30 sc]
Round 20: Crochet (3 sc, 1 dec) × 6. [24 sc]
Round 21: Crochet (2 sc, 1 dec) × 6. [18 sc]
Lower Cavity
From this round onward, maintain the 18 stitches without increases or decreases, pushing the fabric inward.
Rounds 22 to 28: Crochet 18 sc in each round for 7 identical rounds. [18 sc]
These 7 rounds form the lower cavity to accommodate the neck spindle.
Ears (Make 2)
The ears are crocheted separately in skin color as anatomical semicircles.
In a magic ring, crochet the following sequence without closing the ring into a circle:
1 sc, 1 hdc, 3 dc, 1 hdc, 2 sc. [8 stitches]
Gently pull the short tail of the magic ring to tighten the center, forming a rounded, shell-shaped semicircle. Crochet 1 sl st at the base to level the curve.
Fasten off, leaving a long yarn tail for sewing to the sides of the head.
## Section 10: The Hair
The hair is made in brown using strands of thick yarn, which are individually grafted directly onto the head fabric.
The technique consists of securing each individual strand onto the stitches of the head so that the hair becomes integrated into the fabric and can be distributed following the shape of the head.
Preparing the Strands
Cut the strands of thick yarn to approximately twice the length desired for the finished hair.
The strands do not need to be exactly the same length if a more natural finish is desired.
Grafting the Hair
Work on the finished and stuffed head.
Insert the hook from the outside toward the inside of a stitch of the head, catching a strand of hair at its center.
Pull the strand partially through until a small loop is formed on the outside.
Pass both ends of the strand through this loop and gently pull to secure it to the stitch.
Repeat the procedure on the stitches of the head where hair is desired.
Distribution
Begin at the lower part of the head and work toward the crown.
Place the strands following horizontal rows of stitches, keeping them close together to prevent too much of the head fabric from showing.
In the back and side areas, place a greater number of strands to achieve the volume of hair shown in the reference.
At the top, distribute the strands following the shape of the crown.
Once the grafting is complete, arrange the hair with your fingers and trim only the ends that protrude excessively.
Section 11: The Chef’s Hat
The hat is worked in white and consists of two parts: a lower band that fits around the head and a puffy upper section that reproduces the characteristic shape of a chef’s hat.
The head has 60 stitches at its main diameter, so the hat is constructed separately to obtain a 60-stitch band that can fit around the head.
Lower Band
Work in a spiral.
Round 1: Chain 60 and join into a ring with 1 sl st in the first chain, taking care not to twist the strip. Crochet 1 sc in each chain around. [60 sc]
Rounds 2 to 6: Crochet 60 sc in each round for 5 rounds. [60 sc]
This band forms the fitted section that surrounds the head and corresponds to the visible lower band of the hat.
Puffy Upper Section
To achieve the puffy appearance, progressively increase from the 60 stitches of the band to 72 stitches.
Round 7: Crochet (9 sc, 1 inc) × 6. [66 sc]
Round 8: Crochet (10 sc, 1 inc) × 6. [72 sc]
Rounds 9 to 14: Crochet 72 sc in each round for 6 rounds. [72 sc]
These rounds form the area of greatest volume of the hat. Stuff lightly as you progress, avoiding deforming the piece with the stuffing.
Closing the Upper Section
Begin reducing the volume of the hat.
Round 15: Crochet (10 sc, 1 dec) × 6. [66 sc]
Round 16: Crochet (9 sc, 1 dec) × 6. [60 sc]
Rounds 17 and 18: Crochet 60 sc in each round. [60 sc]
Fasten off, leaving a long yarn tail to close the opening at the top.
Close the opening by passing the needle through all 60 stitches of the last round and gradually tightening. Hide the yarn tail inside.
Placing the Hat
Place the hat over the head, matching the 60-stitch band with the circumference of the head.
The upper section should remain slightly puffy and retain a soft volume. The lower band should remain relatively straight around the head.
Adjust the stuffing inside before completely closing the upper section to achieve the desired volume without deforming the hat.
Section 12: Facial Details, Embroidery, Nose, and Assembly
This section brings together the final facial details and the assembly of all the doll’s pieces. Work with the head, body, arms, ears, and garments completely finished.
Eye Placement
The image shows two large, round, shiny black eyes accompanied by small embroidered eyelashes.
Place the two eyes symmetrically on the face. Before securing them permanently, check that both are at the same height and that the distance between them is even.
If using safety eyes, place the washers on the inside of the head and check that they are firmly secured.
Eyelashes
Use thin black yarn to embroider the eyelashes.
Embroider small curved lines at the outer corner of each eye. The eyelashes should be short and subtle, following the delicate appearance shown in the image.
Eyebrows
Embroider the eyebrows with dark brown or black yarn, using short stitches.
Place one eyebrow above each eye, maintaining the same angle and length on both sides.
The eyebrows should be sufficiently separated from the eyes to preserve the doll’s soft expression.
Nose
The nose is small and positioned in the center of the face, between the eyes and mouth.
Use skin-colored yarn slightly darker than the yarn used for the head.
Make a few very small horizontal and vertical stitches until forming a subtle, slightly protruding nose.
Do not make a large nose, as in the reference it barely protrudes from the volume of the face.
Mouth
Embroider the mouth with pink yarn.
Make a small, delicate curved line positioned below the nose and centered between both eyes.
The mouth should be small to maintain the expression shown in the reference.
Cheeks
The image shows a slight pinkish tone on the cheeks.
Apply the color very softly to both sides of the face, making sure both cheeks are approximately at the same height.
This detail should be subtle and should not cover the fabric.
Placing the Ears
Position one ear on each side of the head, approximately at eye level.
Sew them directly onto the head using the yarn tails left when finishing each piece.
Before sewing them permanently, secure both ears with pins and check from the front that they are symmetrical.
Attaching the Head to the Body
The head is attached to the body through the 18-stitch lower opening that was prepared in Section 9.
Place the head over the neck, matching the 18 stitches of the cavity with the 18 available stitches of the neck.
Sew stitch by stitch using a yarn needle and the same color used for the skin.
Stuff the neck area before completely closing the join, making sure the head is firm but can maintain a natural position.
Attaching the Arms
Position both arms at the same height on either side of the torso.
The upper part of each arm should be positioned underneath the sleeve.
Sew each arm directly to the body using firm stitches, passing through the stitches at the upper part of the arm and the corresponding stitches of the torso.
Before finishing the seam, check that both arms are at the same height and that the hands are oriented toward the front.
Placing the Sleeves
Insert each arm into its corresponding sleeve.
The upper part of the sleeve should be positioned over the shoulder.
Sew the upper edge of the sleeve directly to the shoulder of the jacket, as established in the corresponding section.
The sleeve should retain its small cup-like volume and should not be stretched while sewing.
Placing the Apron
Place the light green apron centered over the front of the skirt.
The tie strap should wrap around the waist and sit over the upper part of the skirt.
Tie the ends of the strap at the back or side, depending on the position that is most suitable for keeping the apron centered.
The panel should retain the gathering along its upper edge, and the fans should remain free along the bottom.
Placing the Skirt
Check that the pink skirt is distributed evenly around the waist.
The BLO round worked during the waist section should be hidden by the upper attachment of the skirt.
Arrange the skirt around the body so that the flare is even and the lower edge retains its wavy shape.
Placing the Hat
Place the white hat over the head once the hair is finished.
The lower band should surround the head and sit above the hair, while the puffy upper section should retain the characteristic volume of the chef’s hat.
Secure the hat with a few discreet stitches if necessary to prevent it from shifting.
Assembly Check
Before considering the doll finished, check that the head is centered in relation to the body, that the ears and eyes are symmetrical, that both arms are at the same height, and that the legs maintain a balanced position.
Also check that the apron is centered, that the skirt retains its flare, and that the hat remains correctly positioned.
Bringing Your Amigurumi Cook to Life
Completing your **amigurumi cook** is more than just finishing a project; it is about bringing a tiny, handcrafted character to life. From the delicate lace on her socks to the perfectly folded chef’s collar, every detail you have crocheted adds to her unique story.
We hope you enjoyed the process of building her structure, especially the stability of the neck and the volume of her pleated skirt, which make this doll a truly standout piece in any collection.
Join Our Creative Kitchen
Your journey with the **amigurumi cook** doesn’t have to end here! We would love to see your finished creations and the unique color palettes you chose for her apron and dress. Sharing your work helps inspire the entire crochet community.
Remember, if you find any errors or inconsistencies in the pattern, please communicate them through the comments so we can address and resolve them. Your feedback is essential for keeping our patterns accurate and enjoyable for everyone.
**A Quick Note to My Fellow Makers**
I have put a lot of love and care into designing this **amigurumi cook** pattern to make it as clear and enjoyable as possible. However, we are all human, and sometimes a tiny “knot” can slip through!
If you come across any errors, typos, or instructions that seem a bit confusing while you are crocheting, **please let me know in the comments below.** Your feedback is incredibly valuable to me.
It helps me fix any inconsistencies and ensures that every crafter has a smooth and happy experience with this pattern. Thank you for your support and for helping me make this design the best it can be!
**Happy crocheting!**

Spanish version of that pattern
Here’s another pattern for an amigurumi baker doll
video tutorial for crocheting an amigurumi chef
Knitting pattern for a wonderful chef found on Etsy

Affiliate Disclosure:
This post contains affiliate links. If you purchase through them, I may earn a small commission at no extra cost to you. Thank you for supporting my work!
Discover more crochet patterns, free downloads, and premium PDFs on Ko-fi.