
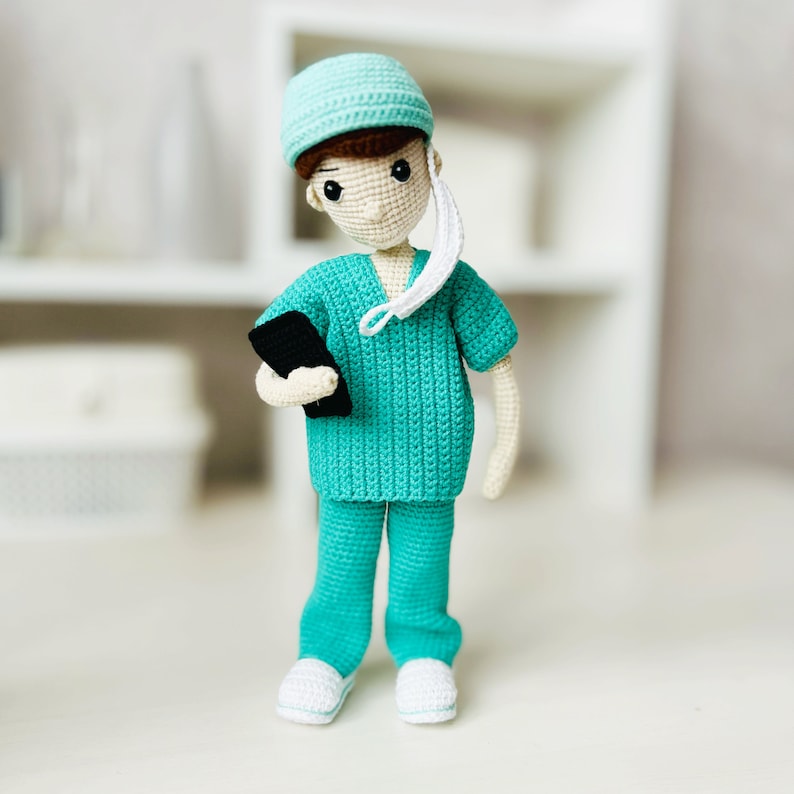
The amigurumi paramedic crochet pattern is a meaningful project designed to honor everyday heroes through detailed handmade artistry. This 12-inch doll combines realism and charm, featuring reflective uniform details, a structured jacket, and a functional-style medical bag. Advanced techniques such as internal neck support ensure stability and a professional finish, while clean color transitions enhance its visual appeal. Ideal for intermediate crocheters, this amigurumi paramedic is perfect for gifts, collectors, or display pieces. A unique crochet creation that blends craftsmanship, emotion, and storytelling, transforming every stitch into a tribute to care, courage, and dedication.
**Amigurumi Paramedic: A Tribute to Everyday Heroes**
Creating an amigurumi is more than just pulling loops through stitches; it is about bringing a character to life with personality and purpose. This **Amigurumi Paramedic** pattern was designed to honor the brave first responders who dedicate their lives to helping others. Standing at a proud 12 inches, this doll is a detailed representation of strength and compassion, captured through the art of crochet.
**Design and Detail**
What makes this project special is the focus on realism within the whimsical amigurumi style. From the reflective safety stripes on the trousers to the structured “socket and tenon” neck design for stability, every element has been carefully thought out. The separate jacket and the functional medical bag add layers of texture and playability, making it a standout piece for collectors or a meaningful gift for a real-life medical professional.
**Your Creative Journey**
Whether you are an experienced maker or a confident beginner, this pattern will guide you through advanced shaping techniques and clean color changes. As you work through the rows, you aren’t just making a toy; you are crafting a symbol of care. We invite you to pick up your hook, choose your favorite yarn, and enjoy the rewarding process of creating your very own miniature hero.
**PROJECT DETAILS**
**Project Size:**
This doll has an approximate finished size of **12 inches (30 cm) tall** when using the recommended materials. It is an ideal proportion for displaying all her accessories while maintaining a firm and huggable structure.
**Difficulty Level:**
**Intermediate – Experienced Beginner.** Although we explain every step in detail, the pattern includes special techniques such as joining the legs, crocheting the jacket separately, and the “socket and tenon” technique for head stability.
**Estimated Crochet Time:**
Between **12 and 15 hours** of handwork, depending on your pace and skill. It is a perfect project to enjoy calmly throughout a week or during a weekend crochet marathon.
**MATERIALS LIST**
To ensure your paramedic looks identical to the one in the image, I suggest having the following supplies ready:
* **Cotton yarn (or appropriate wool):** Colors: Red, Black, White, Gray, and Skin tone (Dark Brown for the hair).
* **Crochet Hook:** 2.5 mm or 3 mm (depending on your personal tension).
* **Safety Eyes:** A pair of large, expressive eyes (approx. 12 mm).
* **Stuffing:** High-quality polyester fiberfill (siliconized) so it doesn’t lose shape over time.
* **Stability Support:** A thick silicone (hot glue) stick or a covered wooden dowel for the neck.
* **Sewing:** Yarn needle and pins for assembly.
* **External Accessories:** 6 inches (15 cm) of thin black wire or cord for the stethoscope and small buttons for the medical bag.
* *Guide to useful crochet tools.*
**STITCH ABBREVIATIONS**
We will use standard US terminology so there are no doubts during the process:
* **MR:** Magic Ring.
* **ch:** Chain.
* **sc:** Single Crochet.
* **hdc:** Half Double Crochet.
* **dc:** Double Crochet.
* **sl st:** Slip Stitch.
* **inc:** Increase (2 stitches in the same space).
* **dec:** Decrease (close 2 stitches together).
* **BLO:** Back Loop Only.
* **FLO:** Front Loop Only.
* **R:** Round (for spiral crochet).
* **Row:** Row (for back-and-forth crochet).
**The Paramedic’s Shoes**
We will use **black yarn** and a **2.5 mm or 3 mm** hook. We will work in a spiral.
**Step 1: The Foundation Chain (The “Skeleton”)**
To create an oval, we do not start with a magic ring, but with a foundation chain and crochet around it.
* **R1:** **Ch 6** (these do not count as a stitch).
* **How:** Make a slip knot on your hook and crochet 6 chain links.
* Now, we will begin crocheting in the **second chain** from the hook:
* Crochet **4 single crochet (sc)**, one in each chain.
* In the last chain, crochet **3 sc together**. This helps us “turn the corner” to begin crocheting on the other side of the original chain.
* On the other side of the chain (where the free loops are): crochet **3 sc**.
* In the last space (where we started), crochet **1 increase** (2 sc in the same place).
* **Total stitches:** 12 sc.
**Step 2: The Expansion (Increases in multiples of 6)**
This is where we apply the “golden rule” of increases so the oval grows flat and does not curl.
* **R2:** 1 inc, 3 sc, 3 inc in a row, 3 sc, 2 inc.
* **Explanation:** By doing 3 increases at the tips, the oval widens uniformly.
* **Total stitches:** 18 sc.
* **R3:** 1 sc, 1 inc, 3 sc, (1 sc, 1 inc) repeated 3 times, 3 sc, (1 sc, 1 inc) repeated 2 times.
* **Total stitches:** 24 sc.
* **R4:** 2 sc, 1 inc, 3 sc, (2 sc, 1 inc) repeated 3 times, 3 sc, (2 sc, 1 inc) repeated 2 times.
* **Total stitches:** 30 sc.
**Step 3: Building the “Wall” of the Shoe**
Now that we have our flat 30-stitch base, we need the fabric to go upward to form the shoe.
* **R5 (Blocking Round or BLO):** Crochet **30 sc** picking up the **back loop only** of each stitch.
* **How and Where:** If you look at your work from above, each stitch looks like a “V”. Normally you insert the hook under both lines of the “V”. For this round, insert the hook **only into the line furthest from you**.
* **Why:** This creates a horizontal seam that allows the shoe to turn 90 degrees upward cleanly, leaving the sole well-defined on the floor.
* **R6 and R7:** Crochet **30 normal sc** (using both loops).
* This gives the initial height to the sides of the black boot.
**Step 4: Closing the Toe (Decreases)**
To make the shoe stop looking like a cylinder and take the shape of a boot, we must reduce stitches in the front part.
* **R8:** 9 sc, **6 decreases in a row**, 9 sc. (Total: 24 stitches).
* **How to decrease:** I recommend the **invisible decrease**. Insert the hook through the front loop of the first stitch only, then through the front loop of the second stitch, yarn over and pull through both, yarn over and close. This prevents gaps where the stuffing might show.
* **R9:** 8 sc, **4 decreases in a row**, 8 sc. (Total: 20 stitches).
* **R10:** 6 sc, **4 decreases in a row**, 6 sc. (Total: 16 stitches).
At this point, the shoe already has its shape. Stuff the toe firmly. Since this is a 12-inch doll, make sure the stuffing is well-compacted so the foot doesn’t flatten under the doll’s weight.
**Step 5: Pants (Black Color)**
Now that we have the 16 firm stitches at the ankle, we proceed to the color change:
* **R11 (Front Loop Only – FLO):** To go from 16 to 20 stitches, follow this sequence:
* (3 sc, 1 inc) x 4 times.
* **Explanation for beginners:** You crochet 3 normal single crochets, and in the fourth space, you crochet 2 single crochets together. Repeat this 4 times in total until you go all the way around.
* **Result:** You will have the 20 stitches needed to start going up the pant leg.
* **A little “crochet friend” tip:** Since we are building a 12-inch doll, ensure the stuffing in the area of the 4 decreases (the instep/top of the foot) is well-distributed so the boot doesn’t look “wrinkled.”
**Step 6: The Paramedic’s Pants**
We now have the 20-stitch base in black (after crocheting the FLO row). Now we are going to add height and integrate the safety stripes seen on her legs.
**Rounds 12 to 16: Body of the Pants (Black)**
Crochet 20 sc in each round.
* **Note for beginners:** Upon reaching the end of Round 16, do not close the last stitch with black. Get ready to introduce the red color.
* **The “How”:** To keep the line very straight, I suggest crocheting this round using the **back loop only (BLO)**. This prevents the stitches from looking “jagged” and makes the stripe look like a real band attached to the uniform.
**Round 17: 20 sc in Red**
Change to **Gray** color.
**Rounds 18 and 19:** Crochet 20 sc.
Change to **Red** color.
**Rounds 20 to 26: Section of the Pants (Red)**
Crochet 20 sc.
* **Stuffing:** As you go up, fill the leg. Do not skimp on the “where”: press the stuffing toward the edges so the leg becomes a perfect and firm cylinder.
* When finishing the **first leg**, cut the yarn and fasten off.
* When finishing the **second leg**, **DO NOT CUT THE YARN.** We will use it to join both legs and begin the body.
**Golden Tip for the Join**
Since our doll is 12 inches tall, the legs must be strong. Before continuing, make sure both legs have exactly the same number of rounds and that the stuffing reaches the top, but leave a small 1/2 inch (1 cm) space unstuffed at the end so that, when joining them, the cotton doesn’t escape between the stitches.
**Step 7: Joining the Legs and Forming the Body**
We will use **Red**. Make sure the tips of the feet are facing forward before joining.
* **Round 27: The Join**
* From the right leg (where you did not cut the yarn), **ch 3**.
* Find the center stitch on the inner side of the left leg and join with **1 sc**.
* Crochet **19 sc** around the left leg.
* Crochet **3 sc** over the joining chains (using the loops on one side).
* Crochet **20 sc** around the right leg.
* Crochet **3 sc** over the other side of the joining chains.
* **Total stitches:** 46 sc (20 + 20 from the legs + 6 from the chains).
* **Rounds 28 to 34: The Hips and Waist (Red)**
* Crochet **46 sc** in each round.
* **Stuffing Tip:** As you close the join, stuff the crotch area firmly so there are no gaps. A 12-inch doll needs a very solid torso base.
**Step 8: Color Change and Torso (White)**
In Round 35, we will change to **White** to simulate the undergarment.
* **Round 35: Change to White**
* Crochet **46 sc** in the **Back Loop Only (BLO)**.
* **Why:** This leaves the front loop free in case we want to attach the jacket later, or simply so the color change looks like a real clothing line.
* **Round 36 to 38: Going up the Chest**
* Crochet **46 sc** in each round.
**Step 9: Decreasing toward the Neck**
To ensure a natural shape, we will place decreases on the sides (simulating the shoulders) and some distributed throughout.
* **R39:** (21 sc, 1 dec) x 2 times. (Total: 44 sc).
* **R40:** (9 sc, 1 dec) x 4 times. (Total: 40 sc).
* **R41:** (8 sc, 1 dec) x 4 times. (Total: 36 sc).
* **R42:** (4 sc, 1 dec) x 6 times. (Total: 30 sc).
* **R43:** (3 sc, 1 dec) x 6 times. (Total: 24 sc).
* **R44:** (2 sc, 1 dec) x 6 times. (Total: 18 sc).
* **R45:** (4 sc, 1 dec) x 3 times. (Total: 15 sc).
**Step 10: The Base of the Neck**
* **R46 to R54:** Crochet **15 sc** in **Skin color**. These extra rounds will create a “tenon” (post) that will later be inserted into the “socket” (cavity) we will create at the base of the head.
* **Important Note:** For a 12-inch doll, the neck must be very well reinforced. I recommend inserting a support (this can be a thick silicone/hot glue stick or a wooden dowel wrapped in tape) that goes from the chest into the head so it doesn’t “wobble.”
* **Final Stuffing Instruction:** Ensure the chest is well-stuffed. The body should feel firm to the touch without the stitches stretching open.
**Step 11: The Jacket (Crocheted in back-and-forth rows)**
We will use red and gray yarn and a **3 mm** hook.
* **Note for beginners:** At the end of each row, you must **ch 1** and **turn** your work. This chain does not count as a stitch.
* **Start: The Base**
* **Row 1:** **Ch 50** (this provides the necessary ease to fit over the 46 stitches of the body).
* **Row 2:** Starting in the second chain from the hook, crochet **49 sc**. Ch 1 and turn.
* **Lower Section and First Gray Stripe**
* **Rows 3 to 5 (Red):** Crochet **49 sc** in each row.
* At the end of Row 5, change to **Gray**.
* **Rows 6 and 7 (Gray):** Crochet **49 sc** in each row. (This is the first stripe, 2 rows thick).
* At the end of Row 7, change to **Red**.
* **Middle Section and Second Gray Stripe**
* **Rows 8 to 10 (Red):** Crochet **49 sc** in each row.
* At the end of Row 10, change to **Gray**.
* **Rows 11 and 12 (Gray):** Crochet **49 sc** in each row. (Second reflective stripe).
* At the end of Row 12, change to **Red**.
* **Upper Section and Armholes**
This is where the jacket takes shape to fit the shoulders.
* **Row 13 (Red):** Crochet **49 sc**.
* **Row 14: Creating the Armholes**
In this row, we do not increase or decrease stitches; we simply “reposition” the fabric to leave gaps.
* **Right Front:** Crochet **9 single crochet (sc)**.
* **Armhole 1:** **Ch 8** and skip 8 stitches from the previous row (this is where the arm will go).
* **Back:** Crochet **15 sc**.
* **Armhole 2:** **Ch 8** and skip 8 stitches from the previous row.
* **Left Front:** Crochet **9 sc**.
* **Math check for the crocheter:** 9 (front) + 8 (skipped) + 15 (back) + 8 (skipped) + 9 (front) = 49 total stitches. Now it matches perfectly!
* **Row 15: Recovering the Stitches**
In this row, we return to a solid row of single crochets.
* Crochet **9 sc** over the front stitches.
* Crochet **8 sc** (one in each of the chains).
* Crochet **15 sc** over the back stitches.
* Crochet **8 sc** (one in each of the chains).
* Crochet **9 sc** over the front stitches.
* **Row total:** 49 single crochets.
* **Row 16 to 18: The Neck and Shoulders**
Crochet the last 3 rows of **49 sc** each in **Red**.
* **How and Where:** Upon reaching the last row (Row 18), I suggest crocheting the first and last 5 stitches with slightly looser tension or even using **Half Double Crochets (hdc)**.
* **The Why:** This will help you fold the top corners outward when finished, creating that “lapel” or open collar effect that looks so professional on the paramedic image.
**Step 12: The Hands (Make 2)**
We will work in **Skin color** and in a spiral.
* **R1:** Magic ring of **5 sc**.
* **R2:** **5 increases** (2 sc in each stitch). (Total: **10 sc**).
* **R3 to R6:** Crochet **10 sc** in each round.
* **How and Where:** Stuff the hand firmly. Having 10 stitches gives it an appropriate size to stand out at the end of the sleeve.
* **R7:** Change to **Red**. Crochet **10 sc** in the **Back Loop Only (BLO)**.
* **Why:** This leaves a small ridge that defines where the skin ends and the jacket begins.
**Step 13: The Jacket Sleeve (Arm Structure)**
Since the arm goes inside the sleeve and is not visible, we will crochet the sleeve directly upward using **Red** and **Gray**, giving it the necessary body to support itself.
* **R8 (Increase for sleeve width):** (4 sc, 1 inc) x 2 times. (Total: **12 sc**).
* **R9 to R11 (Red):** Crochet **12 sc**.
* **R12 and R13 (Gray):** Change to **Gray**. Crochet **12 sc**. (First reflective tape on the sleeve).
* **R14 to R16 (Red):** Change to **Red**. Crochet **12 sc**.
* **R17 and R18 (Gray):** Change to **Gray**. Crochet **12 sc**. (Second reflective tape, as seen in some uniform variants).
* **R19 to R26 (Red):** Change to **Red**. Crochet **12 sc** in each round until reaching the desired length to reach the shoulder.
**Step 14: Finishing and Assembly**
* **Stuffing:** Fill the sleeve every 4 or 5 rounds. Do not overstuff the top part (the last 2 rounds) so the arm can hang down and doesn’t stick out to the sides.
* **Closing:** Flatten the top opening and crochet **6 sc** through both sides to close the piece.
* **Joining:** This finished piece is inserted into the armhole of the jacket we previously crocheted and is sewn from the inside, joining the edge of the sleeve to the edge of the jacket’s armhole.
By having 10 stitches in the hand and 12 in the sleeve, the arm will have a much more solid and realistic structure for a doll of this size.
**Step 15: The Head (From the crown to the base)**
We will use **Skin color** and a **2.5 mm or 3 mm** hook. We will work in a spiral.
**The Expansion (Increases)**
* **R1:** Magic ring of 6 sc.
* **R2:** 6 increases (2 sc in each stitch). (Total: 12 sc).
* **R3:** (1 sc, 1 inc) x 6. (Total: 18 sc).
* **R4:** (2 sc, 1 inc) x 6. (Total: 24 sc).
* **R5:** (3 sc, 1 inc) x 6. (Total: 30 sc).
* **R6:** (4 sc, 1 inc) x 6. (Total: 36 sc).
* **R7:** (5 sc, 1 inc) x 6. (Total: 42 sc).
* **R8:** (6 sc, 1 inc) x 6. (Total: 48 sc).
* **R9:** (7 sc, 1 inc) x 6. (Total: 54 sc).
* **R10:** (8 sc, 1 inc) x 6. (Total: 60 sc).
**The Face Height**
* **R11 to R22:** Crochet 60 sc in each round (12 rounds total).
* **Safety eyes:** If using safety eyes (like the ones in the image, which are large and expressive), place them approximately between rounds 17 and 18, with about 10 or 11 stitches of separation.
* **Embroidery:** You can take the opportunity to embroider the eyelashes and thin eyebrows before closing.
**The Decreases (Shaping the base)**
* **R23:** (8 sc, 1 dec) x 6. (Total: 54 sc).
* **R24:** (7 sc, 1 dec) x 6. (Total: 48 sc).
* **R25:** (6 sc, 1 dec) x 6. (Total: 42 sc).
* **R26:** (5 sc, 1 dec) x 6. (Total: 36 sc).
* **R27:** (4 sc, 1 dec) x 6. (Total: 30 sc).
* **R28:** (3 sc, 1 dec) x 6. (Total: 24 sc).
* **R29:** (2 sc, 1 dec) x 6. (Total: 18 sc).
**Step 16: The Internal Cavity (The “How and Where”)**
This is where we create the support for the neck. Instead of closing the head or leaving a simple hole, we are going to crochet toward the inside of the head.
* **R30 (BLO – Back Loop Only):** Crochet 18 sc.
* **Note:** By crocheting in the back loop, a “line” is created that allows the fabric to fold inward easily.
* **R31 to R36:** Crochet 18 sc in each round (6 rounds total).
* **The effect:** These 6 rounds will form a “tunnel” or tube of fabric that goes inside the head.
**Critical Stuffing Instructions**
* **Stuffing the sphere:** Before progressing too far with the 6 rounds of the cavity, stuff the head very firmly. The stuffing should surround the “tunnel” you are creating but not crush it.
* **The central space:** The 18-stitch cavity must remain free of stuffing inside, as that is where the doll’s neck (which has 12 stitches plus the silicone or wooden support) will enter.
* **Closing:** Once R36 is finished, fasten off and leave a long tail to sew the base of the head to the body.
**Step 17: The Hair (Hooked Strands Technique)**
We will work with **Dark Brown yarn**. The goal is for the hair to appear to grow from the scalp, following the direction of the hairstyle toward the back.
**1. Marking the “Middle Part”**
* **The “Where”:** Before starting, use pins to mark a straight line from the center of the forehead (a couple of rounds above the eyes) to the crown. This will be our main guide.
**2. Creating the Strands (Chain Strips)**
Instead of crocheting a separate piece, we are going to attach the hook directly into the stitches of the head along that line we marked:
* **Step A:** Insert the hook into a stitch on the “middle part,” grab a strand of yarn, and pull up a loop.
* **Step B:** Crochet a **chain of 35 to 40 stitches** (enough to comfortably reach the nape of the neck).
* **Step C:** Work back by crocheting **slip stitches (sl st)** in each chain. This gives the strand body without making it too thick.
* **Step D:** Close with a slip stitch in the same stitch on the head where you started.
* **Repetition:** Repeat this process going down the entire part line, one strand next to the other, to the left and to the right.
**3. Side Coverage**
So that the “skin” of the head is not visible when we comb the hair back:
* Attach similar strands in the temple area and above the ears.
* **Direction:** All strands should be crocheted with the intention of combing them toward the nape later.
**Step 18: The “Overlay” Bun (Chongo)**
This piece provides the final volume and hides all the strand joins at the back of the head.
* **R1:** Magic ring of **6 sc**.
* **R2:** **6 increases** (12 sc).
* **R3:** (1 sc, 1 inc) x 6 (18 sc).
* **R4:** (2 sc, 1 inc) x 6 (24 sc).
* **R5:** (3 sc, 1 inc) x 6 (30 sc).
* **R6 to R10:** Crochet **30 sc** (maintaining the diameter).
* **R11:** (3 sc, 1 dec) x 6 (24 sc).
* **R12:** (2 sc, 1 dec) x 6 (18 sc).
* **Stuffing:** Stuff very firmly so it forms a perfect sphere.
* **Closing:** Leave a long tail for sewing.
**Step 19: Final Hairstyling**
This is where the magic happens to achieve the look in the image:
1. **Styling:** Take all the strands you crocheted on the top and sides. Pull them all back toward the nape of the neck, as if you were making a ponytail.
2. **Securing:** You can make a few small stitches with brown thread on the sides so the hair stays “flush” against the head and doesn’t lift.
3. **Placement:** Sew the bun exactly over the point where all the strands converge at the nape.
* **Result:** The bun will cover the ends of the chains and provide that impeccable, professional updo look for the uniform.
**Step 20: The Emergency Medical Bag (First Aid Kit)**
To ensure the bag maintains its “box” shape and doesn’t look like a pouch, we will crochet one long piece that wraps around the body and two side panels.
**1. Bag Body (Central Piece)**
Crochet in back-and-forth rows using **Red**.
* **Row 1:** Ch 11.
* **Row 2:** Starting in the second chain from the hook, crochet **10 sc**. Ch 1 and turn. (This is the width of the bag).
* **Rows 3 to 35:** Crochet **10 sc** in each row.
* **The “How”:** This long strip will form the bottom, front, top (flap), and back.
* **Structure:** If you want it to be very rigid, you can cut a strip of plastic (from a milk jug or a folder) to the same measurement and glue it inside when finished.
**2. Side Panels (Make 2)**
* **Row 1:** Ch 9.
* **Row 2:** Starting in the second chain from the hook, crochet **8 sc**. Ch 1 and turn.
* **Rows 3 to 8:** Crochet **8 sc** in each row.
* **Result:** You will have two small rectangles of approximately 8×6 stitches.
**Step 21: Assembly and Bag Details**
* **Joining:** Sew the side panels to the central piece. The central piece should “wrap around” the side panels to form the box.
* **The Medical Cross:**
* Using **White**, crochet a small square of 4×4 stitches or cut a piece of white felt.
* Using red thread, embroider a cross in the center of the white square.
* Sew this emblem onto the center of the front flap of the bag.
* **The Handle:**
* In **Black** (or red), join the yarn to the top of the bag.
* **Ch 10** and join to the other side with a slip stitch.
* Work back by crocheting single crochets over the chains to make the handle sturdy.
* **Closure:** You can place a small black button or a wooden bead on the front to simulate the kit’s clasp.
**Final Pattern Note: The Stethoscope (Non-Crocheted Accessory)**
Instruction for the maker: *”For a realistic finish, the stethoscope is not crocheted. It is recommended to source this item from a kit sold in craft supply stores for dolls.”*
**Final Touches: Bringing Your Hero to Life**
Completing this **Amigurumi Paramedic** is a significant achievement that showcases both your technical skill and your dedication to the craft. As you fasten off the last stitch and secure the final strand of hair, take a moment to appreciate the transformation from simple skeins of yarn into a detailed, 12-inch tribute to frontline workers. This doll stands as a reminder of the patience and care required to create something truly meaningful with your own two hands.
**Personalizing Your Creation**
While the pattern provides a faithful blueprint, the true magic lies in the personal touches you choose to add. Whether you adjusted the hair color to match a specific person, embroidered a name on the medical bag, or added a tiny handmade stethoscope, these details turn a project into a cherished keepsake. This paramedic is now ready to serve as a symbol of gratitude, a comforting gift for a child, or a professional mascot for a medical office.
**The Joy of the Craft**
We hope this journey through specialized stitches and structural techniques has inspired you to push the boundaries of your crochet abilities. Thank you for choosing this pattern to honor the healthcare community. Your handmade hero is now complete—firm, stable, and full of character. We look forward to seeing your finished dolls and the smiles they bring to those who receive them. Happy crocheting!
**Let’s Perfect This Pattern Together!**
One of the most beautiful things about our crochet community is how we support and learn from one another. I have poured a lot of love and care into designing this **Amigurumi Paramedic**, but as every maker knows, sometimes a sneaky little stitch count error or a confusing instruction can hide between the rows!
If you happen to spot a mistake, find a calculation that doesn’t quite add up, or think a step could be explained more clearly, **please let me know in the comments below.** Your feedback is incredibly valuable! It helps me update the pattern and ensures that every “crochet sister” who follows in your stitches has a smooth and joyful experience. Don’t be shy—whether it’s a tiny typo or a suggestion for a better technique, I’m all ears.
**Happy crocheting, and thank you for helping me make this pattern the best it can be!**
Love Crochet? Learn New Skills Today 👉 Explore beginner-friendly crochet courses
Spanish version of this same pattern
Here’s another pattern for crocheting an amigurumi doctor

Video tutorial on how to crochet an amigurumi nurse
Knitting pattern for another quick and easy nurse design found on Etsy
Affiliate Disclosure:
This post contains affiliate links. If you purchase through them, I may earn a small commission at no extra cost to you. Thank you for supporting my work!
Discover more crochet patterns, free downloads, and premium PDFs on Ko-fi.