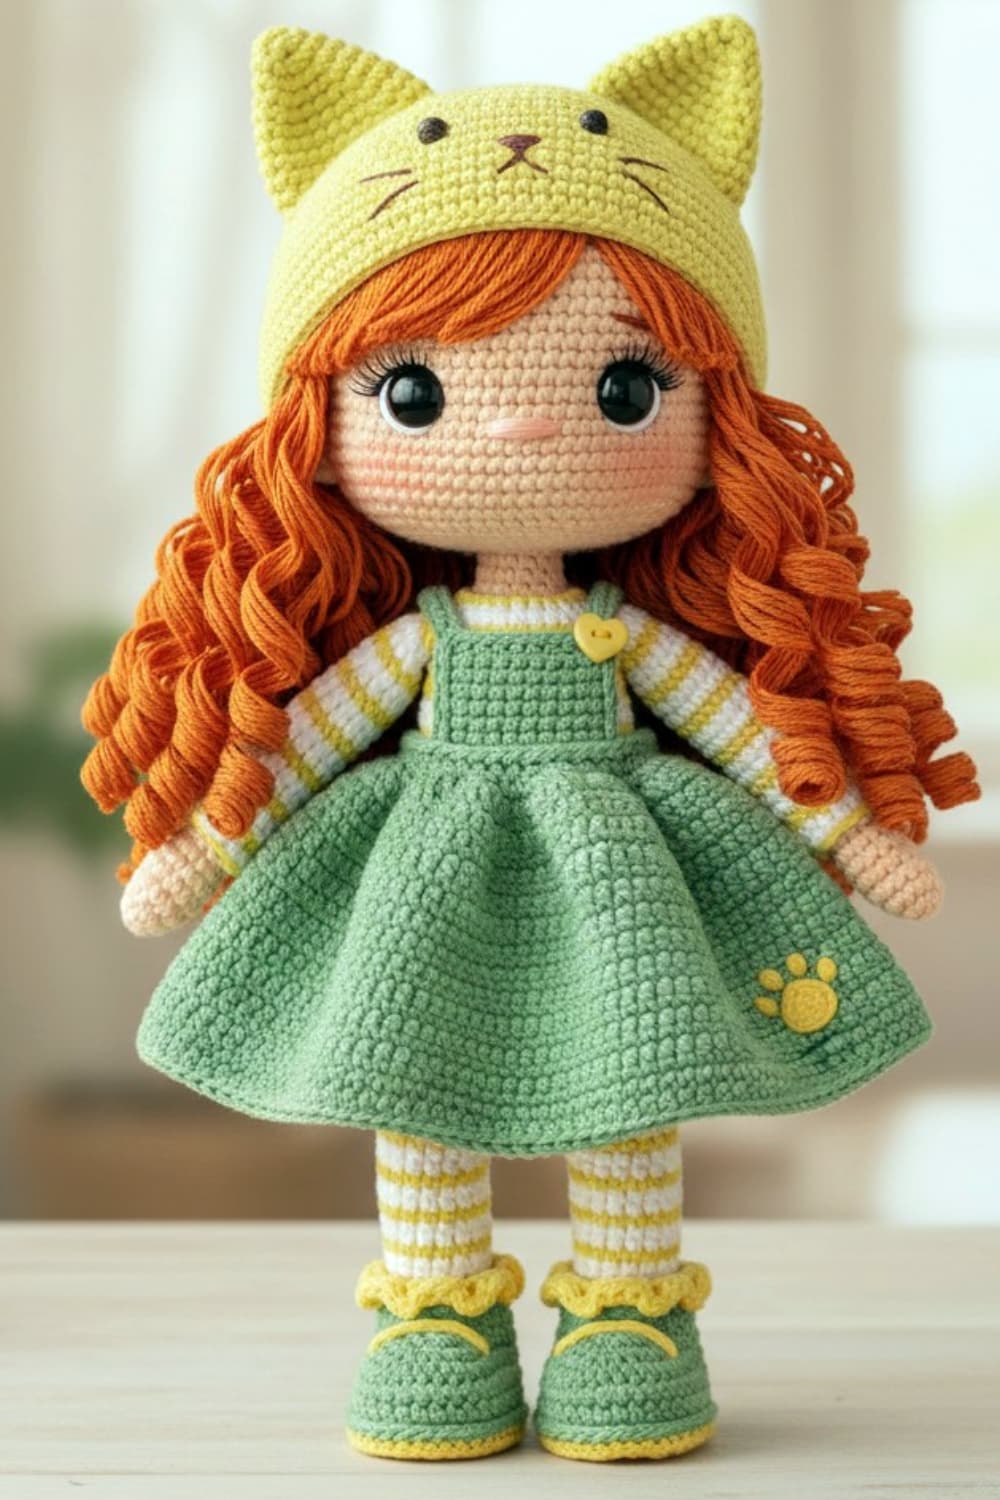
The amigurumi cat doll crochet pattern is a 30cm premium project designed for experienced crocheters seeking a sophisticated and highly detailed handmade creation. This elegant design blends chibi-style charm with advanced structural techniques, including a cavity-and-peg neck system for stability and a professionally shaped silhouette. With a voluminous 126-stitch skirt, textured mane, and intricate embroidered details, this amigurumi cat doll delivers a polished, high-end finish. Perfect for collectors, gifts, or selling online, it offers a rewarding 15–20 hour crochet journey. A unique amigurumi project that combines creativity, precision, and artistry into a standout handmade masterpiece.
Amigurumi Cat Doll: A Masterpiece of Texture and Style
Welcome to a crochet journey that balances whimsical charm with sophisticated structural techniques. This **Amigurumi Cat Doll** is not just another project; it is a 30cm statement piece designed for those who have mastered the basics and are ready to elevate their craft. With its incredible volume and lifelike presence, this doll captures the imagination through a blend of “chibi” aesthetics and classic toy-making artistry.
Elevated Techniques for the Modern Maker
What sets this pattern apart is the focus on professional finishing. Throughout the process, you will explore advanced methods like the **”cavity and peg”** neck structure, which ensures your doll’s head remains stable and upright without wobbling. You will also dive into the world of texture by creating a high-volume, 126-stitch flared skirt and a lush, hand-grafted orange mane.
A Journey of Patience and Precision
Crocheting this doll is an exercise in mindfulness. From the intricate asymmetric stripes of the torso to the delicate embroidery of the kitten-themed hat, every stitch serves a purpose. Whether you are creating this as a centerpiece for a collection or a cherished gift for a loved one, the 15 to 20 hours of labor will reward you with a professional-grade heirloom. Grab your hooks, find your favorite yarn, and let’s bring this vibrant character to lif
Project Details

🐾 Calico Cat Pattern
Step-by-step crochet PDF pattern with colorwork and full assembly guide.
**Finished Size:** Approximately 30 cm tall (when using recommended materials). It is a doll with incredible presence and great volume.
**Difficulty Level:** Intermediate / Advanced. Ideal for those who have already mastered the basic sphere and want to learn structural techniques such as the “cavity/peg,” hair grafting, and full-flare skirts.
**Estimated Crochet Time:** 15 to 20 hours. This is a detailed project that requires patience, especially with the 126-stitch skirt and hair curling. Enjoy every round!
Materials List
* **Yarn:** Medium weight cotton or acrylic (Worsted/4) in colors: Green (dress), White (body/stockings), Skin (face/hands), and Yellow (hat/details).
* **Hair:** High-density thick wool in Orange (heat-safe if using a curling iron).
* **Crochet Hook:** 2.5 mm or 3.0 mm (depending on your tension; we want a tight fabric).
* **Safety Eyes:** 2 units of 12 mm, black color.
* **Stuffing:** High-quality polyester fiberfill (plenty of it to provide firmness).
* **Extras:** Neck support (thick silicone stick or coated wire), a yellow heart-shaped button, pink blush for the cheeks, and a yarn needle.
* **Guide:** Useful crochet tools.
Stitch Abbreviations
To ensure you don’t get lost in the pattern, here is our stitch “compass”:
* **ch:** Chain
* **sc:** Single crochet
* **hdc:** Half double crochet
* **dc:** Double crochet
* **inc:** Increase (2 stitches in the same place)
* **dec:** Invisible decrease (close 2 stitches together)
* **sl st:** Slip stitch
* **BLO:** Back Loop Only
* **FLO:** Front Loop Only
* **Bobble:** Bobble stitch (3 dc closed together for the thumb)
* **R:** Round
* **[ ] x…:** Repeat the instructions inside the brackets the indicated number of times.
Part 1: The Shoes (Bootie Style)
*We will work with **Green** and a bit of **Yellow** for the details.*
**Prior considerations for beginners:**
* **Stitch Marker:** This is vital. Always place it in the first stitch of every round.
* **Spiral Crochet:** We will not close rounds with a slip stitch unless indicated; we will crochet one stitch over the other continuously.
* **Tension:** Try to crochet the shoes “tightly” so the stuffing doesn’t show and they maintain the boot shape.
Step 1: The Sole (Oval Base)
*With **Green** color.*
1. **Round 1 (Foundation Chain):** Ch **7**.
* *Where to insert the hook?* Start in the second chain from the hook.
* Crochet **5 sc**, then crochet **3 sc in the last chain** (this helps us turn and crochet along the other side of the foundation chain).
* Along the “bottom” side of the chains, crochet **4 sc** and finish with **1 increase (inc)** in the last space.
* **Total stitches: 14.**
2. **Round 2 (Increases at the ends):**
* 1 inc, 4 sc, 3 inc in a row (this forms the toe of the shoe), 4 sc, 2 inc in a row (this forms the heel).
* **Total stitches: 20.**
3. **Round 3 (Expanding the base):**
* 1 sc, 1 inc, 4 sc, (1 sc, 1 inc) repeated 3 times, 4 sc, (1 sc, 1 inc) repeated 2 times.
* **Total stitches: 26.**
4. **Round 4 (Final base):**
* 2 sc, 1 inc, 4 sc, (2 sc, 1 inc) repeated 3 times, 4 sc, (2 sc, 1 inc) repeated 2 times.
* **Total stitches: 32.**
* *Note:* You now have a flat sole. If you want it to be firmer, you can cut a piece of plastic (from a milk or yogurt container) in this shape and insert it at the end.
Step 2: The Shoe Body (Working Upwards)
5. **Round 5 (The “Wall”):** In **Yellow**, crochet **32 sc** working in the **Back Loop Only (BLO)**.
* *How is it done?* Instead of inserting the hook under both loops of the stitch, insert it only through the one furthest from you. This creates a ridge that makes the fabric rise vertically.
* **Switch color to Green.**
6. **Rounds 6 and 7:** Crochet **32 sc** normally (through both loops). This gives height to the sides of the shoe.
Step 3: Forming the Toe (Decreases)
*This is where we give the shoe its “foot” shape.*
7. **Round 8:** Crochet **10 sc**, then perform **6 decreases (dec)** in a row only at the front part, and finish with **10 sc**.
* **Total stitches: 26.**
* *Tip:* Use the “invisible decrease” (picking up only the front loops of the two stitches to be closed) so that no gaps remain.
8. **Round 9:** Crochet **8 sc**, perform **5 decreases** in a row, and finish with **8 sc**.
* **Total stitches: 21.**
9. **Round 10:** Crochet **7 sc**, perform **3 decreases**, and finish with **8 sc**.
* **Total stitches: 18.**
* *Important:* On the last step of the last stitch of this round, **change to White** (the color for the stockings). Do not cut the green yarn yet if you want to make the decorative border later.
Step 4: Image Details (The Laces)
In the photo, we see that the shoe has yellow “laces.” These are not functional; they are embroidered.
* **Embroidery:** Using a yarn needle and **Yellow** yarn, make an “X” or 3 horizontal lines over the decrease area (the instep). Do this before stuffing the leg too much to make it easier to hide the knots inside.
Step 5: The Bootie Ruffle
We will use **Yellow** color.
1. **Location: Where to insert the hook?**
* Look for Round 10 of the shoe (the last one you did in green before switching to the white of the leg).
* Hold the boot with the toe facing you.
* Look for the front loops (**FLO**) that were left free in that round. If you don’t see them clearly, simply insert the hook horizontally through the stitch right at the junction of the two colors.
2. **The Ruffle Sequence:**
* Attach the yellow yarn with a slip knot on the hook and do the following around the entire ankle:
* **Slip Stitch (sl st):** Insert the hook, yarn over, and pull through both loops. This secures the yarn.
* **Chains:** Ch 2.
* **Half Double Crochet Increases (hdc inc):** In each stitch around, crochet 2 or 3 hdc.
* *Why 3?* The more stitches you put into a single space, the more “flare” or “wave” the ruffle will have. To make it look like the photo, I suggest **3 hdc in each stitch**.
* **Closing:** Upon reaching the end of the round, sl st into the first chain you made at the beginning.
3. **Clean Finish:**
* Cut the yarn, leaving about 10 cm.
* Using the yarn needle, hide the tail inside the shoe (where the stuffing will go later).
**Pro Tips for Beginners:**
* **The Direction Trick:** For the ruffle to face outward (downward, covering the shoe slightly), you must crochet with the sole of the shoe facing the ceiling. If you crochet with the leg facing up, the ruffle will tend to stand up toward the knee.
* **What is hdc?** Yarn over, insert hook, pull up a loop (you have 3 loops on the hook), and pull through all 3 at once. It is perfect for ruffles because it is taller than a single crochet but firmer than a double crochet.
Part 2: The Legs
*Colors: **White** (Thick base, 2 rounds) and **Green** (Thin stripe, 1 round).*
*Leg thickness: **18 stitches**.*
1. **Adjusting Stitches (Transitioning from shoe to leg):**
In the previous step, we finished the shoe with **18 stitches** (Round 10). Since we want to maintain that thickness for a strong leg, **we will not do any decreases** when starting the stocking.
2. **Step-by-Step Sequence:**
* **R11 (White):**
* **What to do:** Crochet **18 sc**, one in each stitch of the shoe.
* **Where:** Use the **Back Loop Only (BLO)** for this first white round.
* *Why?* This creates a clean edge that visually separates the green shoe from the white stocking, just like in high-quality dolls.
* **R12 (White):**
* **What to do:** Crochet **18 sc** normally (through both loops).
* **Color change:** In the last stitch of this round, close the stitch with **Green** yarn.
* **R13 (Green – Thin Stripe):**
* **What to do:** Crochet **18 sc** in green.
* **Color change:** In the last stitch, close with **White**.
* *Note:* Do not cut the white; leave it waiting on the inside.
* **R14 (White):**
* **What to do:** Crochet **18 sc**.
* **R15 (White):**
* **What to do:** Crochet **18 sc**.
* **Color change:** At the end, close with **Green**.
3. **Repetition for Height:**
For a 30 cm doll, the leg must have a proportional length (approximately 10-12 cm from the heel).
* **Repeat the sequence:** (1 round Green / 2 rounds White) until you have a total of **9 or 10 green stripes**.
* **Stuffing:** Being an 18-stitch leg, you will need a fair amount of stuffing (fiberfill).
* *How:* Stuff every 3 green stripes.
* *Important:* The stuffing must be very compact in the ankle area. If the ankle is soft, the doll will bend under its own weight.
**Tips for Beginners:**
1. **The “Invisible” Seam:** When changing colors every few rounds, a diagonal line usually forms where you switch the yarn. To keep this “seam” at the back and hidden from the front, ensure the color change always occurs at the back of the leg.
2. **Yarn Carried Inside:** When bringing up the yarn that was waiting (carrying the yarn), do not pull it tight. If the internal yarn is tense, the leg will shrink and look wrinkled.
Part 3: Joining the Legs (The Bridge)
**Color: White.** **Objective:** Join the two pieces into a single 42-stitch piece.
1. **Positioning (The “Where”):**
To ensure the feet aren’t pointing sideways, we must be very precise:
* Place the two legs side by side, with the toes of the shoes facing forward.
* **Leg 1 (yarn cut):** Find the exact point on the inner side (the one touching the other leg) and place a marker.
* **Leg 2 (active yarn):** Crochet the necessary stitches in white until you reach the inner side of this leg.
2. **Creating the Bridge (The “How”):**
* From the side of Leg 2, **ch 3**.
* *Why 3?* With 18-stitch legs, 3 chains provide the ideal hip separation so the body is proportional to a 60-stitch head.
3. **The Moment of Union (The “When”):**
* Without letting go of the hook, insert the hook into the stitch you marked on Leg 1.
* Yarn over and make **1 single crochet (sc)**.
* They are now connected! That first single crochet counts as stitch number 1 of our new body round.
4. **The Complete Round (Stitch Count):**
Now we are going to go around the entire structure to form a large circle. Follow this exact order:
* Crochet the remaining 17 stitches of Leg 1. (Total: 18 on this side).
* When you reach the middle chains, crochet **3 sc** by picking up only one of the loops of the chain.
* Crochet **18 sc** around Leg 2.
* Crochet **3 sc** by picking up the loops that were left free on the other side of the joining chains.
* **Final Count: 18 + 3 + 18 + 3 = 42 stitches.**
**Tips for this Union:**
* **Why 42 stitches?** If the head will measure 60 stitches, a 42-stitch body at the base gives us a very cute and stable “pear” shape, which we will later decrease toward the neck.
* **The “Hole Trick”:** It is almost inevitable that a small gap will remain where the chains touch the legs. Don’t worry now. At the end, using the tail left over from Leg 1, we will give it a “surgeon’s stitch” to close it from the inside.
* **Leveling:** Make sure both legs have the same number of stripes before joining. If one has one more stripe than the other, the doll will be uneven.
Part 4: The Torso and the Dress Base
*Color: **White**. Objective: Build up the body and prepare the attachment point for the skirt.*
1. Hip Height (R28 to R32)
From the joining round of 42 stitches, we need to work upward to reach the waist.
* **R28 to R32 (5 rounds):** Crochet **42 sc** in each round.
* *Why 5 rounds?* This provides the necessary height so the dress doesn’t start too low, giving the doll “girl-like” proportions.
2. The Waist and the Anchor Round (BLO)
This is where we prepare the “ledge” where the green skirt will be born. To make the skirt and the bib fit perfectly as shown in the photo, we will create an **anchor line** (the BLO).
* **R33 (The Anchor Round – BLO):** Crochet **42 sc** in the **Back Loop Only (BLO)**.
* *How is it done?* By inserting the hook only through the back loop, a “ridge” or small strand of yarn will remain on the outside (the front loop).
* *What is it for?* **This** is where we will attach the green yarn for the skirt later on.
3. Waist Decreases (R34)
Now we will narrow the body slightly so the dress has a better shape.
* **R34:** Crochet **(5 sc, 1 dec) repeated 6 times**.
* **Total stitches: 36.**
* *Note:* This is your **1st decrease**. This is where the waist is defined.
4. Transition Rounds (R35 and R36)
As indicated, we will crochet two more rounds after the decrease so the dress bib sits well.
* **R35 and R36:** Crochet **36 sc**.
**Section Summary:**
* **The “Step” (BLO):** Look at your work from the side. You will see a horizontal line of loops sticking out at round 33. It is vital that this line is level.
* **Stuffing the Body:** Now that the body is starting to close (moving from 42 to 36 stitches), it is time to stuff the buttocks and hip area.
* *Tip:* Push the stuffing toward the sides to make the hips look rounded and give the doll stability.
Part 5: The Upper Torso (Asymmetric Stripes)
*Colors: **White** (2 rounds) and **Green** (1 accent round).*
*Stitch count: **36 sc**.*
1. Continuing the Sequence (R37 to R42)
Since we are coming from round 36 (white), we resume the color logic:
* **R37 (Green – Thin stripe):** Crochet **36 sc**. Change to White at the end.
* **R38 and R39 (White):** Crochet **36 sc** in each round. Change to Green at the end of R39.
* **R40 (Green – Thin stripe):** Crochet **36 sc**. Change to White at the end.
* **R41 and R42 (White):** Crochet **36 sc** in each round. Change to Green at the end of R42.
2. Forming the Chest and Shoulders (Decreases)
To ensure the neck isn’t too wide, we will reduce stitches before reaching the skin color.
* **R43 (Green – Thin stripe):** Crochet **(4 sc, 1 dec) repeated 6 times**.
* **Total stitches: 30.** Change to White.
* **R44 and R45 (White):** Crochet **30 sc** in each round. At the end of R45, make the final change to **Skin Color**.
3. Transitioning to the Neck (Skin Color)
For the neck to be firm enough to support a 60-stitch head, we need a clean transition.
* **R46 (Skin):** Crochet **(3 sc, 1 dec) repeated 6 times** (24).
* **R47 (Skin):** Crochet **24 sc**.
* **R48 (Skin):** Crochet **(2 sc, 1 dec) repeated 6 times** (18).
* **R49 (Skin):** Crochet **(4 sc, 1 dec) repeated 3 times** (15).
* **R50 to R55:** Crochet **15 sc**. These 6 identical rounds will create a “peg” that must be stuffed very firmly. You can reinforce this peg with a piece of a silicone glue stick to ensure the head won’t wobble once inserted into the “cavity” we will create at the base of the head.
Part 6: The Arms
*Color: Skin (Hand) and White/Green (Sleeve).*
*Constant thickness: 12 stitches.*
1. The Hands (Skin Color)
Work in a spiral.
* **R1:** 6 sc in a Magic Ring (6).
* **R2:** 6 inc (12).
* **R3 to R6 (4 rounds):** 12 sc.
* **R7 (The Thumb):** 1 “Bobble” stitch (3 dc closed together in the same stitch), followed by 11 sc (12).
* **R8:** 12 sc. Change to White in the last stitch.
2. The Sleeve (Asymmetric Stripes)
Continue the visual logic: 2 White rounds / 1 thin Green round.
* **R9 (White):** Use **Back Loop Only (BLO)**. Crochet 12 sc.
* *Why?* Like the shoe, this leaves a “front loop” free to crochet the yellow ruffle later.
* **R10 (White):** 12 sc normally. Switch to Green.
* **R11 (Green – Thin):** 12 sc. Switch to White.
* **R12 and R13 (White):** 12 sc in each round.
* **R14 (Green – Thin):** 12 sc.
3. Height and Proportion
* **Repetition:** Follow the sequence (2 white / 1 green) until the arm measures approximately 12 cm or reaches the height of the torso shoulders.
* **Stuffing:**
* **Hand:** Stuff firmly.
* **Arm:** Stuff moderately up to the halfway point. The upper part (where it joins the body) should have almost no stuffing so the arm hangs flat against the body.
4. The Cuff Ruffle (Yellow)
* Step 1: Hold the arm with the hand facing you.
* Step 2: Attach **Yellow** yarn to the front loops (FLO) left free in R9.
* **Sequence:** (1 sl st, 3 dc in the same stitch, 1 sl st). Repeat this around the entire wrist.
Part 7: The Dress Bib
*Color: **Green**. Technique: Crocheting in rows (back and forth).*
The bib is green, square-shaped, and centered on the chest.
1. **Row 1:** Ch **15** + 1 to turn.
2. **Row 2:** Starting in the second chain from the hook, crochet **15 sc**. (15).
3. **Rows 3 to 12 (10 rows):** Crochet **15 sc** in each row.
* *When to stop?* The bib should cover from the waist (the BLO line) to just before the neck skin color begins.
**The Neat Edge (Optional but recommended):**
* At the end of the last row, do not cut the yarn. Crochet a round of **single crochets** all around the bib (down one side, across the foundation chains, and up the other side) for a professional “seam” finish.
**Placement and Sewing:**
* **Positioning:** Center the bib over the striped torso. The bottom of the bib must align exactly with **Round 33 (the BLO)**.
* **Detail:** Sew a **yellow heart-shaped button** (or embroider one) on the top right corner of the bib (left side as you look at the doll).
Part 8: The Jumper Straps
*Color: Green. Technique: Chains and single crochets.*
1. **Strap 1:** From the top-left corner of the bib, **ch 30**.
* *Test it:* Bring the chain over the shoulder to the back waist. If it’s too tight, add 5 more chains.
* Work back down the chain with **29 sc** starting from the second chain.
* Attach to the bib with a **sl st**. Fasten off.
2. **Strap 2:** Attach green yarn to the other top corner and repeat the process (ch 30, return with 29 sc, sl st).
**The “X” Crossing:**
To look like a real jumper, cross the straps in the back to form an “X.” This prevents them from slipping off the shoulders. Sew the ends to the waistline (the BLO line) in the back, leaving 4 or 5 stitches of separation between them.
3. The Final Touch: The Heart Button
As mentioned before, the image highlights a yellow detail.
* **When:** Now that the straps are fixed in place.
* **Where:** Sew the yellow button (or embroider a heart) exactly at the junction where the right strap meets the bib.
* **Tip:** Make sure your stitches go through both the strap and the bib; this serves as extra reinforcement for security.
**Review Tips for Beginners:**
* **Twisting:** Before sewing the strap to the back, ensure it isn’t twisted. Run your finger along it so it sits flat over the shoulder.
* **Symmetry:** Look at the doll from the front. The straps should come out at the same distance from the neck. If one looks closer to the ear than the other, reposition the bib.
* **Length:** If the straps are “dancing” or have too much slack, it’s better to frog a few stitches and remove 3 or 4 points. A loose strap causes the dress to lose its shape.
Part 9: The Full-Flare Skirt
*Color: **Green**. Technique: Spiral crochet attached to the body.*
1. The “Where”: Resuming the Anchor
Look for **Round 33 (the BLO)** that we left on the white torso. Attach the **Green** yarn to the first available front loop (FLO) at the waist.
2. The “How”: Creating Volume (Increase Rounds)
To make the skirt fan out from the very beginning:
* **R1 (Constant Increases):** Crochet 2 single crochets (sc) in every loop around.
* *Result:* We had 42 stitches; now we have **84 stitches**. This creates the initial ruffle.
* **R2:** Crochet **(1 sc, 1 inc) repeated 42 times**.
* *Result:* **126 stitches**. This is where the skirt gains the “flare” seen in the photo.
* **R3:** Crochet **126 sc**.
* *Note:* From here on, the work will feel heavy and take longer to crochet, but this is what gives it the appearance of real fabric.
3. The “When”: Length and Finishing (R4 to R15)
* **R4 to R15 (or to desired length):** Crochet **126 sc** in each round.
* *Where to stop?* In the image, the skirt reaches approximately mid-thigh. It should reveal a good portion of the striped stockings.
* **R16 (The Edging):** To ensure the edge is firm and doesn’t curl:
* Crochet the entire round in **Crab Stitch** (reverse single crochet) or simply a round of **Slip Stitches (sl st)** without pulling too tight.
4. The Paw Print Patch (Visual Detail)
The image shows a small yellow paw print on the bottom right edge of the skirt.
* **Option A (Felt):** Cut one large yellow felt circle and four smaller ones. Glue or sew them on.
* **Option B (Embroidery):** With yellow yarn, embroider a filled circle (satin stitch) and four French knots or small stitches above it for the toes.
* **Placement:** Position it about 2 cm above the bottom edge of the skirt, toward one side.
Part 10: The Head (Chibi Style)
*Color: **Skin**. Technique: Spiral from the crown.*
1. **R1:** 6 sc in Magic Ring (6).
2. **R2:** 6 inc (12).
3. **R3:** (1 sc, 1 inc) x 6 (18).
4. **R4:** (2 sc, 1 inc) x 6 (24).
5. **R5:** (3 sc, 1 inc) x 6 (30).
6. **R6:** (4 sc, 1 inc) x 6 (36).
7. **R7:** (5 sc, 1 inc) x 6 (42).
8. **R8:** (6 sc, 1 inc) x 6 (48).
9. **R9:** (7 sc, 1 inc) x 6 (54).
10. **R10:** (8 sc, 1 inc) x 6 (60).
11. **R11 to R22 (12 rounds):** 60 sc in each round.
* *Note:* Place safety eyes between **R17 and R18**, approximately 10 to 12 stitches apart.
12. **R23:** (8 sc, 1 dec) x 6 (54).
13. **R24:** (7 sc, 1 dec) x 6 (48).
14. **R25:** (6 sc, 1 dec) x 6 (42).
15. **R26:** (5 sc, 1 dec) x 6 (36).
16. **R27:** (4 sc, 1 dec) x 6 (30).
17. **R28:** (3 sc, 1 dec) x 6 (24).
18. **R29:** (2 sc, 1 dec) x 6 (18).
Part 11: The Internal Cavity (The Fold)
This is where we create the “pocket” where the neck will fit.
* **R30 (Break Round – BLO):** Crochet **18 sc** in the **Back Loop Only**.
* *Why?* This creates a “crease” that allows the fabric to fold inside the head without resistance.
* **R31 to R36 (6 rounds):** Crochet **18 sc** normally.
* *Result:* You have created a small 6-row tube hanging from the base of the head.
**Assembly Instructions (The “How”):**
1. **The Fold:** Push that 18-stitch tube (R31-R36) upward into the interior of the head with your finger. You will see a cylindrical hole form.
2. **The Stuffing:** Stuff the head *around* this internal tube. Do not stuff inside the tube itself; stuff between the outer walls of the head and the cavity wall.
3. **The Join:** When mounting the head, the 15-stitch neck peg will slide into this 18-stitch cavity. Since the cavity is slightly wider, it accommodates the neck reinforcement (silicone or support) and stays rock-steady.
Part 12: Facial Details and Nose
*Materials: Skin-colored yarn (nose), fine black/brown thread (brows/lashes), and pink blush.*
1. **The Nose:** Position it one row below the eyes, centered. Use skin-colored yarn to make 3 or 4 horizontal passes (2 stitches wide), then wrap those threads with 2 vertical passes to create a small “button” shape.
2. **The Eyebrows:** Position them 4 or 5 rounds above the eyes. Embroider short, fine diagonal lines (2 stitches long).
3. **The Eyelashes:** Use black thread to make two small outward and upward flick stitches (like a fan) next to the safety eyes.
4. **The Blush:** Apply real cosmetic blush or pink pastel chalk just below the eyes on the cheeks and a tiny dot on the tip of the nose.
Part 13: Hair Placement (Strand Grafting)
*Material: **Thick Orange Wool**. Technique: Fringe-style latch hook.*
1. **Preparation:** Cut strands about 40 cm long. (When folded, they will be 20 cm).
2. **The Grafting:**
* **Crown:** Fill every stitch so the skin color doesn’t show through.
* **Sides/Back:** You can skip a stitch or a row since the wool is thick.
* **Front:** Define the bangs (fringe) 3 or 4 rounds above the eyebrows.
3. **Curling:** Use a curling iron (if the fiber is heat-safe) or wrap damp strands around wooden dowels/pencils and let them dry overnight. Divide into two large side pigtails.
Part 14: The Kitten Hat
*Color: **Yellow**.*
1. **R1:** 6 sc in MR (6).
2. **R2:** 6 inc (12).
3. **R3:** (1 sc, 1 inc) x 6 (18).
4. **R4:** (2 sc, 1 inc) x 6 (24).
5. **R5:** (3 sc, 1 inc) x 6 (30).
6. **R6:** (4 sc, 1 inc) x 6 (36).
7. **R7:** (5 sc, 1 inc) x 6 (42).
8. **R8:** (6 sc, 1 inc) x 6 (48).
9. **R9:** (7 sc, 1 inc) x 6 (54).
10. **R10:** (8 sc, 1 inc) x 6 (60).
11. **R11:** (9 sc, 1 inc) x 6 (66).
* *Why 66?* These 6 extra stitches provide space so the orange hair isn’t flattened.
12. **R12 to R22 (11 rounds):** 66 sc.
13. **R23 (Finishing Edge):** Crochet the entire round in **Slip Stitch (sl st)**. This prevents the edge from stretching over the wig.
Part 15: The Cat Ears
*Color: **Yellow**. (Make 2).*
1. **R1:** 6 sc in MR (6).
2. **R2:** 6 inc (12).
3. **R3:** 12 sc.
4. **R4:** (1 sc, 1 inc) x 6 (18).
5. **R5 to R6:** 18 sc.
6. **R7:** (2 sc, 1 inc) x 6 (24).
7. **R8 to R9:** 24 sc.
**Finishing Touches for the Hat:**
* **The Embroidery:** Use yellow yarn to make 3 fan-shaped stitches from the base of the ear toward the tip to simulate inner folds.
* **Attachment:** Sew the ears between Rounds 5 and 13 of the hat, about 8 to 10 stitches apart. Give the base a slight “C” curve as you sew to make them look realistic.
* **Hat Face:** Embroider two small black “V” shapes for eyes and a small pink triangle for the nose centered between the ears.
* **Anchor Stitches:** Give the hat a few invisible anchor stitches at the crown and behind the ears, sewing through the wig into the head so it stays securely in place.
Amigurumi Cat Doll: A Legacy in Every Stitch
As you pull the final slip stitch through and secure the last anchor of the kitten hat, take a moment to admire the incredible presence of your finished Amigurumi Cat Doll. Standing at a proud 30 cm, this project is more than just a toy; it is a testament to your patience, precision, and evolving skill. From the complex internal neck cavity to the massive 126-stitch flare of the skirt, you have navigated the challenges of intermediate and advanced crochet with grace.
The Art of the Hand-Finished Heirloom
The beauty of this doll lies in the small, soulful details you’ve added along the way—the tiny embroidered paw print, the rosy blush on the cheeks, and the carefully curled orange pigtails. These elements transform a collection of yarn and fiberfill into a character with a story. Because of the sturdy structural techniques used in the torso and neck, this doll is built to last, ready to be displayed as a centerpiece or cherished as a lifelong companion.
Your Journey Continues
Completing a detailed project of 15 to 20 hours is a significant milestone for any maker. You have mastered the “espiga” support system and the art of hair grafting, tools that will serve you in every future amigurumi endeavor. We hope you enjoyed every round and that this vibrant cat doll brings a touch of whimsical magic to your home. Until the next pattern, keep your tension even and your creativity flowing!
“Did you spot a detail that needs fixing? My goal is for you to enjoy every round of this project without any confusion. While I have carefully reviewed this pattern, if you detect any technical errors or unclear instructions, I invite you to leave a comment below. Your feedback helps me improve and ensures the best experience for the whole community. Thank you for your support and for being part of the creative process! 🌸”
Love Crochet? Learn New Skills Today 👉 Explore beginner-friendly crochet courses
Spanish version of this same pattern
Brazilian Portuguese version of this same pattern
Here’s another pattern for crocheting a koala doll
Video tutorial for crocheting another amigurumi doll pattern
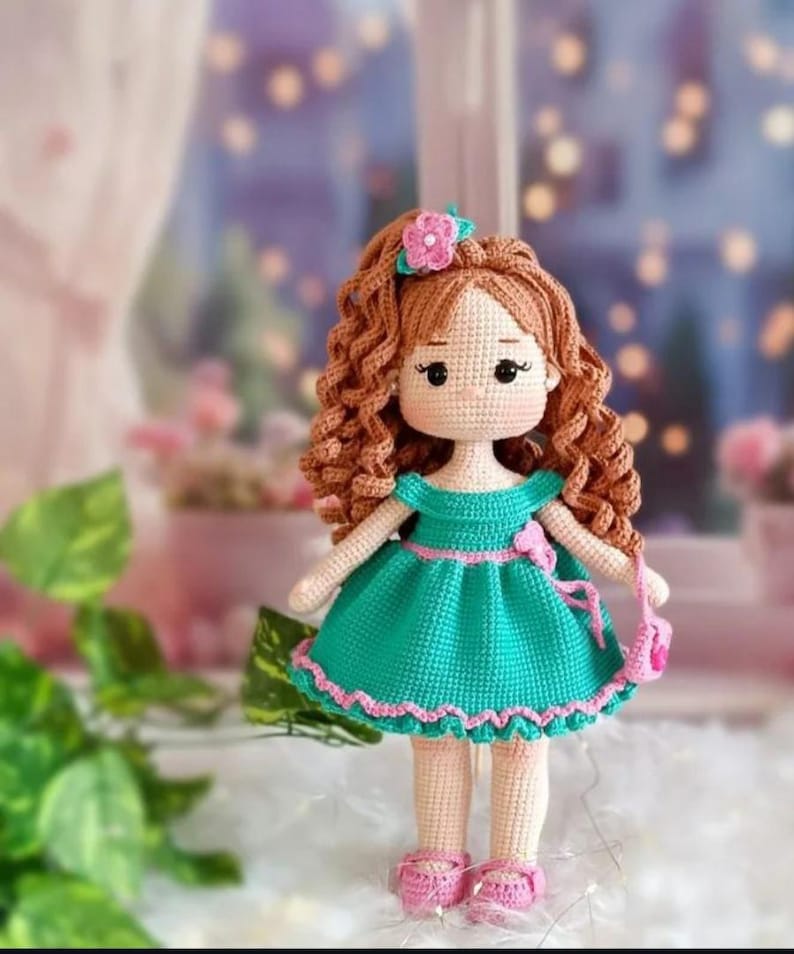
A pattern for another adorable little amigurumi doll to crochet, found on Etsy
Affiliate Disclosure:
This post contains affiliate links. If you purchase through them, I may earn a small commission at no extra cost to you. Thank you for supporting my work!
Discover more crochet patterns, free downloads, and premium PDFs on Ko-fi.