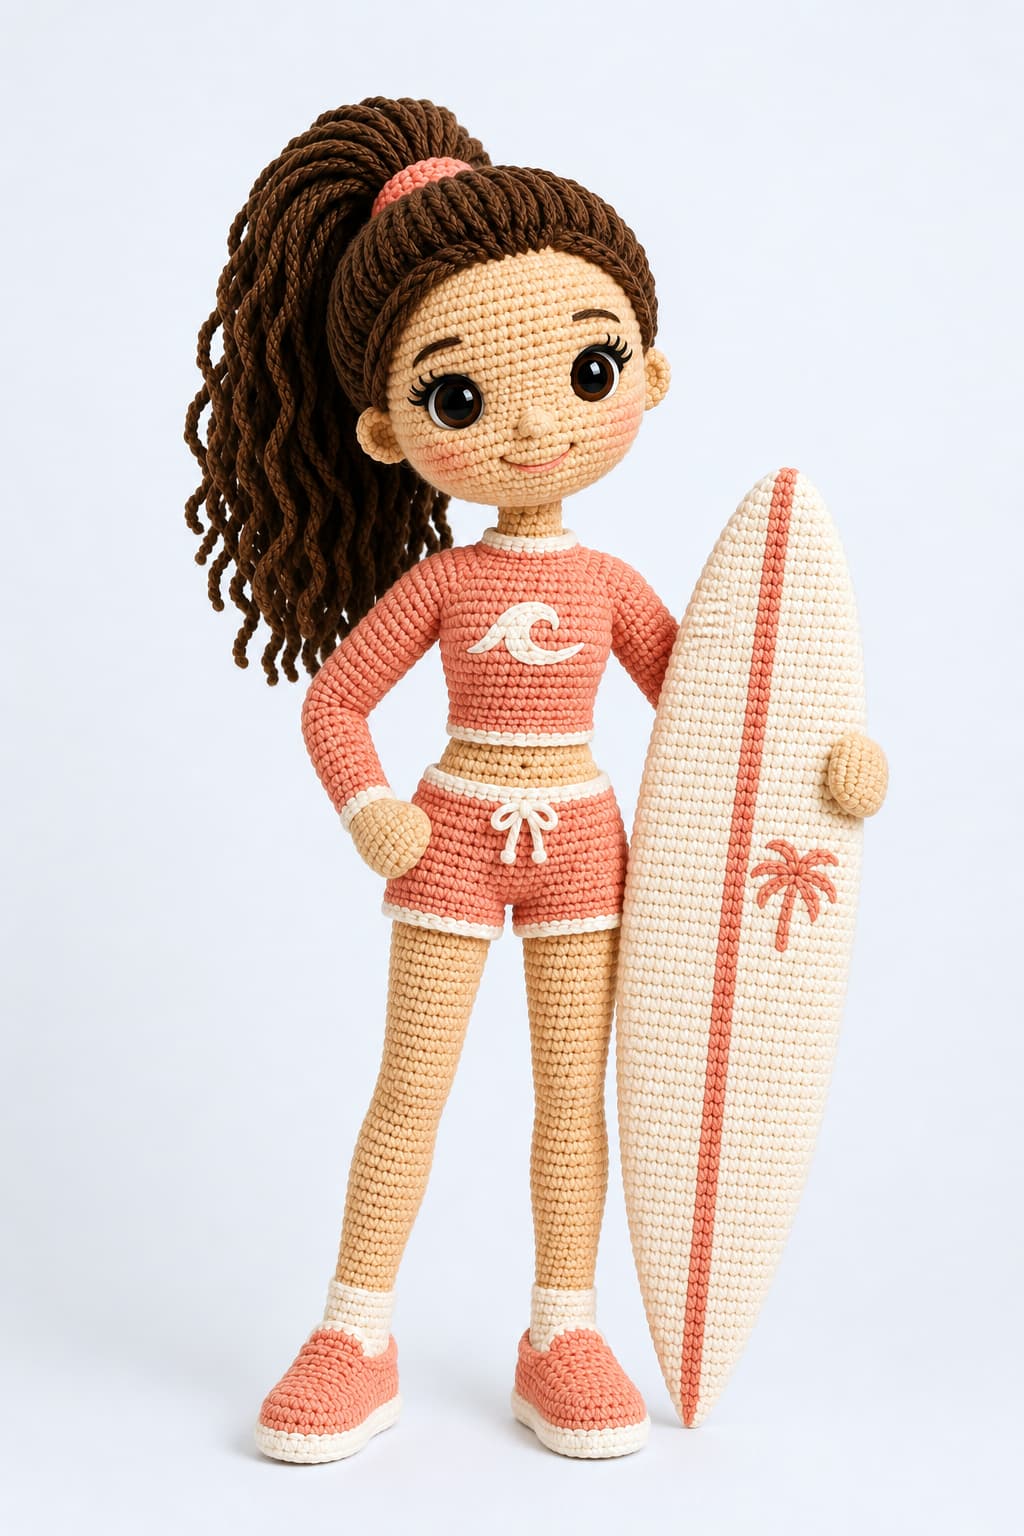
Ready to ride the creative waves? Dive into this comprehensive **free amigurumi surfer doll crochet pattern** and craft your own adorable, beach-loving companion. Perfect for intermediate makers, this detailed step-by-step guide features a unique neck socket design for realistic stability and a gorgeous curly high ponytail. Grab your favorite cotton yarn, follow our clear instructions, and bring this summer-inspired doll to life today!
Catch the Creative Wave: Your Next Crochet Adventure
Welcome to your ultimate summer project! This detailed crochet pattern combines advanced amigurumi techniques with a fun, beach-inspired aesthetic to help you create a truly exceptional handmade piece. Designed with structural integrity in mind, this project introduces an innovative internal socket and dowel system, ensuring your doll’s head stays stable and beautifully aligned without tilting. From her perfectly defined curly high ponytail to her custom-crafted miniature surfboard, every element has been thoughtfully designed for clarity and aesthetic appeal. Grab your crochet hook, choose your favorite yarn colors, and let’s bring this adorable amigurumi surfer to life!
Project Size
* **Approximate height:** 30 cm.
* **Approximate width:** 12 cm (including arms).
* **Surfboard:** approximately 17 cm long.
* *Note: Measurements may vary slightly depending on yarn weight, crochet hook size, and stitch tension.*
Difficulty Level
**Intermediate.**
This pattern is explained step-by-step and can be completed by beginners who are already familiar with basic amigurumi techniques. It includes color changes, increases, invisible decreases, working in spirals, working in rows, embroidering details, and sewing pieces together.
Estimated Time to Complete
**Between 14 and 20 hours.**
Time may vary depending on individual experience, crocheting speed, and the level of detail dedicated to assembly and finishing embroidery.
Materials List
* **Fine cotton or acrylic yarn** (Amigurumi weight or similar) in the following colors:
* Skin tone.
* White.
* Pink/Coral.
* Brown or chestnut (hair).
* Black or dark brown (embroidery).
* Soft pink (mouth).
* **2.5 mm crochet hook.**
* **12 mm safety eyes.**
* **Yarn needle.**
* **Stitch marker.**
* **Scissors.**
* **Fiberfill / Silicone stuffing.**
* **(Optional)** Thin sheet of craft foam (EVA foam) or acetate to reinforce the surfboard.
*Guide to useful crochet tools*
Stitch Abbreviations
* **ch** = chain
* **mr** = magic ring
* **sc** = single crochet
* **inc** = increase (2 single crochets in the same stitch)
* **dec** = invisible decrease
* **sl st** = slip stitch
* **hdc** = half double crochet
* **dc** = double crochet
* **BLO** = back loop only
* **FLO** = front loop only
* **(…) × n** = repeat the sequence the indicated number of times
* **[ ]** = total stitch count at the end of the round/row
Section 1: The Shoes (Make 2)
**Important:** Starting from Round 1, work in a **continuous spiral** without closing the rounds with a slip stitch. Place a stitch marker in the **first stitch of each round** and move it up to the first stitch of the next round as you progress. All color changes in this pattern are made by **closing the last stitch of the round with the new color**.
Part A: The Oval Sole (White Color)
**Round 1:**
* **How:** Make a slip knot on your hook and **chain 6**. Skipping the first chain (the one closest to the hook), work **4 single crochets (sc)** in sequence. In the last chain, work **3 single crochets** in the same stitch. Turn your work to crochet through the remaining free loops on the bottom side of the initial chain foundation, and work **3 single crochets**. Finish by working **2 single crochets** in the last free loop of the chain where you started the round, thus completing the oval shape.
* **When:** This is done at the beginning of the project to establish the base of the shoe.
* **Where:** Work linearly across the chain strip first, and then through the free loops on the opposite side of that same strip, forming a flat oval.
* **Total stitches:** **[12 stitches]**
**Round 2:**
* **How:** Work **1 increase**, then **3 single crochets**, make **3 increases in a row**, work **3 single crochets**, and finish with **2 increases in a row**.
* **When:** Immediately after completing Round 1, maintaining the work in a continuous spiral.
* **Where:** The increases are located at both rounded ends of the oval (toe and heel) to expand the sole evenly.
* **Total stitches:** **[18 stitches]**
**Round 3:**
* **How:** Work **1 single crochet**, then **1 increase**. Continue with **3 single crochets**. Next, perform the sequence of **(1 single crochet, 1 increase) repeated 3 times**. Work **3 single crochets** and finish by repeating the sequence of **(1 single crochet, 1 increase) 2 times**.
* **When:** Upon finishing the previous round, maintaining an even tension.
* **Where:** The increases are distributed over the front and back curves so that the sole continues to grow flat without warping.
* **Total stitches:** **[24 stitches]**
**Round 4:**
* **How:** Work **2 single crochets**, then **1 increase**. Continue with **3 single crochets**. Perform the sequence of **(2 single crochets, 1 increase) repeated 3 times**. Work **3 single crochets** and finish by repeating the sequence of **(2 single crochets, 1 increase) 2 times**.
* **When:** This is the final expansion round of the sole.
* **Where:** The increases are made on the curved ends to reach the final circumference of the shoe.
* **Total stitches:** **[30 stitches]**
Part B: Shoe Height and Color Change
**Round 5:**
* **How:** Work **30 single crochets**, inserting the hook **back loop only (BLO)** of each stitch from the previous round. **Upon completing single crochet number 30, close it with the pink/coral yarn** to make a clean color change. Cut the white yarn.
* **When:** Right after finishing the flat base of the sole.
* **Where:** Around the entire sole. By working in the back loops only, a distinct ridge is formed that causes the fabric to rise at an approximate 90° angle, creating the wall of the shoe.
* **Total stitches:** **[30 stitches]**
**Round 6 and Round 7:**
* **How:** Work **30 single crochets** in each round, going through both loops of each stitch as usual.
* **When:** After changing to the pink/coral color.
* **Where:** Around the entire perimeter of the shoe to form its side walls.
* **Total stitches:** **[30 stitches in each round]**
Part C: Shaping the Instep (Pink/Coral Color)
**Round 8:**
* **How:** Work **9 single crochets**. Next, perform **6 invisible decreases in a row** (inserting the hook through the front loops only of the two stitches you are going to decrease). Finish the round by working **9 single crochets**.
* **When:** When the shoe has reached sufficient height and the instep shaping begins.
* **Where:** If you have correctly maintained the stitch marker since the beginning of the work, the **6 decreases will automatically center over the toe of the shoe**, forming the instep.
* **Total stitches:** **[24 stitches]**
**Round 9:**
* **How:** Work **8 single crochets**, perform **4 invisible decreases in a row**, and finish with **8 single crochets**.
* **When:** In the round immediately following the start of the instep shaping.
* **Where:** The decreases continue to concentrate over the front part of the shoe to accentuate the shape of the toe.
* **Total stitches:** **[20 stitches]**
**Round 10:**
* **How:** Work **8 single crochets**, perform **2 invisible decreases in a row**, and finish with **8 single crochets**. **Upon completing the last single crochet, close it with the white yarn** to prepare the sock cuff. Cut the pink/coral yarn.
* **When:** The final round of the shoe body.
* **Where:** The decreases are done in the center of the instep, reducing the upper opening of the shoe to reach the **18 stitches** with which the leg will continue.
* **Total stitches:** **[18 stitches]**
Part D: The Sock Cuff (White Color)
**Round 11:**
* **How:** Work **18 single crochets** using the **back loop only (BLO)** of each stitch.
* **When:** Immediately after changing to the white color.
* **Where:** Around the entire opening of the shoe. By working in BLO, the front loop is left free, forming a small ridge that mimics the elastic ribbing of the sock.
* **Total stitches:** **[18 stitches]**
**Round 12:**
* **How:** Work **18 single crochets** taking both loops of each stitch. **Upon completing stitch number 18, close it with the skin tone yarn.** Cut the white yarn.
* **When:** This is the final round of the shoe section.
* **Where:** Around the entire upper edge of the sock.
* **Total stitches:** **[18 stitches]**
Section 2: The Legs (Skin Tone Color)
**Round 13:**
* **How:** Work **16 single crochets** using the **back loop only (BLO)** of each stitch.
* **When:** At the beginning of the leg, immediately after finishing the white edge of the sock.
* **Where:** Around the entire upper opening. By working in BLO, the front loop of the white edge is left free, forming a ridge that visually separates the sock from the leg.
* **Stuffing Note:** **Before starting the next round**, firmly stuff the shoe with fiberfill, paying special attention to the toe and heel so that the footwear retains its shape throughout the crocheting process.
* **Total stitches:** **[16 stitches]**
**Round 14 (Ankle Shaping):**
* **How:** Work **4 single crochets**, perform **4 invisible decreases in a row** (inserting the hook through the front loops only of the two stitches you are going to decrease), and finish with **4 single crochets**.
* **When:** At the start of the ankle shaping.
* **Where:** If you have correctly maintained the stitch marker since the beginning of the shoe, the **4 decreases will automatically center at the back of the leg**, naturally narrowing the ankle.
* **Total stitches:** **[12 stitches]**
**Round 15 to Round 18 (Straight Ankle Section):**
* **How:** Work **12 single crochets** in each round, taking both loops as usual. These are **4 consecutive rounds** without making increases or decreases.
* **When:** After completing the ankle shaping.
* **Where:** Around the entire leg, forming a uniform cylinder that represents the ankle.
* **Total stitches:** **[12 stitches in each round]**
**Round 19 (Start of the Calf):**
* **How:** Work **2 single crochets**, perform **1 increase**, work **6 single crochets**, perform **1 increase**, and finish with **2 single crochets**.
* **When:** When the gradual widening of the leg begins.
* **Where:** The increases are located approximately on the sides of the leg, providing an even expansion of the diameter without warping the fabric.
* **Total stitches:** **[14 stitches]**
**Round 20 and Round 21:**
* **How:** Work **14 single crochets** in each round, taking both loops as usual.
* **When:** After reaching a diameter of **14 stitches**.
* **Where:** Around the entire leg to consolidate the new width before starting the thigh.
* **Total stitches:** **[14 stitches in each round]**
**Round 22 to Round 38 (Thigh):**
* **How:** Work **14 single crochets** in each round for **17 consecutive rounds**, without making any increases or decreases.
* **When:** Once the calf section is completed.
* **Where:** Continue crocheting straight up to form the thigh, maintaining a uniform diameter that provides the long, slender appearance characteristic of the surfer doll.
* **Stuffing Tip:** Insert small amounts of fiberfill every **4 or 5 rounds**, compacting it gently to avoid gaps and achieve a firm, uniform leg.
* **Total stitches:** **[14 stitches in each round]**
Section 3: The Short Legs / Pant Legs (Worked over each leg)
Part A: The Trim or Bottom Edge (White Color)
**Round 39:**
* **How:** Change to **white color** by closing the last stitch of the previous round with this new color. Work **16 single crochets** using the **back loop only (BLO)** of each stitch.
* **When:** Upon finishing the skin-tone thigh section.
* **Where:** Around the upper edge of the leg. By working in BLO, the front loop is left free, forming a small ridge that mimics the trim or bottom hem of the shorts.
* **Total stitches:** **[16 stitches]**
**Round 40 (Pant Leg Ease):**
* **How:** Work the sequence of **(3 single crochets, 1 increase) repeated 4 times**, taking both loops as usual.
* **When:** After completing the bottom trim of the shorts.
* **Where:** Around the entire round. The evenly distributed increases provide a slight ease to the pant leg, preventing the shorts from fitting too tightly against the leg.
* **Total stitches:** **[20 stitches]**
Part B: Pant Leg Height (Pink/Coral Color)
**Round 41 and Round 42:**
* **How:** Change to **pink/coral color** by closing the last stitch of the previous round with the new color. Cut the white yarn and work **20 single crochets** in each of the two rounds.
* **When:** After completing the bottom edge of the shorts.
* **Where:** Around the entire pant leg to build the height of the shorts before joining both legs together.
* **Total stitches:** **[20 stitches in each round]**
Piece Preparation
**Leg 1:**
* Upon finishing **Round 42**, work **1 slip stitch** in the next stitch to smooth out the height difference between the start and end of the round. Cut the yarn, leaving a tail of approximately **15 cm**, and fasten off.
**Leg 2:**
* Upon finishing **Round 42**, **do not cut the yarn**. Keep the active loop on your hook, as you will start joining both legs from this leg to continue crocheting the body of the doll.
Section 4: Joining the Legs and Shorts Hip (Pink/Coral Color)
Before Advancing
* **Alignment:** Before joining the legs, place them on the table with the shoes pointing forward. The **start of the round** should be located on the inner side of each leg so that the shorts and the body line up perfectly. If the marker does not match this position upon finishing **Leg 2**, work the necessary shift/compensation stitches until you reach the inner side before starting the join.
* **Stitch Count:** At the end of the joining round, carefully count all your stitches. You must have exactly **46 stitches** before continuing with the next round.
**Round 43 (The Joining Round):**
* **How:** From the loop you left on hold on **Leg 2**, **chain 3**. Take **Leg 1** and insert your hook into the **first available stitch on the inner side**. Work the first **single crochet** there and place your stitch marker in this stitch, as **all body rounds will start from this point forward**.
Continue working **19 single crochets** around the entirety of **Leg 1**, completing its **20 stitches**. When you reach the **3 chains** that join both legs, work **1 single crochet in each of the three chains**, inserting the hook under the top loop of each chain.
Next, work **20 single crochets** around the entirety of **Leg 2**. To finish the round, work **1 single crochet in each of the three free loops** on the opposite side of the joining chains.
* **When:** Immediately after completing the individual pant legs of both legs.
* **Where:** Work by going all the way around **Leg 1**, across the joining chains, all the way around **Leg 2**, and returning along the opposite side of the same chains until the round is complete.
* **Round total:** **[46 stitches]** *(20 from Leg 1 + 3 across the chains + 20 from Leg 2 + 3 returning along the chains).*
**Round 44 to Round 47 (Body and Shorts Hip Height – 4 rounds):**
* **How:** Work **46 single crochets** in each round, taking both loops of each stitch and working in a continuous spiral.
* **When:** After successfully completing the joining round.
* **Where:** Around the entire perimeter of the hips, crocheting straight up to provide the necessary height to the shorts before shaping the waist.
* **Total for each round:** **[46 stitches]**
**Round 48 (Preparation for the Shorts Waistband):**
* **How:** To begin gently tapering the waist perimeter, work **10 single crochets**, perform **1 invisible decrease**, work **21 single crochets**, perform **1 invisible decrease**, and finish with **11 single crochets**.
* **When:** This is the final round of the shorts body before forming the waistband edge.
* **Where:** The decreases are located approximately on both sides of the hip, slightly reducing the perimeter before continuing with the abdomen.
* **Round total:** **[44 stitches]**
* **Stuffing Note:** Before continuing with the next round, take advantage of the wide opening of the body to firmly stuff the crotch area and the base of the hips. Distribute the fiberfill with your fingers to ensure even stuffing and prevent lumps from forming.
**Round 49 (The White Elastic Waistband):**
* **How:** Complete the last stitch of **Round 48** using the **white** yarn and cut the pink/coral yarn. Next, work **44 single crochets** using the **back loop only (BLO)** of each stitch.
* **When:** Upon reaching the final height of the shorts, before starting the abdomen.
* **Where:** Around the entire upper edge of the shorts. By working in BLO, the front loop is left free, forming a small ridge that visually defines the separation between the shorts and the abdomen.
* **Round total:** **[44 stitches]**
Section 5: The Abdomen and Start of the Torso
Before Advancing
* **Stuffing:** From this section onward, the body opening will begin to narrow progressively. Keep the hips and abdomen well-stuffed, adding small amounts of fiberfill as you progress. Even stuffing will help the doll maintain a firm and stable silhouette.
* **Symmetry of Decreases:** The decreases in this section are distributed approximately over both sides of the body to gently define the waist without altering the symmetry of the torso.
**Round 50 (Transition to the Abdomen – Skin Tone Color):**
* **How:** Complete the last stitch of **Round 49** using the **skin tone** yarn and cut the white yarn. Next, work **44 single crochets** using the **back loop only (BLO)** of each stitch.
* **When:** Immediately after finishing the white edge of the shorts’ waistband.
* **Where:** Around the entire perimeter of the body. By working in BLO, the front loop is left free, forming a small ridge that visually defines the upper edge of the shorts.
* **Round total:** **[44 stitches]**
**Round 51 (Waist Adjustment):**
* **How:** Work **9 single crochets**, perform **1 invisible decrease** (inserting the hook through the front loops only of the two stitches you are going to decrease), work **20 single crochets**, perform **1 invisible decrease**, and finish with **11 single crochets**, taking both loops as usual.
* **When:** In the second round of the skin tone color.
* **Where:** The decreases are located approximately on both sides of the body, slightly reducing the perimeter to shape a more slender waist.
* **Round total:** **[42 stitches]**
**Round 52 and Round 53 (Abdomen Height – 2 rounds):**
* **How:** Work **42 single crochets** in each of these rounds, taking both loops as usual and without making any increases or decreases.
* **When:** After completing the waist adjustment.
* **Where:** Continue crocheting straight up to form the abdomen before starting the torso.
* **Total for each round:** **[42 stitches]**
* **Stuffing Note:** Before continuing with the torso, check that the abdomen is completely stuffed. If necessary, add small amounts of fiberfill and distribute it evenly with your fingers to maintain a firm and symmetrical silhouette.
Section 6: The Shirt / Cropped Top
**Round 54 (Bottom Edge of the Shirt – White Color):**
* **How:** Complete the last stitch of **Round 53** using the **white** yarn and cut the skin tone yarn. Next, work **42 single crochets** using the **back loop only (BLO)** of each stitch.
* **When:** Upon reaching the height where the top garment begins.
* **Where:** Around the entire perimeter of the torso. By working in BLO, the front loop is left free, forming a small ridge that represents the bottom edge of the shirt.
* **Round total:** **[42 stitches]**
**Round 55 (Transition to the Shirt Body – Pink/Coral Color):**
* **How:** Complete the last stitch of **Round 54** using the **pink/coral** yarn and cut the white yarn. Next, work **42 single crochets** using the **back loop only (BLO)** of each stitch.
* **When:** After completing the white bottom edge of the shirt.
* **Where:** Around the entire torso. By working in BLO once again, the front loop of the previous round is left free, creating a second ridge that visually defines the separation between the white edge and the body of the shirt.
* **Round total:** **[42 stitches]**
**Round 56 to Round 60 (Chest Height – 5 rounds):**
* **How:** Work **42 single crochets** in each of these rounds, taking both loops as usual and without making any increases or decreases.
* **When:** After completing the base of the shirt.
* **Where:** Continue crocheting cylindrically around the entire torso to form the chest, maintaining a uniform diameter until reaching the area where the armholes will begin.
* **Total for each round:** **[42 stitches in each round]**
* **Stuffing Note:** As you progress through this section, add small amounts of fiberfill and distribute it evenly with your fingers to keep the torso firm, cylindrical, and free of gaps. Do not wait to stuff it completely at the end, as the body opening will narrow in the following sections.
Section 7: The Arms (Make 2)
Beginner Notes Before Advancing
* **Stuffing:** Firmly stuff the hand and the lower half of the arm. As you progress, gradually reduce the amount of fiberfill. The last **4 rounds** should have very little to no stuffing so that the arms can sit naturally against the body during assembly.
Part A: The Hands (Skin Tone Color)
**Round 1 (Magic Ring):**
* **How:** Make a magic ring and work **5 single crochets** inside it. Pull the short tail to close it completely and place your stitch marker in the first stitch.
* **When:** At the beginning of crocheting the arm.
* **Where:** At the base of the mitten-style hand.
* **Round total:** **[5 stitches]**
**Round 2 (Increases):**
* **How:** Work **5 consecutive increases** (2 single crochets in each of the 5 stitches from the previous round).
* **When:** Immediately after completing the magic ring.
* **Where:** Around the entire round to evenly expand the diameter of the hand.
* **Round total:** **[10 stitches]**
**Round 3 to Round 5 (Hand Structure – 3 rounds):**
* **How:** Work **10 single crochets** in each of these rounds, without making any increases or decreases.
* **When:** After reaching the **10 stitches** from the previous round.
* **Where:** Continue crocheting cylindrically to give volume to the mitten-style hand.
* **Total for each round:** **[10 stitches]**
**Round 6 (Transition and Color Change):**
* **How:** Work **10 single crochets**. Complete the last stitch using the **white** yarn and cut the skin tone yarn.
* **When:** Upon finishing the hand to start the sleeve cuff.
* **Where:** Around the entire wrist. Maintaining the **10 stitches** allows for a uniform thickness before starting the cuff.
* **Round total:** **[10 stitches]**
Part B: The Sleeve Cuff (White Color)
**Round 7 (Cuff Edge):**
* **How:** Work **10 single crochets** using the **back loop only (BLO)** of each stitch.
* **When:** At the start of working with the white color.
* **Where:** Around the entire wrist. By working in BLO, the front loop is left free, forming a small ridge that visually defines the cuff.
* **Round total:** **[10 stitches]**
**Round 8:**
* **How:** Work **10 single crochets** taking both loops as usual. Complete the last stitch using the **pink/coral** yarn and cut the white yarn.
* **When:** Upon finishing the white detail of the cuff.
* **Where:** Around the entire round, preparing the start of the sleeve.
* **Round total:** **[10 stitches]**
Part C: The Sleeve Length (Pink/Coral Color)
**Round 9 (Garment Ridge):**
* **How:** Work **10 single crochets** using the **back loop only (BLO)** of each stitch.
* **When:** At the start of the sleeve body.
* **Where:** Around the entire wrist. By working in BLO, the front loop of the previous round is left free, forming a small ridge that defines the cuff.
* **Round total:** **[10 stitches]**
**Round 10 to Round 25 (Arm Body – 16 rounds):**
* **How:** Work **10 single crochets** in each of these rounds, taking both loops as usual and without making any increases or decreases.
* **When:** After completing the base of the sleeve.
* **Where:** Continue crocheting cylindrically to form the arm. Add small amounts of fiberfill as you progress, leaving the last **4 rounds** with very little to no stuffing to facilitate assembly.
* **Total for each round:** **[10 stitches]**
Piece Status for Continuing
**Arm 1:**
* Upon finishing **Round 25**, work **1 slip stitch** in the next stitch to smooth out the height difference between the start and end of the round. Cut the yarn, leaving a tail of approximately **10 cm**, fasten off, and set the piece aside.
**Arm 2:**
* Repeat exactly the same procedure as for **Arm 1**. Upon finishing **Round 25**, work **1 slip stitch**, cut the yarn leaving a tail of approximately **10 cm**, fasten off, and set the piece aside.
Section 8: Joining the Arms and Torso Decreases
Before Advancing
* **Arm Alignment:** Place the torso facing you with the stitch marker located in the center of the back. The arms must face each other and line up with the sides of the torso so they hang symmetrically once the doll is finished.
* **Important:** Joining the arms is done over **two rounds**. In **Round 61**, the arms are attached to the torso using part of their stitches, meaning the perimeter of the body **remains at 42 stitches**. In **Round 62**, the free stitches of both arms are worked, temporarily increasing the perimeter to **54 stitches**. Starting from **Round 63**, the decreases that shape the shoulders will begin.
**Round 61 (Joining the Arms to the Torso):**
* **How:** Work **10 single crochets** across the torso until you reach the first side. Place the first arm so that its opening faces the torso and line up **2 stitches of the arm** with the **next 2 stitches of the torso**. Work **2 single crochets going through both pieces at the same time**, thereby securing the arm to the body.
Continue working **19 single crochets** across the front of the torso. Repeat the same procedure with the second arm, joining **2 stitches of the arm** to **2 stitches of the torso** using **2 single crochets**. Finish the round by working **9 single crochets** across the back until you return to the marker.
* **When:** Immediately after completing **Round 60**.
* **Where:** On both sides of the torso, forming the base of the armpits.
* **Round total:** **[42 stitches]**
**Round 62 (Crocheting Around the Arms):**
* **How:** Work **10 single crochets** across the torso. Upon reaching the first arm, **skip the 2 stitches already joined in the previous round** and work **8 single crochets** around the free stitches of the arm. Continue with **19 single crochets** across the front of the torso. Repeat the same procedure on the second arm, working **8 single crochets** around its free stitches. Finish with **9 single crochets** across the back of the torso.
* **When:** In the round immediately following the physical joining of the arms.
* **Where:** Work around the free stitches of both arms to fully integrate them into the torso and form the armpits.
* **Round total:** **[54 stitches]**
**Round 63 (First Shoulder Reduction):**
* **How:** Repeat the sequence of **(7 single crochets, 1 invisible decrease) 6 times** throughout the entire round.
* **When:** Once both arms are fully incorporated into the torso.
* **Where:** The decreases are evenly distributed around the entire round to begin reducing the shoulder perimeter symmetrically.
* **Round total:** **[48 stitches]**
**Round 64 (Second Shoulder Reduction):**
* **How:** Repeat the sequence of **(6 single crochets, 1 invisible decrease) 6 times**.
* **When:** After completing the first shoulder reduction.
* **Where:** Around the entire upper perimeter of the torso, maintaining a uniform reduction.
* **Round total:** **[42 stitches]**
**Round 65 (Third Shoulder Reduction):**
* **How:** Repeat the sequence of **(5 single crochets, 1 invisible decrease) 6 times**.
* **When:** As you continue shaping the upper part of the torso.
* **Where:** The decreases remain evenly distributed to gradually close the shoulders before reaching the neck.
* **Round total:** **[36 stitches]**
**Round 66 (Fourth Shoulder Reduction):**
* **How:** Repeat the sequence of **(4 single crochets, 1 invisible decrease) 6 times**.
* **When:** Before starting the doll’s neck.
* **Where:** Around the entire upper part of the torso, reducing the diameter uniformly.
* **Round total:** **[30 stitches]**
**Round 67 (Fifth Shoulder Reduction):**
* **How:** Repeat the sequence of **(3 single crochets, 1 invisible decrease) 6 times**.
* **When:** This is the final round corresponding to the torso before starting the neck.
* **Where:** The decreases are evenly distributed around the entire round to prepare the base of the neck.
* **Round total:** **[24 stitches]**
* **Stuffing Note:** Before starting the neck, check that the chest, shoulders, and armpits are completely stuffed. Distribute the fiberfill with your fingers to eliminate gaps and achieve a firm, symmetrical torso, as the neck opening will begin to narrow in the following sections.
Section 9: The Neck and the Socket / Dowel System (Skin Tone Color)
Before Advancing
* **Socket / Dowel System:** In this section, the **dowel** (or neck extension) will be constructed. This is a cylindrical extension of the neck that will later be inserted into the internal socket of the head. This system provides a firm connection between both pieces and facilitates assembly, allowing the head to remain properly centered and stable.
* **Important:** The reduction of the neck will be done **progressively** to reach the **15 stitches** required for the dowel. This transition maintains a uniform cylindrical shape and provides better support for the head.
**Round 68 (First Neck Reduction and Color Change):**
* **How:** Complete the last stitch of **Round 67** using the **skin tone** yarn and cut the pink/coral yarn. Next, repeat the sequence of **(2 single crochets, 1 invisible decrease) 6 times** around the entire round.
* **When:** Immediately after finishing the top garment, at the start of the neck.
* **Where:** Around the entire upper part of the torso, reducing the diameter uniformly to begin the neck.
* **Round total:** **[18 stitches]**
**Round 69 (Second Neck Reduction):**
* **How:** Work **4 single crochets**, perform **1 invisible decrease**, repeat **4 single crochets** and **1 invisible decrease** once more, work **4 single crochets** again, perform a third **invisible decrease**, and finish the round with **3 single crochets**.
* **When:** After completing the first neck reduction.
* **Where:** The three decreases are evenly distributed around the neck, gently reducing the diameter until reaching the final measurement of the dowel.
* **Round total:** **[15 stitches]**
**Round 70 to Round 76 (Creating the Dowel – 7 rounds):**
* **How:** Work **15 single crochets** in each of these **7 consecutive rounds**, taking both loops as usual and without making any increases or decreases.
* **When:** After reaching the final diameter of the dowel.
* **Where:** Continue crocheting straight up to build the dowel that will later be inserted into the internal socket of the head.
* **Stuffing Note:** As you progress, insert small amounts of fiberfill and compact it firmly using the end of your crochet hook or a stuffing tool. The dowel must be very firm to provide stable support for the head.
* **Optional Reinforcement:** If you desire an even more rigid connection, you can insert a small, lightweight plastic tube inside the dowel before completing the stuffing.
* **Total for each round:** **[15 stitches]**
Section 10: The Head (Skin Tone Color)
Before Advancing
* **Direction of Crocheting:** In this section, the head is worked **from the crown down to the base**. We will begin by expanding the circle using evenly distributed increases, and once the maximum diameter is reached, we will continue with a straight section before starting the decreases at the base.
* **Important:** In this section, we will construct only the **outer structure of the head**. The internal socket that will receive the neck dowel will be made in the following section of the pattern.
Part A: Expansion of the Crown
**Round 1 (Magic Ring):**
* **How:** Make a magic ring with the **skin tone** yarn and work **6 single crochets** inside it. Pull the short tail to close it completely and place your stitch marker in the first stitch.
* **When:** At the start of the head.
* **Where:** This represents the highest point of the crown, from which the entire structure of the head will grow.
* **Round total:** **[6 stitches]**
**Round 2 (Increases):**
* **How:** Work **6 consecutive increases** (2 single crochets in each of the 6 stitches from the previous round).
* **When:** Immediately after completing the magic ring.
* **Where:** Around the entire round to evenly expand the diameter of the crown.
* **Round total:** **[12 stitches]**
**Round 3 to Round 9 (Progressive Expansion):**
* **How:** Continue expanding the diameter of the head by distributing the increases evenly around each round to maintain a perfectly rounded shape.
* **Round 3:** Repeat **(1 single crochet, 1 increase) 6 times**. **[18 stitches]**
* **Round 4:** Repeat **(2 single crochets, 1 increase) 6 times**. **[24 stitches]**
* **Round 5:** Repeat **(3 single crochets, 1 increase) 6 times**. **[30 stitches]**
* **Round 6:** Repeat **(4 single crochets, 1 increase) 6 times**. **[36 stitches]**
* **Round 7:** Repeat **(5 single crochets, 1 increase) 6 times**. **[42 stitches]**
* **Round 8:** Repeat **(6 single crochets, 1 increase) 6 times**. **[48 stitches]**
* **Round 9:** Repeat **(7 single crochets, 1 increase) 6 times**. **[54 stitches]**
* **When:** During the growth phase of the head.
* **Where:** The increases must be spread out evenly to maintain a regular sphere.
* **Total at the end of Round 9:** **[54 stitches]**
Part B: Face Height
**Round 10 to Round 22 (Straight Head Section – 13 rounds):**
* **How:** Work **54 single crochets** in each of these rounds, taking both loops as usual and without making any increases or decreases.
* **When:** After reaching the maximum diameter of the head.
* **Where:** Continue crocheting around the entire piece to form the forehead, cheeks, and sides of the head.
* **Note for Safety Eyes:** If using safety eyes of approximately **12 mm**, place them between **Rounds 17 and 18**, leaving a spacing of **9 to 10 stitches** between them (adjust this distance slightly depending on the desired effect). Secure the safety washers before continuing with the decreases.
* **Total for each round:** **[54 stitches]**
Part C: Decreases for the Base of the Head
**Round 23 to Round 27 (Bottom Closure of the Head):**
* **How:** Begin closing the base of the head by distributing the invisible decreases evenly around each round.
* **Round 23:** Repeat **(7 single crochets, 1 invisible decrease) 6 times**. **[48 stitches]**
* **Round 24:** Repeat **(6 single crochets, 1 invisible decrease) 6 times**. **[42 stitches]**
* **Round 25:** Repeat **(5 single crochets, 1 invisible decrease) 6 times**. **[36 stitches]**
* **Round 26:** Repeat **(4 single crochets, 1 invisible decrease) 6 times**. **[30 stitches]**
* **Round 27:** Repeat **(3 single crochets, 1 invisible decrease) 6 times**. **[24 stitches]**
* **When:** After completing the height of the head and before constructing the internal socket.
* **Where:** The decreases are evenly distributed around the entire base to maintain the spherical shape of the head while narrowing its opening.
* **Total at the end of Round 27:** **[24 stitches]**
Section 11: Creating the Internal Socket (The Inset)
Before Advancing
* **Socket / Dowel System:** In this section, we will construct the internal socket where the neck dowel will later reside. This system provides a firm and stable connection between the head and the body.
* **Important:** The internal socket is crocheted with **18 stitches**, while the neck dowel was crocheted with **15 stitches**. This three-stitch difference provides the necessary space to insert the dowel easily, allowing for a tight fit without warping the head.
**Round 28 (Forming the Neck Edge):**
* **How:** Work the sequence of **(2 single crochets, 1 invisible decrease) repeated 6 times**, using the **back loop only (BLO)** of each stitch.
* **When:** After completing the outer base of the head.
* **Where:** Around the entire bottom opening. By working in BLO, the front loop of this round is left free, which will later allow for a clean closure between the head and the neck. At the same time, the fabric naturally turns its direction toward the inside of the head, beginning the construction of the socket.
* **Round total:** **[18 stitches]**
**Round 29 to Round 35 (Constructing the Internal Socket – 7 rounds):**
* **How:** Work **18 single crochets** in each of these **7 consecutive rounds**, taking both loops as usual and without making any increases or decreases.
* **When:** Immediately after completing Round 28.
* **Where:** Continue crocheting toward the inside of the head, forming an internal cylinder that will serve as the housing for the neck dowel.
* **Total for each round:** **[18 stitches]**
* **Stuffing Note:** Once **Round 35** is completed, firmly stuff the entire head by distributing the fiberfill around the internal cylinder. Avoid inserting stuffing inside the socket itself, as it must remain completely free to accommodate the neck dowel later.
* **Checking the Fit:** Before proceeding with assembly, insert the neck dowel into the socket to verify that the fit is firm and that the head can be placed correctly. If necessary, slightly adjust the stuffing before moving forward.
The Ears (Make 2) – Skin Tone Color
Beginner Notes Before Advancing
* **Half Double Crochet (hdc):** Yarn over hook, insert hook into the indicated stitch, yarn over and pull up a loop (you will have **3 loops** on your hook). Yarn over and pull through all **3 loops at the same time**.
* **Semicircular Crochet:** Although the piece starts with a magic ring, it is not worked in a spiral. All stitches are worked inside the same ring to form a small, crescent-shaped ear.
Ear Construction
**Round 1 (Crescent in Magic Ring):**
* **How:** Make a magic ring with the **skin tone** yarn. Inside the ring, work the following sequence: **1 single crochet, 3 half double crochets (hdc), and 1 single crochet**. Pull the short tail to close the ring firmly, but **do not join the first stitch to the last stitch**, as the piece must retain its semicircular shape. Work **1 slip stitch** to secure the work, cut the yarn leaving a tail of approximately **20 cm** for sewing, and fasten off.
* **When:** After completing the head.
* **Where:** Worked as an independent piece directly on the hook.
* **Round total:** **[5 stitches]**
Placement and Assembly Instructions
**To achieve symmetrical placement:**
* **When to Sew Them:** Sew the ears **after** placing the safety eyes and completing the head, but **before** attaching the hair, so that the hair completely hides the stitches and knots.
* **Where to Locate Them:** Position them symmetrically on both sides of the head.
* **Vertical Alignment:** Place them approximately between **Rounds 17 and 19** of the head, ensuring they line up with the height of the eyes.
* **Horizontal Alignment:** Leave approximately **6 to 7 stitches** of spacing between the outer edge of each eye and the front edge of the ear.
* **How to Sew Them:** Using a yarn needle and the tail left for sewing, make **2 or 3 firm stitches** through the straight base of the ear and the corresponding stitches on the head. The curved part of the ear should face slightly toward the back of the head. Finish by making a secure knot inside the head and hide the yarn tail within the stuffing for a clean, invisible finish.
Section 12: The Hair (Brown / Chestnut Color)
Before Advancing
* **Slip Stitch (sl st):** Used to fasten off a piece or secure a strand of hair. Insert the hook into the indicated stitch, yarn over, and pull it directly through the stitch and the loop already on your hook.
* **Crocheting on Chains:** Each hair strand is formed by crocheting a long chain and returning down it by working **2 half double crochets (hdc)** in each chain stitch. This excess of stitches causes the fabric to curl naturally, forming the characteristic ringlets of the hairstyle.
Part A: The Base Cap (Worked in a Spiral)
This piece is worked separately and later sewn onto the head, forming the base upon which the high ponytail will be mounted.
**Round 1 (Magic Ring):**
* **How:** Make a magic ring with the **brown/chestnut** yarn and work **6 single crochets** inside it. Pull the short tail to close it completely and place your stitch marker in the first stitch.
* **When:** At the start of making the hair.
* **Where:** This represents the upper center of the head.
* **Round total:** **[6 stitches]**
**Round 2 (Increases):**
* **How:** Work **6 consecutive increases** (2 single crochets in each of the stitches from the previous round).
* **When:** Immediately after completing the magic ring.
* **Where:** Around the entire round to evenly expand the diameter of the cap.
* **Round total:** **[12 stitches]**
**Round 3 to Round 9 (Cap Expansion):**
* **How:** Continue expanding the diameter following the same increase sequence used for the head to achieve a perfect fit.
* **Round 3:** Repeat **(1 single crochet, 1 increase) 6 times**. **[18 stitches]**
* **Round 4:** Repeat **(2 single crochets, 1 increase) 6 times**. **[24 stitches]**
* **Round 5:** Repeat **(3 single crochets, 1 increase) 6 times**. **[30 stitches]**
* **Round 6:** Repeat **(4 single crochets, 1 increase) 6 times**. **[36 stitches]**
* **Round 7:** Repeat **(5 single crochets, 1 increase) 6 times**. **[42 stitches]**
* **Round 8:** Repeat **(6 single crochets, 1 increase) 6 times**. **[48 stitches]**
* **Round 9:** Repeat **(7 single crochets, 1 increase) 6 times**. **[54 stitches]**
* **When:** During the growth phase of the cap.
* **Where:** The increases must be distributed evenly to maintain a rounded shape that fits the head correctly.
* **Total at the end of Round 9:** **[54 stitches]**
**Round 10 to Round 18 (Cap Depth – 9 rounds):**
* **How:** Work **54 single crochets** in each of these rounds, taking both loops as usual and without making any increases or decreases. Upon finishing **Round 18**, work **1 slip stitch** in the next stitch to level the work, cut the yarn leaving a tail of approximately **50 cm** for sewing later, and fasten off.
* **When:** After completing the cap expansion.
* **Where:** Continue crocheting around the entire piece to cover the sides and the back of the neck, leaving the forehead partially uncovered to achieve a natural hairline.
* **Total for each round:** **[54 stitches]**
Part B: The High Ponytail Strands (Worked Separately)
To achieve the volume and drape of the hair, a curtain of curly strands will be made and then rolled up to form the high ponytail.
**Foundation of the Hair Strands Base:**
* **How:** Chain **20**. This chain strip will serve as the base to hold all the strands.
* **When:** At the start of making the ponytail.
* **Where:** Worked as an independent piece.
**Strand Construction (One strand per each foundation chain):**
* **How:**
1. Work a strand across **each of the 20 chains** of the base strip, starting with the first free chain and moving to the last.
2. In each chain, **chain 45**.
3. Starting in the second chain from the hook, return down the chain by working **2 half double crochets (hdc)** in each chain stitch until you reach the base strip again.
4. Upon returning to the base strip, work **1 slip stitch** in the next available chain to secure the strand.
5. Repeat the same procedure until all **20 strands** are complete.
* **When:** Immediately after completing the base strip.
* **Where:** Each strand remains attached to the chain strip, forming a dense curtain of well-defined curls.
Part C: The Ponytail Hair Band (Pink / Coral Color)
**Band Construction:**
* **How:** **Chain 25** and join the first to the last chain with **1 slip stitch** to form a ring. Next, work **1 round of 25 single crochets** around the ring. Cut the yarn leaving a tail for sewing, and fasten off.
* **When:** Upon finishing the construction of the hair strands.
* **Where:** This band will encircle the base of the ponytail to hide the joins and mimic a hair tie.
Hair Assembly Instructions
**1. Positioning the Cap**
Place the cap onto the head, ensuring that **Round 1** is centered on the crown. Secure it temporarily with pins, leaving the forehead partially uncovered and correctly covering the back of the neck. Before sewing permanently, check that both ears are at the same distance from the edge of the cap. Using the yarn needle and the tail you saved, sew all around the perimeter using invisible stitches.
**2. Assembling the Ponytail**
Take the curtain of hair strands and **roll it up to form a compact spiral**, creating a bun of curls. Securely sew the base of this spiral onto the upper back section of the cap, approximately between **Rounds 4 and 6**, forming a high ponytail.
**3. Placing the Hair Band**
Slide the pink band around the base of the ponytail and secure it with a few invisible stitches to achieve a clean and neat finish.
* **Final Styling:** Once assembly is complete, gently separate the curls with your fingers and distribute them around the ponytail to achieve uniform volume and a more natural finish.
Section 13: Face Embroidery and Expression
Before Advancing
* **Thin Threads:** To embroider the facial features, it is recommended to split a strand of your regular yarn or use sewing or embroidery thread (such as mouliné/floss). This will allow for a finer embroidery that is well-proportioned to the size of the doll.
* **Hiding Knots:** Always insert your needle through the top or back of the head (an area that will later be covered by the hair) and bring it out at the exact point where you will do the embroidery. When finished, reinsert the needle into the same spot and guide it back toward the top of the head. Tie a secure knot, pull the thread gently so the knot hides inside the stuffing, and snip the excess.
Section 14: The Surfboard (Single Piece in a Spiral)
Before Advancing
* **Spiral Crochet:** The surfboard is worked as a single continuous piece, just like the doll’s body. Do not close the rounds with a slip stitch or make turning chains. Always work in a continuous spiral and use a **stitch marker** to identify the start of each round.
* **Oval Construction:** The shape of the board is achieved by making increases and decreases exclusively at the **two rounded ends**. The long sides are crocheted without any modifications to retain the elongated silhouette.
* **Decorative Stripe:** The pink/coral line across the board is not crocheted during construction. It is made separately and sewn on once the work is completed.
* **Stuffing:** The surfboard must remain flat. Use only a thin layer of fiberfill or, if you prefer greater rigidity, a piece of craft foam (EVA foam) or acetate cut to the internal shape of the board.
Part A: Oval Base
**Round 1:**
* **How:** Make a **magic ring** and work **4 single crochets (sc)** inside it. Do not close with a slip stitch; continue working in a spiral.
* **When:** At the start of the surfboard.
* **Where:** This small base represents one of the rounded ends of the surfboard.
* **Round total:** **[4 stitches]**
Part B: Board Expansion
**Rounds 2 to 14 (13 rounds):**
* **How:** In each round, work **2 increases distributed at each rounded end** of the board (**4 increases in total per round**). The stitches corresponding to the long sides are worked normally, without making increases.
* **Important:** Distribute the increases evenly over each rounded end. Avoid making them always in the same stitch to maintain a symmetrical, oval silhouette.
* **When:** During the growth phase of the surfboard.
* **Where:** Increases are only made at the two ends; the sides remain straight.
* **Round 2:** 8 stitches.
* **Round 3:** 12 stitches.
* **Round 4:** 16 stitches.
* **Round 5:** 20 stitches.
* **Round 6:** 24 stitches.
* **Round 7:** 28 stitches.
* **Round 8:** 32 stitches.
* **Round 9:** 36 stitches.
* **Round 10:** 40 stitches.
* **Round 11:** 44 stitches.
* **Round 12:** 48 stitches.
* **Round 13:** 52 stitches.
* **Round 14:** 56 stitches.
Part C: Central Body
**Rounds 15 to 50 (36 straight rounds):**
* **How:** Work **56 single crochets** in each round, without making any increases or decreases.
* **When:** Once the maximum width of the surfboard is reached.
* **Where:** Corresponds to the central section, which provides the characteristic length of the board.
* **Total for each round:** **[56 stitches]**
Part D: Decreases
**Rounds 51 to 63 (13 rounds):**
* **How:** Perform **2 invisible decreases distributed at each rounded end** of the board (**4 decreases in total per round**). The long sides continue to be worked normally.
* **Important:** Distribute the decreases evenly to preserve the oval shape and prevent the ends from warping.
* **Round 51:** 52 stitches.
* **Round 52:** 48 stitches.
* **Round 53:** 44 stitches.
* **Round 54:** 40 stitches.
* **Round 55:** 36 stitches.
* **Round 56:** 32 stitches.
* **Round 57:** 28 stitches.
* **Round 58:** 24 stitches.
* **Round 59:** 20 stitches.
* **Round 60:** 16 stitches.
* **Round 61:** 12 stitches.
* **Round 62:** 8 stitches.
* **Round 63:** 4 stitches.
* **Stuffing Note:** Starting from **Round 57**, insert a thin layer of fiberfill or your chosen rigid reinforcement. Distribute it evenly to keep the board flat.
**Round 64 (Closure):**
* **How:** Cut the yarn leaving a long tail. Using a yarn needle, pass the tail through the **4 remaining stitches**, pull gently to close the opening completely, and hide the yarn tail inside the piece.
* **When:** Upon finishing the surfboard structure.
* **Where:** At the top end of the surfboard.
Part E: Central Stripe
**Construction:**
* **How:** With **pink/coral** yarn, chain a length exactly equal to the length of the finished surfboard. Return down the chain by working **1 single crochet** in each chain stitch. Cut the yarn leaving a long tail for sewing.
* **When:** After completing the surfboard.
* **Where:** Worked as an independent piece.
**Assembly:**
* **How:** Center the strip over the front face of the surfboard and sew it using invisible stitches along both long sides, ensuring it sits completely flat.
* **When:** Once the strip is completed.
* **Where:** Along the longitudinal axis of the front face of the surfboard.
Part F: Palm Tree Embroidery
**How:**
With pink/coral yarn and a yarn needle:
1. Embroider a vertical trunk approximately **4 rounds** tall.
2. From the top of the trunk, make **5 curved stitches** pointing in different directions to form the palm tree fronds.
**When:**
Once the central stripe is sewn on.
**Where:**
Locate the palm tree on the lower third of the front face of the surfboard, slightly offset to one side of the central stripe.
Final Check
Before considering the piece finished:
* Check that both ends of the surfboard are symmetrical.
* Verify that the central stripe is perfectly aligned.
* Confirm that the surfboard retains a flat shape and shows no lumps.
* If you used fiberfill, distribute it evenly before completely closing the piece.
Part 1: The Eyeliner and Eyelashes (Black or Dark Brown Color)
* **How:** Thread a length of black or dark brown thread onto a yarn needle. Insert the needle from the top of the head and bring it out right next to the upper outer edge of one of the safety eyes. Outline only the upper edge of the eye to form the eyelid liner. At the outer corner of the eye, make **two small diagonal stitches** pointing slightly upward and outward, about one stitch long, forming subtle and gently arched eyelashes.
* **When:** After placing the safety eyes and before sewing the hair.
* **Where:** Along the upper edge and the outer corner of both eyes.
Part 2: The Eyebrows (Brown / Chestnut Color)
* **How:** Using thread of the same color as the hair, insert the needle and bring it out approximately **two rounds above the eye**. Embroider a slightly arched line about **3 stitches wide**, gently sloping the outer end downward to achieve a natural expression.
* **When:** After completing the eyeliner and eyelashes.
* **Where:** Approximately two rounds above each eye, ensuring that both eyebrows have the same length and slant.
Part 3: The Nose (Skin Tone Color)
* **How:** Thread a length of the same skin tone yarn used for the head. Insert the needle from the back or top of the head and bring it out in the center of the face, approximately **one round below the bottom edge of the eyes**. Make **3 or 4 horizontal passes** over the same **2 center stitches**, forming a small ridge to represent the nose.
* **When:** After verifying the final position of the eyes and eyebrows.
* **Where:** Centered between both eyes, occupying approximately **2 stitches in width**.
Part 4: The Mouth (Soft Pink or Coral Color)
* **How:** Using a fine strand of soft pink or coral thread, embroider a small smile using a very wide **”V” shaped stitch** or a gently curved line about **3 stitches wide**. If you wish to slightly accentuate the smile, make a small anchoring stitch right in the center of the mouth, pulling the thread gently before securing it to create a slight, natural curve.
* **When:** Once all other facial features are completed.
* **Where:** Centered along the midline of the face, approximately **3 rounds below the nose**.
Final Expression Check
Before tying the final knots and cutting the threads, carefully observe the doll from different angles.
* Check that both eyes are perfectly aligned.
* Verify that the eyebrows have the same height and slant.
* Make sure the nose and mouth are centered relative to the axis of the face.
* Only when you are satisfied with the final expression, tie the final knots and hide all yarn tails inside the head for a clean, professional finish.
Ride Into the Sunset with Your Completed Surfer Doll
Congratulations on finishing your beautiful handmade creation! By completing this pattern, you’ve mastered advanced amigurumi techniques, from the innovative head socket construction to intricate facial embroidery and perfectly sculpted curls. Your new surfer doll is ready to catch some waves, brighten up a summer display, or become a cherished gift for someone special. Don’t forget to share your finished project on Instagram or your favorite crafting community—we would love to see your unique color choices and final styling! Thank you for crocheting along, and may your next creative adventure be just as rewarding.

Spanish version of this same pattern
Here’s another pattern for an amigurumi tennis doll

Video tutorial for knitting another doll design
Pattern in several languages found on Etsy to knit this wonderful doll
Affiliate Disclosure:
This post contains affiliate links. If you purchase through them, I may earn a small commission at no extra cost to you. Thank you for supporting my work!
Este artículo contiene enlaces de afiliado, lo que significa que si comprás desde aquí, recibimos una pequeña comisión sin costo extra para vos. ¡Gracias por apoyar nuestro trabajo!
Discover more crochet patterns, free downloads, and premium PDFs on Ko-fi.