
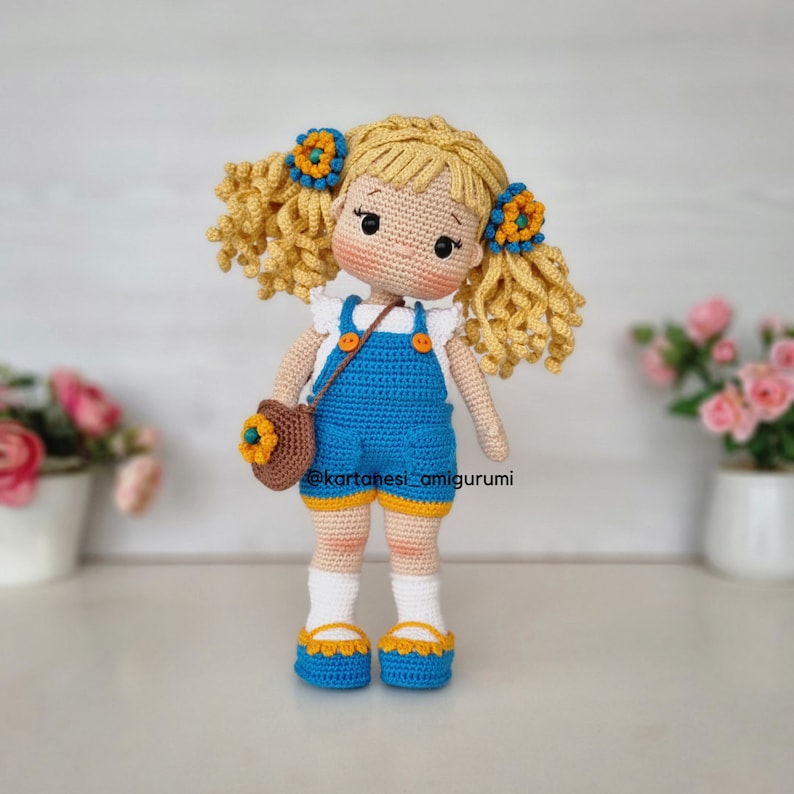
**Lawyer amigurumi pattern:** Discover how to crochet a stunning professional doll with this comprehensive, free intermediate-level guide. Perfect as a meaningful graduation gift for law students and attorneys, this detailed tutorial covers everything from the structural flat-base design to the miniature law book accessory. Master seamless color changes, neat invisible decreases, and beautiful hair strands step-by-step to create a high-quality, standing amigurumi doll that completely stands out.
Crafting the Perfect Attorney Doll
Welcome to this comprehensive lawyer amigurumi pattern, expertly designed for intermediate crocheters looking to advance their craft. This free step-by-step tutorial guides you through creating a beautifully proportioned, standing professional doll, complete with her signature judicial attire and a detailed miniature law book. Using an innovative structural design with a flat base and a secure neck-and-cavity system, this project ensures exceptional stability and a clean finish without awkward seams. Perfect as a memorable graduation gift for attorneys and law students, this pattern offers clear instructions for seamless color changes, hair strand attachment, and precise embroidery.
Project Size
The finished doll measures approximately 30 cm tall, although the final size may vary slightly depending on the yarn weight, the crochet hook size used, and each crocheter’s tension. The law book measures approximately 6.5 cm tall × 5 cm wide × 1.2 cm thick.
Difficulty Level
Intermediate
This pattern is designed for crocheters who have already mastered the basic amigurumi stitches and wish to make a project with color changes, assembled pieces, attached hair strands, and embroidered details. All techniques used are explained step-by-step to facilitate its creation.
Estimated Crochet Time
Approximately 18 to 24 hours of work, depending on the crocheter’s experience and the time dedicated to the assembly, embroidery, and hairstyling details.
Materials List
* **Fine cotton or acrylic yarn (Sport or DK)** in the following colors:
* Skin color
* Black (dress, coat, and shoes)
* White (jabot)
* Dark brown or black (hair)
* Brown (book)
* Cream or ivory (book pages)
* **2.5 mm crochet hook** (or the appropriate size for the chosen yarn).
* **Yarn needle.**
* **Stitch marker.**
* **Scissors.**
* **Fiberfill** for stuffing.
* **Rigid plastic disc** (approximately 8 cm in diameter) to stabilize the base.
* **Black embroidery floss** for eyes and eyelashes.
* **Brown embroidery floss** for eyebrows.
* **Pink, light brown, or sienna embroidery floss** for the mouth.
* **Cosmetic blush or pink pastel chalk** for the cheeks (optional).
* **Guide of useful tools for crocheting.**
Stitch Abbreviations
* **MR:** Magic ring.
* **ch:** Chain.
* **sc:** Single crochet.
* **inc:** Increase (2 single crochets in the same stitch).
* **dec:** Invisible decrease.
* **dc:** Double crochet.
* **sl st:** Slip stitch.
* **BLO:** Back Loop Only (crochet using the back loop only).
* **FLO:** Front Loop Only (crochet using the front loop only).
* **rep.:** Repeat.
* **next:** Next.
* **sts:** Stitches.
Part 1: The Flat Base of the Skirt (Black Color)
This section forms the circular base upon which the lawyer’s entire skirt will be built. The goal is to obtain a **completely flat circle**, as it will serve as the doll’s support on the table.
To prevent the circle from taking on a hexagonal shape, the increases in the even rounds will be **staggered**, shifting them relative to the previous round.
Round 1
Make a **Magic Ring** and crochet **6 sc** into the ring. Pull the short tail to completely close the center.
**How to check?**
You will get a small circle with 6 stitches. Place a marker in the last stitch made.
**Total:** 6 sc.
Round 2
Crochet **1 increase in each of the 6 stitches** from the previous round.
**How to do it?**
Insert the hook into the first stitch and make a single crochet. Without changing stitches, insert the hook into the same place again and make another single crochet. Repeat this procedure in all stitches.
**Total:** 12 sc.
Round 3
Crochet the sequence:
**(1 sc, 1 inc)** × 6
**How to do it?**
Make a single crochet in the first stitch and an increase in the next. Repeat the sequence until you reach the marker.
**Total:** 18 sc.
Round 4 (Staggered Increases)
Crochet:
**1 sc, 1 inc**, then **(2 sc, 1 inc)** × 5, and finish with **1 sc**.
**Why does the start change?**
The increases are shifted relative to the previous round, achieving a much more uniform circle and preventing the formation of six distinct sides.
**Total:** 24 sc.
Round 5
Crochet:
**(3 sc, 1 inc)** × 6
**Total:** 30 sc.
Round 6 (Staggered Increases)
Crochet:
**2 sc, 1 inc**, then **(4 sc, 1 inc)** × 5, and finish with **2 sc**.
**Total:** 36 sc.
Round 7
Crochet:
**(5 sc, 1 inc)** × 6
**Total:** 42 sc.
Round 8 (Staggered Increases)
Crochet:
**3 sc, 1 inc**, then **(6 sc, 1 inc)** × 5, and finish with **3 sc**.
**Total:** 48 sc.
Round 9
Crochet:
**(7 sc, 1 inc)** × 6
**Total:** 54 sc.
Round 10 (Staggered Increases)
Crochet:
**4 sc, 1 inc**, then **(8 sc, 1 inc)** × 5, and finish with **4 sc**.
**Total:** 60 sc.
Transition Toward the Height of the Skirt
Up to this point, the crochet piece is completely flat. In the next round, we will change the direction of the stitches to begin forming the walls of the skirt.
Round 11
Crochet **60 sc using the back loop only (BLO – Back Loop Only)**.
**How to do it?**
Look at the stitch from above: it is shaped like a “V”. Instead of inserting the hook under both strands of the “V”, insert it only through the back loop of each stitch.
This change creates a perfectly defined crease around the entire base, marking the beginning of the vertical walls of the skirt.
**Total:** 60 sc.
**Structural Tip (recommended for a 30 cm doll):**
> Before continuing with the next round, place a flexible plastic disc approximately **0.5 to 1 mm thick** inside, cut exactly to the diameter of the base. You can obtain it from a plastic folder or a food container. This reinforcement will prevent the base from deforming over time and will allow the doll to stand with greater stability.
New Stitch: Invisible Decrease (dec)
Starting from the next section, we will begin to gradually reduce the diameter of the skirt.
The **invisible decrease** allows you to reduce stitches without leaving visible gaps.
How to make an invisible decrease?
1. Insert the hook through the **front loop only (FLO)** of the next stitch.
2. Without finishing the stitch, insert the hook through the **front loop of the following stitch** as well.
3. Yarn over and pull it through both front loops.
4. Yarn over again and pull it through the two loops remaining on the hook.
This way, two stitches become one, resulting in a clean, firm, and practically invisible decrease, ideal for amigurumi.
Part 2: The Lower Body of the Skirt (Black Color)
In **Round 11**, we marked the bottom edge of the skirt using the **BLO (Back Loop Only)** technique. From this section forward, we will return to crocheting the stitches in the usual manner, working through both loops of each stitch.
The skirt of this lawyer doll has a **truncated cone** shape, so the decreases are made very gradually. This provides a firm, stable structure that is faithful to the doll’s silhouette.
Round-by-Round Instructions
Rounds 12 to 16 (5 rounds)
Crochet **60 sc**.
**How to do it?**
Make one single crochet in each stitch from the previous round, working through both loops of the stitch. Do not make any increases or decreases.
**Total per round:** 60 sc.
Round 17 (First Decrease)
Crochet the sequence:
**(8 sc, 1 dec)** × 6
**How to do it?**
Crochet eight single crochets normally. Next, make an **invisible decrease**, joining the next two stitches into one. Repeat this sequence six times throughout the round.
**Total:** 54 sc.
Rounds 18 to 22 (5 rounds)
Crochet **54 sc**.
Do not make any increases or decreases. These rounds allow the skirt to maintain a gentle slope before the next reduction.
**Total per round:** 54 sc.
Round 23
Crochet:
**(7 sc, 1 dec)** × 6
**Total:** 48 sc.
Rounds 24 to 28 (5 rounds)
Crochet **48 sc**.
One single crochet in each available stitch.
**Total per round:** 48 sc.
Round 29
Crochet:
**(6 sc, 1 dec)** × 6
**Total:** 42 sc.
Rounds 30 to 35 (6 rounds)
Crochet **42 sc**.
These rounds form the upper part of the skirt, where the slope begins to become slightly more visible without creating a waist that is too narrow.
**Total per round:** 42 sc.
Time to Place the Reinforcement and Stuffing
If you haven’t already, insert the plastic disc inside the base now and settle it against the flat bottom.
Begin to stuff firmly with fiberfill, distributing it especially toward the edges to keep the base completely flat and ensure that the doll can stand on its own without deforming.
Round 36
Crochet:
**(5 sc, 1 dec)** × 6
**Total:** 36 sc.
Rounds 37 to 42 (6 rounds)
Crochet **36 sc**.
These rounds stabilize the new shape before the final reduction of the skirt.
**Total per round:** 36 sc.
Round 43
Crochet:
**(4 sc, 1 dec)** × 6
**Total:** 30 sc.
Rounds 44 to 46 (3 rounds)
Crochet **30 sc**.
Do not make any increases or decreases.
Upon finishing round 46, you will have completed the doll’s skirt and waist. The structure will be stable, slightly tapered, and well-proportioned, faithfully reproducing the silhouette seen in the reference image.
**Total per round:** 30 sc.
Result Upon Finishing This Section
At the end of round 46 you will have:
* A completely flat and stable base.
* A skirt with a truncated cone shape, similar to the model.
* A waist of **30 stitches**, ready to begin the torso.
* The interior partially stuffed and reinforced with the plastic disc, providing stability to the entire structure.
Next Step
In the next section, we will begin crocheting the **torso**.
Although a white shirtfront is observed beneath the coat in the photograph, this corresponds to the **characteristic jabot of judicial attire**, an independent piece that will be crafted later.
For this reason, the torso will continue to be crocheted entirely in **black** until reaching the neck. Subsequently, the open coat and the white jabot will be added as separate pieces, achieving a finish much more faithful to the model in the image.
Part 3: The Upper Torso, Shirtfront, and Neck
We are coming from Round 45 with 30 stitches in black.
How to Make a Perfect (Invisible) Color Change:
In the last single crochet of round 45, insert the hook, yarn over with black, and pull up a loop (you have two black loops on your hook). Do not close the stitch with black. Take the new strand of white yarn and use it to close those two loops. The stitch will remain black at the bottom, but the top loop ready for the next round will be completely white.
Round-by-Round Instructions
Round 46 (Change to White Color)
Crochet **30 sc using the back loop only (BLO)**.
**Why BLO?:** This leaves a line of black front loops visible on the outside for the dress’s finish. Additionally, it helps the color change look perfectly straight.
**Total stitches:** 30 sc.
Round 47
Crochet **30 sc** normally, working through the complete stitch.
**Total stitches:** 30 sc.
Round 48 (Torso Decrease)
Crochet the sequence:
**(3 sc, 1 dec)** × 6
**How?:** Make 3 individual white stitches and then one invisible decrease. Repeat until the end of the round.
**Total stitches:** 24 sc.
Round 49
Crochet **24 sc** normally.
**Total stitches:** 24 sc.
**Time to stuff the torso!** Firmly insert fiberfill. Make sure to stuff the chest area well so that the structure maintains the planned height without bending.
Round 50 (Forming the Shoulders)
Crochet the sequence:
**(2 sc, 1 dec)** × 6
**Total stitches:** 18 sc.
Round 51 (Last Round of the Shirt)
Crochet the sequence:
**(1 sc, 1 dec)** × 6
**Change Note:** In the last stitch of this round, make the color change to **Skin Color**, following the same technique explained above.
**Total stitches:** 12 sc.
The Neck and the Pin/Dowel (Skin Color)
Here we apply your structure: the neck originates from 12 sc, widens to 15 sc, and from there it becomes the straight pin (*espiga*) that will go up for 7 identical rounds.
Round 52 (Start of the Neck)
Crochet **12 sc** in skin color normally, working through the complete stitch.
**Total stitches:** 12 sc.
Round 53 (Widening for the Pin)
Crochet the sequence:
**(3 sc, 1 inc)** × 3
**How and where?:** Crochet 3 normal stitches and make an increase in the fourth. Repeat this only 3 times in the round to reach the exact measurement of the pin.
**Total stitches:** 15 sc.
Rounds 54 to 60 (The 7 Identical Rounds of the Pin)
Crochet **15 sc** in each round straight up.
**How?:** One stitch over each stitch, without increasing or decreasing. This will form the firm skin-colored tube (the 15 sc pin) that will be inserted into the 18 sc cavity of the head.
**Total stitches per round:** 15 sc.
**Structural Tip for Assembly:**
Insert the rigid support (a silicone glue stick or plastic tube) inside the torso and along this entire pin. Stuff the cylinder of the pin very firmly with fiberfill. As you designed, when stuffed it will swell just enough so that, when fitted into the 18 sc cavity of the head, the fit will be airtight and precise.
Upon finishing round 60, slip stitch, fasten off leaving about 20 cm of yarn to secure, and weave in ends.
Part 4: The Coat with Lapels (Black Color)
The coat is crocheted **in rows (flat)**, from the top down, forming a single piece. During the first rows, distributed increases are made to widen the yoke. Later on, the spaces corresponding to the sleeves will be left unworked, and you will continue only with the body of the coat.
The front corners will subsequently become the small lapels characteristic of the coat during assembly.
Stitch Guide for Beginners in Rows
* **Chain (ch):** The foundation stitch to start a flat crochet piece.
* **Row (R):** Crocheting back and forth.
* **Triple Increase (triple-inc):** Crocheting **3 single crochets in the same stitch** from the previous row. This increase adds **2 new stitches** and allows the yoke of the coat to widen gradually.
Row-by-Row Instructions
Row 1 (Foundation)
Chain **29**. Starting from the second chain from the hook, crochet **28 sc**.
**Ch 1** and turn.
**Initial Reference Distribution:** These 28 stitches will serve as a guide for the growth of the yoke:
* 5 stitches: front left.
* 4 stitches: left shoulder area.
* 10 stitches: back.
* 4 stitches: right shoulder area.
* 5 stitches: front right.
**Total stitches:** 28 sc.
Row 2
Crochet:
* 5 sc.
* **1 triple-inc**.
* 4 sc.
* **1 triple-inc**.
* 10 sc.
* **1 triple-inc**.
* 4 sc.
* **1 triple-inc**.
* 5 sc.
**Ch 1** and turn.
**What happens in this row?**
The four triple increases widen the yoke of the coat, generating the necessary width so that the sleeves can be separated later without the coat being tight.
**Total stitches:** 36 sc.
Row 3
Crochet:
* 6 sc.
* **1 triple-inc**.
* 6 sc.
* **1 triple-inc**.
* 12 sc.
* **1 triple-inc**.
* 6 sc.
* **1 triple-inc**.
* 6 sc.
**Ch 1** and turn.
**Total stitches:** 44 sc.
Row 4
Crochet:
* 7 sc.
* **1 triple-inc**.
* 8 sc.
* **1 triple-inc**.
* 14 sc.
* **1 triple-inc**.
* 8 sc.
* **1 triple-inc**.
* 7 sc.
**Ch 1** and turn.
Upon finishing this row, the yoke will have the final width needed to separate the body and the sleeves later.
**Total stitches:** 52 sc.
Separation of the Sleeves
Row 5
In this row, the stitches intended for the sleeves will be set aside and the body of the coat will be joined.
Crochet:
* **8 sc** (front left).
* **Skip the next 10 stitches**, which will be reserved for the left sleeve.
* **16 sc** (back).
* **Skip the next 10 stitches**, reserving them for the right sleeve.
* **8 sc** (front right).
**Ch 1** and turn.
**Total body stitches:** 32 sc.
Growth of the Coat Body
Now that the sleeves have been set aside, we will continue only with the body of the coat.
Rows 6 to 15 (10 rows)
Crochet **32 sc** in each row.
At the end of each row, **ch 1** and turn.
These rows form the length of the coat, which will cover the torso and finish slightly above the start of the skirt.
**Total stitches per row:** 32 sc.
Row 16 (Finishing)
Crochet **32 sc**.
At the end of the row, **do not cut the yarn**.
Continue crocheting single crochets around the entire outer edge of the coat: go up the front left side, work around the neck, go down the front right side, and work across the bottom edge until you return to the starting stitch.
This border provides greater firmness to the coat and improves the finish of the lapels.
Fasten off and weave in ends.
Adjusting the Lapels During Assembly
Once the coat is placed on the doll, the first stitches of both fronts will tend to open slightly due to the shape of the neck.
Gently fold those corners outward to form the small lapels characteristic of the coat. If desired, you can secure them with a discreet invisible stitch using a yarn needle so they maintain their position.
Part 5: Arms, Hands, and Sleeves
Phase A: The Arms and Hands (Make 2 identical pieces – Skin Color)
The arms are crocheted from the hand toward the shoulder in a single tubular piece. The hand is sized proportionally to the doll’s body and represents a simple mitten with an independent thumb.
Stitch Guide for Beginners
* **Slip Stitch (sl st):** Insert the hook into the indicated stitch, yarn over, and pull it directly through the loop on the hook. It is used to close rounds and fasten off.
Round-by-Round Instructions (Hands and Arms)
Round 1
Make a **Magic Ring** and crochet **6 sc**.
Close the ring by pulling the short tail.
**Total:** 6 sc.
Round 2
Crochet **6 increases**.
**Total:** 12 sc.
Round 3
Crochet **12 sc**.
This round maintains the size of the hand without widening it excessively.
**Total:** 12 sc.
Rounds 4 to 7 (4 rounds)
Crochet **12 sc**.
These rounds form the palm of the hand.
**Total per round:** 12 sc.
Round 8 (Wrist)
Crochet the sequence:
**(2 sc, 1 dec)** × 3
**Total:** 9 sc.
Rounds 9 to 30 (22 rounds)
Crochet **9 sc** in each round.
Stuff the arm as you go. During the last rounds, place only a small amount of stuffing so that the shoulder retains some flexibility and the arms can rest naturally alongside the body.
**Total per round:** 9 sc.
Closing the arm
Upon finishing round 30, flatten the top opening of the arm and crochet **4 or 5 sc through both layers** to close it.
Cut the yarn, leaving approximately **20 cm** for sewing.
The Thumb (Make 2 identical pieces – Skin Color)
Round 1
Make a **Magic Ring** with **4 sc**.
**Total:** 4 pb.
Rounds 2 and 3
Crochet **4 sc**.
**Total per round:** 4 sc.
Fastening off
**Sl st 1**, cut the yarn leaving about **15 cm** for sewing.
It does not need stuffing due to its small size.
Finger Embroidery and Hand Assembly
Sew the thumb onto one of the sides of the hand, approximately between rounds **5 and 6**, positioning it slightly forward.
Embroider the fingers
With fine black thread, make **three small lines** on the front part of the hand to simulate the separation of the four visible fingers.
Phase B: The Coat Sleeves (Make 2 identical pieces – Black Color)
The sleeves originate directly from the spaces reserved during **Row 5 of Part 4**.
Round-by-Round Instructions (Sleeves)
Round 1
With **Black Color**, join the yarn at the bottom of the armhole.
Crochet the **10 reserved stitches** and add **2 additional sc**, one in each corner of the joint between the body and the sleeve, to prevent holes from forming.
**Total:** 12 sc.
Rounds 2 to 8 (7 rounds)
Crochet **12 sc**.
**Total per round:** 12 sc.
Round 9
Crochet the sequence:
**(4 sc, 1 dec)** × 2
**Total:** 10 sc.
Rounds 10 to 22 (13 rounds)
Crochet **10 sc**.
You can check the length by sliding the sleeve over the finished arm. It should cover it up to the wrist without extending past it.
**Total per round:** 10 sc.
Round 23 (Finishing)
Crochet **10 slip stitches (sl st)** around the entire round to form a clean edge.
Cut the yarn and hide the ends inside the sleeve.
Final Assembly of the Arm
1. First, sew the finished arm to the torso using the long yarn tail left at the shoulder.
2. Once the arm is secured, slide the black sleeve from the hand toward the shoulder until the arm is completely covered.
3. Align the sleeve with the armhole of the coat and secure it using small invisible stitches around the shoulder.
This way, the joint remains hidden under the sleeve and the arm retains a natural drape, similar to the one observed on the reference doll.
Part 6: The Head with Cavity (Skin Color)
Phase A: The Crown and Widening (Multiples of 6)
To achieve a well-proportioned head for a **30 cm** doll, we will widen the piece through regular increases of **6 stitches per round** until reaching a maximum diameter of **54 stitches**, obtaining a balanced sphere that will maintain the proportions observed in the doll.
* **Round 1:** Start with a **Magic Ring** and insert **6 sc**. Pull the short tail to completely close the center.
* **Total stitches:** 6 sc.
* **Round 2:** Crochet **6 inc** (1 increase in each stitch from the previous round).
* **Total stitches:** 12 sc.
* **Round 3:** Crochet the sequence of **(1 sc, 1 inc)** repeated **6 times**.
* **Total stitches:** 18 sc.
* **Round 4:** Crochet the sequence of **(2 sc, 1 inc)** repeated **6 times**.
* **Total stitches:** 24 sc.
* **Round 5:** Crochet the sequence of **(3 sc, 1 inc)** repeated **6 times**.
* **Total stitches:** 30 sc.
* **Round 6:** Crochet the sequence of **(4 sc, 1 inc)** repeated **6 times**.
* **Total stitches:** 36 sc.
* **Round 7:** Crochet the sequence of **(5 sc, 1 inc)** repeated **6 times**.
* **Total stitches:** 42 sc.
* **Round 8:** Crochet the sequence of **(6 sc, 1 inc)** repeated **6 times**.
* **Total stitches:** 48 sc.
* **Round 9:** Crochet the sequence of **(7 sc, 1 inc)** repeated **6 times**.
* **Total stitches:** 54 sc.
Phase B: Height of the Head (Straight Rounds)
* **Rounds 10 to 23 (14 rounds in total):** Crochet **54 sc** in each round, without making any increases or decreases.
* *When to place the facial details?* This is the ideal time to embroider the closed eyes, the eyelashes, and the small smile characteristic of the doll. It is recommended to position the eyes between **rounds 16 and 17**, leaving approximately **8 stitches of separation** between them. Embroidering the face before stuffing makes the work considerably easier.
* **Total stitches per round:** 54 sc.
Phase C: Closing Toward the Base (Multiples of 6)
We will begin to reduce the sphere in a completely symmetrical manner until obtaining the **18 stitches** needed to construct the inner cavity.
* **Round 24:** Crochet the sequence of **(7 sc, 1 dec)** repeated **6 times**.
* **Total stitches:** 48 sc.
* **Round 25:** Crochet the sequence of **(6 sc, 1 dec)** repeated **6 times**.
* **Total stitches:** 42 sc.
* **Round 26:** Crochet the sequence of **(5 sc, 1 dec)** repeated **6 times**.
* **Total stitches:** 36 sc.
* **Round 27:** Crochet the sequence of **(4 sc, 1 dec)** repeated **6 times**.
* **Total stitches:** 30 sc.
* **Round 28:** Crochet the sequence of **(3 sc, 1 dec)** repeated **6 times**.
* **Total stitches:** 24 sc.
* **Round 29:** Crochet the sequence of **(2 sc, 1 dec)** repeated **6 times**.
* **Total stitches:** 18 sc.
* *Time to stuff:* Before starting the internal cavity, firmly stuff the entire head with fiberfill, distributing it evenly to maintain a perfectly rounded shape. Leave the central 18-stitch opening completely clear.
Phase D: Creation of the Internal Cavity (7 Identical Rounds)
From this point forward, we will begin crocheting the inner cylinder that will form the cavity where the neck pin will subsequently fit.
* **Rounds 30 to 36 (7 identical rounds of the cavity):** Crochet **18 sc** in each round, without making any increases or decreases.
* *How is the cavity formed?* Simply continue crocheting normally over the 18 stitches obtained in the previous round. As you progress, the cylinder will naturally grow toward the inside of the head, forming the housing where the neck pin will fit. It is not necessary to fold or push the fabric during this process.
* **Total stitches per round:** 18 sc.
*Upon finishing round 36, **slip stitch (sl st) 1**, cut the yarn leaving enough length to sew the head to the neck later, and carefully fasten off.*
**Stuffing Instruction:** The fiberfill should rest only between the outer wall of the head (rounds 10 to 29) and the wall of the inner cylinder (rounds 30 to 36). **Do not place stuffing inside the 18-stitch cavity**, as it must remain completely clear to receive the neck pin during assembly. This results in a firm, centered, and practically invisible joint.
Part 7: Attached Hair and Bun (Dark Brown or Black Color)
The lawyer’s hairstyle is formed by a **middle part**, the hair completely combed back, and a **high, compact bun** located on the upper-back part of the head.
To reproduce this hairstyle, the hair strands will first be attached following the central line of the head, and subsequently, a separately crocheted bun will be sewn on.
Stitch Guide for Beginners in Hair Attachment
* **Chain (ch):** The foundation stitch used to form each strand.
* **Single Crochet (sc):** Used to give body to each strand before securing it back to the head.
* **Slip Stitch (sl st):** Used to secure each strand to the head.
Phase A: The Middle Part
The part originates at the crown and descends to the center of the forehead.
1. Insert the hook into **Round 1** of the head and secure the yarn with a slip knot.
2. Continue advancing through the center of the head until approximately **Round 13**, forming the dividing line of the hairstyle.
3. The strands will be formed over each stitch along this line.
Phase B: Attaching the Strands
Front Strands (2 units)
These strands softly frame the face.
* **Location:** On each side of the forehead, approximately at **Round 12**.
* **Crocheting each strand:**
* Chain **24**.
* Working back from the second chain, crochet **23 sc**.
* Secure with **1 sl st** to the next stitch on the head.
Upper Strands
Working over the entire central part.
In each stitch, make:
* Chain **28**.
* Working back, crochet **27 sc**.
* Secure with **1 sl st**.
* Repeat until the upper part of the head is completely covered.
Back Strands
In the back area, make slightly longer strands.
Each strand is worked as follows:
* Chain **32**.
* Working back, crochet **31 sc**.
* Secure with **1 sl st**.
* Continue until the nape of the neck is completely covered.
**Styling the hair:**
Once all the strands are finished, carefully comb them backward using your fingers or a yarn needle. Distribute them evenly to cover the entire head without leaving visible gaps. When the hairstyle is completely arranged, secure the strands with small invisible stitches in the area where the bun will subsequently be placed.
Phase C: The High Bun (Crocheted Separately)
The bun is rounded, compact, and slightly flattened, occupying approximately half the width of the head.
Round 1
In a **Magic Ring**, crochet **6 sc**.
**Total:** 6 sc.
Round 2
Crochet **6 inc**.
**Total:** 12 sc.
Round 3
Crochet **(1 sc, 1 inc)** repeated **6 times**.
**Total:** 18 sc.
Round 4
Crochet **(2 sc, 1 inc)** repeated **6 times**.
**Total:** 24 sc.
Round 5
Crochet **(3 sc, 1 inc)** repeated **6 times**.
**Total:** 30 sc.
Round 6
Crochet **(4 sc, 1 inc)** repeated **6 times**.
**Total:** 36 sc.
Rounds 7 to 9 (3 rounds)
Crochet **36 sc**.
These rounds provide the volume for the bun without making it excessively high.
**Total per round:** 36 sc.
Round 10
Crochet the sequence of **(4 sc, 1 dec)** repeated **6 times**.
**Total:** 30 sc.
Round 11
Crochet the sequence of **(3 sc, 1 dec)** repeated **6 times**.
**Total:** 24 sc.
Fastening off
Stuff the bun firmly with fiberfill.
**Slip stitch 1**, cut the yarn leaving approximately **40 cm** for sewing.
Assembly of the Bun
Position the bun on the upper-back part of the head, exactly where all the strands converge.
Check that it remains centered relative to the hair part.
Sew it around its entire base using invisible stitches, securing the underlying strands simultaneously to completely hide the joints.
Details and Facial Embroidery
When observing the doll’s face, a soft and serene expression can be seen.
1. Nose
* **Location:** Centered between both eyes.
* **Instruction:** Embroider a small horizontal stitch with skin-colored yarn or make a slight raised stitch to form a very discreet nose.
2. Eyes
* **Location:** Between rounds **16 and 17**.
* **Separation:** Approximately **8 stitches** between both eyes.
* **Embroidery:** Embroider a softly downward-curved arc approximately **3 stitches** wide with fine black thread.
3. Eyelashes
With the same black thread, embroider **two or three small eyelashes** at the outer corner of each eye, angling them slightly upward.
4. Eyebrows
* **Color:** Dark brown.
* **Location:** Two rounds above the eyes.
* **Instruction:** Embroider a small, slightly slanted line approximately **2 stitches** in length.
5. Mouth
* **Color:** Medium brown or dusty rose.
* **Location:** Two rounds below the nose.
* **Instruction:** Embroider a small open “U”-shaped curve approximately **2 stitches** wide.
6. Blush
* **Location:** Below the outer corner of each eye.
* **Application:** Apply a small amount of cosmetic blush or pink pastel chalk with a soft-bristled brush using circular motions for a delicate finish.
Part 8: Amigurumi Law Book
Project Details
* **Final size:** Approximately **6.5 cm tall × 5 cm wide × 1.2 cm thick.**
* **Gauge reference:** Using the same tension as the rest of the doll, approximately **3 single crochets per centimeter**.
Section 1: Front Cover, Spine, and Back Cover (One Single Piece)
The cover is crocheted around a foundation chain, forming a continuous rectangular piece that will subsequently wrap around the block of pages.
Foundation
Chain **21**.
Round 1
Starting in the second chain from the hook:
* 19 sc
* 3 sc in the last chain
Continue on the opposite side of the chain:
* 18 sc
* 1 increase in the last chain
**Total:** 42 sc.
Round 2
Crochet:
* 1 increase
* 18 sc
* 3 increases
* 18 sc
* 2 increases
**Total:** 48 sc.
Rounds 3 to 14
Crochet **48 sc**.
These rounds provide the thickness for the book covers.
**Total per round:** 48 sc.
Round 15 (Spine)
Gently fold the piece in the middle to identify the spine.
Crochet **48 sc using the back loop only (BLO)** of the stitches located along the central line of the spine. This creates a flexible crease that will allow the book to open slightly once finished.
Fasten off, leaving a long tail for assembly.
Section 2: Inner Pages (Cream or Ivory Color)
The pages are crocheted as independent blocks that are subsequently stacked inside the cover.
Foundation
Chain **19**.
Round 1
From the second chain:
* 17 sc
* 3 sc in the last chain
Continue on the opposite side:
* 16 sc
* 1 increase
**Total:** 38 sc.
Round 2
* 1 increase
* 16 sc
* 3 increases
* 16 sc
* 2 increases
**Total:** 44 sc.
Rounds 3 to 10
Crochet **44 sc**.
**Total per round:** 44 sc.
Make **3 identical pieces**.
When stacked, they create a thickness very similar to the one observed in the photograph.
Section 3: Assembly
1. Stack the three inner page pieces, perfectly aligning all their edges.
2. Join them together using several stitches in the spine area so they form a single compact block.
3. Insert the block inside the cover.
4. Place a small amount of stuffing only inside each cover to provide firmness without deforming them.
5. Sew the block of pages to the central line of the spine using invisible stitches.
6. Finally, secure the covers to the inner block using a few hidden stitches near the spine, allowing the book to open slightly and maintain the appearance of an authentic law book, just like the one the lawyer holds in the article’s cover image.

Spanish version of this same pattern
another amigurumi lawyer pattern

Video tutorial for knitting another doll design
Pattern in several languages found on Etsy to knit this wonderful little doll
Affiliate Disclosure:
This post contains affiliate links. If you purchase through them, I may earn a small commission at no extra cost to you. Thank you for supporting my work!
Este artículo contiene enlaces de afiliado, lo que significa que si comprás desde aquí, recibimos una pequeña comisión sin costo extra para vos. ¡Gracias por apoyar nuestro trabajo!
Discover more crochet patterns, free downloads, and premium PDFs on Ko-fi.