
The amigurumi doll in an elegant red dress crochet pattern is a sophisticated project designed for creators who value both technique and artistic detail. This stunning 30 cm doll features a structured gala skirt with deep pleats, a refined silhouette, and elegant finishing touches that create a boutique-quality result. Using advanced methods like internal neck support and precision shaping, this pattern ensures stability and a polished look. Ideal for intermediate to advanced crocheters, it’s perfect for gifts, collectors, home decor, or selling online. A unique crochet design that blends engineering, beauty, and handmade craftsmanship in every stitch.
**Amigurumi doll in an elegant red dress: A Masterpiece of Crochet Design**
Embark on a creative journey to craft a stunning **Amigurumi doll in an elegant red dress**, a project that transcends traditional toy making to become a true piece of textile art. Standing at a majestic 30 cm, this doll is designed for those who appreciate the intersection of technical precision and aesthetic beauty. Every detail, from the structural integrity of the neck to the weight of the yarn, has been carefully selected to ensure a professional, boutique-quality finish.
**Sophistication in Every Stitch**
The centerpiece of this design is undoubtedly the gala skirt. By utilizing advanced techniques such as grouping increases to create deep, structural pleats, the dress achieves a natural volume that allows the doll to stand with presence. The vibrant red cotton yarn provides a striking contrast against the soft skin tones, while the off-the-shoulder lace ruffle adds a touch of classic high-fashion elegance.
**Engineering Meets Artistry**
Beyond its outward beauty, this pattern introduces the “mortise and tenon” stability system. This internal engineering ensures that the head remains upright and secure, supporting the weight of the signature high-bun hairstyle. Whether you are creating this for a special collection or as a cherished gift, this project offers an rewarding challenge that will elevate your crochet skills to a professional level.
Project Technical Sheet
**Project Size:** This finished doll stands approximately 30 cm tall when using the recommended materials. It is an ideal size for both play and shelf display, offering a majestic presence thanks to the volume of her skirt.
**Difficulty Level:**
Intermediate. Although the instructions are detailed step-by-step so an enthusiastic beginner can follow along, the pattern includes technical challenges such as joining legs with chain stitches, creating structural pleats in the skirt, and the “mortise and tenon” stability system for the neck.
**Estimated Crochet Time:**
Between 12 and 15 hours of net work. This time may vary depending on your crochet pace and experience. Most of the time is dedicated to the gala skirt due to the high stitch count in the final rounds and the detailed high-bun hairstyle.
Materials List
* **Yarn:** 100% Cotton, medium weight (4-ply/DK) in colors: Skin (beige or cream), Vibrant Red (for the dress), and Brown (for the hair). A bit of Black for the shoes.
* **Crochet Hook:** 2.5 mm or 3.0 mm (depending on your tension so the fabric is tight and stuffing doesn’t show).
* **Stuffing:** High-quality polyester fiberfill (cloud type).
* **Eyes:** 10 mm or 12 mm safety eyes (or black embroidery thread if you prefer to embroider them).
* **Stability Support:** A thick silicone (hot glue) stick or a plastic support to insert into the neck “tenon.”
* **Extras:** Yarn needle, scissors, stitch markers, pins, two small pearls for earrings, and a bit of blush or soft pastels for the cheeks.
Guide to useful tools for crocheting
Stitch Abbreviations (US Terms)
For this pattern, we will use the following nomenclature:
* **MR:** Magic Ring (Base for crocheting in a spiral).
* **ch:** Chain.
* **sc:** Single Crochet.
* **dc:** Double Crochet (used exclusively for the neckline ruffle).
* **hdc:** Half Double Crochet (used for the ears).
* **inc:** Increase (2 stitches in the same base stitch).
* **dec:** Decrease (Close 2 stitches together, preferably using the invisible technique).
* **sl st:** Slip Stitch.
* **BLO:** Back Loop Only.
* **FLO:** Front Loop Only.
* **x 6:** Repeat the sequence the indicated number of times.
* **( ) :** The total number of stitches at the end of the round.
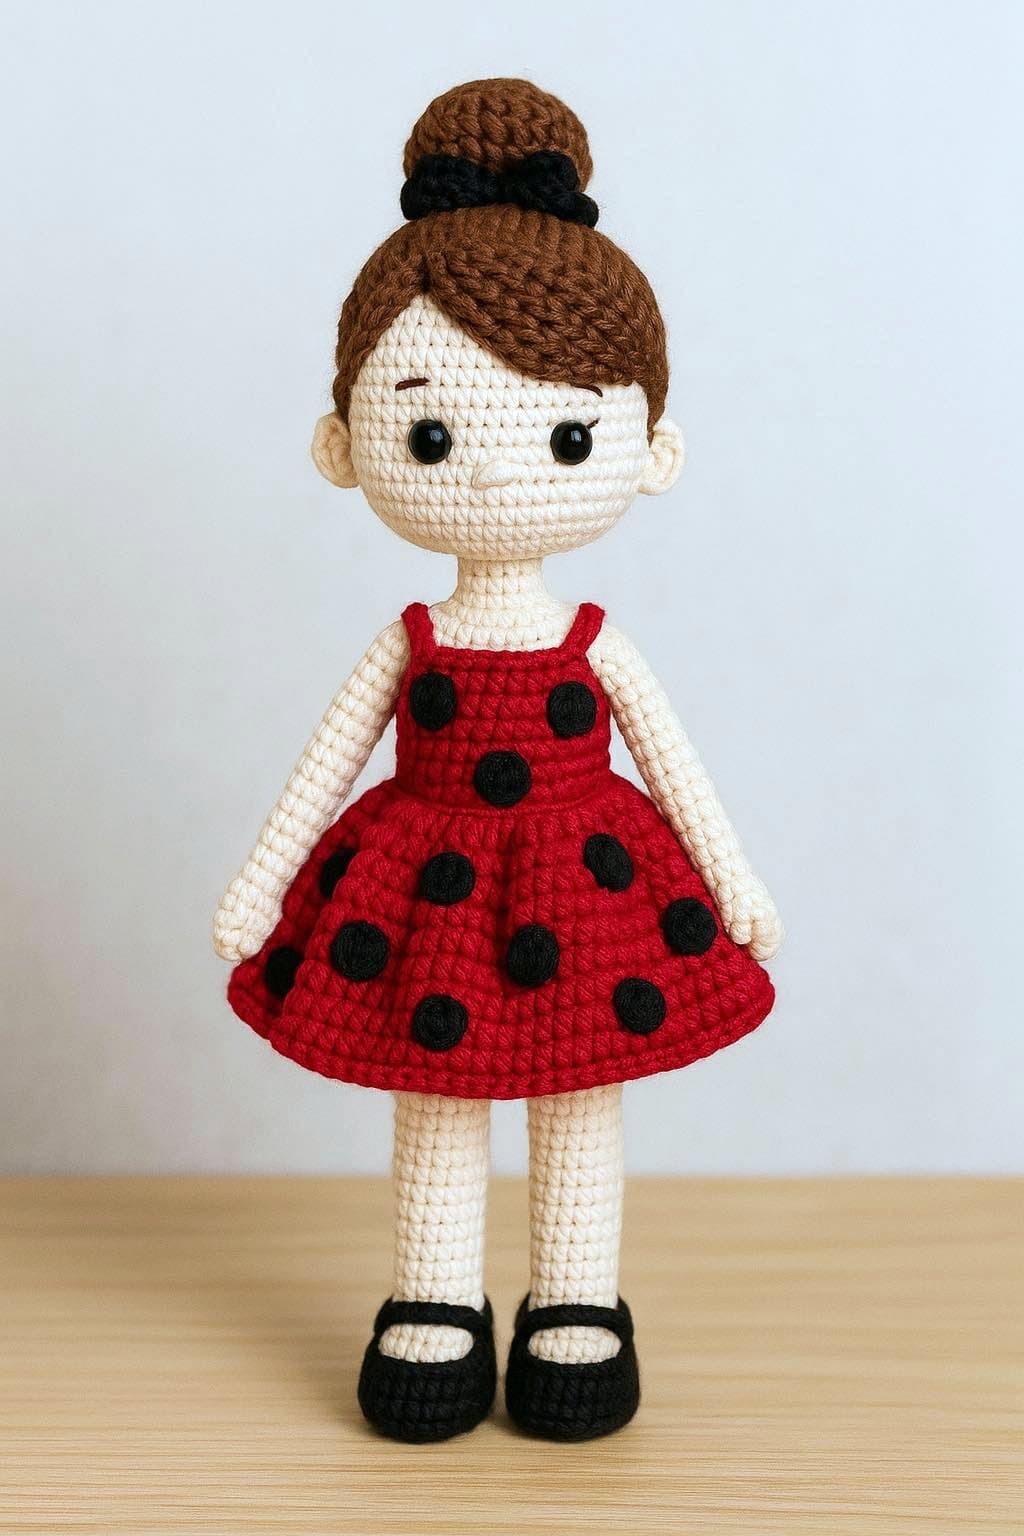
Polka-dotted amigurumi doll: Complete Crochet Pattern & Technical Guide
Step-by-step crochet PDF pattern with colorwork and full assembly guide.
Step 1: The Shoes (Make 2)
**Color:** Black or your preferred color for footwear.
**Recommended Material:** Medium-weight cotton yarn and a 2.5 mm or 3.0 mm hook.
* **Round 1: The base chain**
We begin by crocheting a foundation chain of 7 chains. The footwear is not crocheted in a closed circle, but around this chain (like a track).
* Starting in the second chain from the hook: crochet 5 sc.
* In the last chain, crochet 3 sc in the same hole (this helps us turn to the other side of the chain).
* Now crochet along the bottom “loops” of the chains that remained free: 4 sc.
* In the last space (where we started), crochet 1 inc (2 sc in the same place).
* **Total stitches: 14 sc.**
* **Round 2: Growing outwards**
1 inc in the first stitch of the previous round (always place your marker here), 4 sc, 3 inc in a row (this forms the curve of the toe), 4 sc, 2 inc in a row. **Total stitches: 20 sc.**
* **Round 3: Defining the sole**
1 sc, 1 inc, 4 sc, (1 sc, 1 inc) repeated 3 times, 4 sc, (1 sc, 1 inc) repeated 2 times. **Total stitches: 26 sc.**
* **Round 4: Changing direction (Sole effect)**
To stop the shoe from being flat and start moving upwards, we will crochet this round in **Back Loop Only (BLO)**.
Crochet 26 sc taking only the back loop of each stitch. This will create a ridge or “step” that separates the sole from the sides of the shoe.
* **Rounds 5 and 6: Shoe height**
Crochet 26 sc (taking the full stitch normally) for these two rounds. This gives body to the shoe before we start closing it.
* **Round 7: Starting to shape (Decreases)**
This is where the shoe stops looking like a “little boat” and starts to close over the instep.
* Crochet 7 sc.
* Now, make 6 decreases in a row.
* *How to decrease?* To make it “invisible” and professional: insert the hook into the front loop of the first stitch and then into the front loop of the second stitch. Yarn over, pull through those two loops, yarn over again and close the stitch.
* Finish the round with 7 sc. **Total stitches: 20 sc.**
* **Round 8: Final shoe adjustment**
Crochet 5 sc. Perform 5 decreases in a row (this will close the front of the shoe). Finish with 5 sc. **Total stitches: 15 sc.**
* **Round 9: The shoe edge**
Crochet 15 sc all around.
**Important Note:** If you want the shoe to be part of the foot (as a fixed shoe), perform the color change to skin color in the last stitch of this round.
“How, When, and Where” Tips:
* **When to stuff?** Not now! If you stuff the shoe now, the stuffing fibers will snag on your hook while you crochet the legs, and the work will look messy. We will wait until we have a few rounds of the leg (skin color) to start stuffing only the tip of the foot.
* **Where to place decreases?** Ensure the decreases in Rounds 7 and 8 are centered exactly at the front. If you notice they are drifting to one side, you can crochet one more or one less stitch at the beginning to center them; every crocheter has a different tension and sometimes the fabric “rotates” a bit.
* **How to make a clean color change?** In the last stitch of Round 9 (black), insert hook, yarn over and pull up a loop (you have 2 loops on the hook). Do not close the stitch with black. Take the skin color, put it on your finger, and close those two loops with the new color. Done! The next round will be entirely in skin color.
Step 2: The Legs
**Color:** Skin (Beige, cream, or your chosen tone).
* **Rounds 10 to 14: Stabilizing the ankle**
We will crochet these 5 rounds simply to create the ankle area and the base of the calf.
* **Rounds 10 to 14:** Crochet 15 sc in each round. **Total stitches: 15 sc.**
* **Round 15: A small increase for the calf**
To ensure the leg isn’t a straight tube and has a more anatomical shape (as seen in the reference image), we will add a bit of volume.
* Crochet 4 sc, 1 inc. Repeat this sequence 3 times in total. **Total stitches: 18 sc.**
* **Rounds 16 to 35: Leg length**
This is where we give our doll her height. We will crochet straight.
* **Rounds 16 to 35:** Crochet 18 sc in each round. **Total stitches: 18 sc.**
**Note for the second leg:** When you finish the first leg, cut the yarn and fasten off. However, when you finish the second leg, **DO NOT** cut the yarn, as we will continue from there to join the two legs and start the body.
“How, When, and Where” Explanations:
* **When to stuff?** Now! As you move up (every 5 or 6 rounds), add the stuffing (fiberfill).
* **How:** Use the back of your crochet hook or a wooden stick to push the stuffing down to the tip of the shoe.
* **Expert Tip:** Stuff the foot and ankle area firmly, but do not “explode” the fabric. If you overstuff, the stitches will stretch open and the white cotton will show. The leg should be firm like a carrot, not soft.
* **Where to position the fabric?** If you notice your fabric leaning slightly to the right (normal due to the anatomy of the single crochet stitch), don’t worry. The important thing is that at the end, when we join the legs, both are the same height.
* **How to make the legs identical?** The secret is counting rounds. If you did 35 rounds on the first leg, you must do exactly the same on the second. If you get distracted, use a row counter or mark a tally on paper for each finished round.
Step 3: Joining the Legs and the Body
We’ve reached one of the key moments! Joining the legs is what determines if the doll will stand straight and if the body will have the necessary support for the dress.
For a 30 cm doll, we aren’t going to join the legs right against each other; we will leave a small space with foundation chains to give volume to the hips.
**Important:** Make sure the tips of the toes are pointing forward. If necessary, crochet a few extra stitches on the leg where you have the yarn (the second leg) to reach the inner side of the leg.
The Join
1. From the second leg, **ch 3**.
2. Locate the inner side of the first leg (the one you fastened off) and join to it by making **1 sc**. This will now be our new “beginning of the round.” **Place your marker here!**
* **Round 36: Creating the body base**
Now we will crochet all the way around, passing through the legs and the joining chains.
* Crochet 18 sc over the first leg.
* Upon reaching the chains, crochet 3 sc over one side of the 3 chains.
* Crochet 18 sc over the second leg.
* Crochet 3 sc over the other side of the 3 joining chains.
* **Total stitches: 42 sc.**
* **Rounds 37 to 43:** Crochet 42 sc in each round.
Step 4: The Torso and the Waist Mark
We continue from Round 43 (where we had 42 stitches).
* **Rounds 44 to 45: Rising up the abdomen**
Crochet 42 sc in each round.
* **Round 46: First waist decreases**
To give the red dress in the image that flared shape, we need the waist to be a bit narrower than the hips.
* Crochet (5 sc, 1 dec) x 6.
* **Total stitches: 36 sc.**
* **The Key Round (BLO for the skirt)**
This is where we prepare the ground for the dress.
* **Round 47: Crochet 36 sc taking the Back Loop Only (BLO).**
In this round, insert the hook only through the loop at the back of the base stitch. You will see a horizontal line of free loops remaining on the front of the doll. This is where the dress will be born later!
* **Rounds 48 to 50: Rising toward the chest**
Now we go back to crocheting through both loops normally.
* Crochet 36 sc in each round.
“How, When, and Where” Explanations:
* **How to position the waist?** The line we left in Round 47 should be approximately at the height of what would be the doll’s belly button. If you feel it is too low, you can crochet one more normal round before the BLO round.
* **When to stuff the body?** As you move up through Round 50, the body will start to close further up. It is a good time to firmly stuff the hip area.
* **Stability Trick:** Ensure the stuffing at the leg join is very compact so the doll doesn’t “fold” in half when we add the weight of the dress.
* **Where to place the support structure?** As mentioned before, if you are going to use a silicone stick or a central support, this is the time to insert it into the stuffing. It should start from the base of the leg join and rise through the center of the torso.
Step 5: Shoulders and Stability Tenon
We continue from Round 50 (where we had 36 stitches).
* **Round 51: Reducing toward the chest**
* Crochet (4 sc, 1 dec) x 6.
* **Total stitches: 30 sc.**
* **Round 52: Straight round**
* Crochet 30 sc. (This gives height to the chest before the shoulders).
* **Round 53: Forming the shoulders**
Here we close faster to create the slope of the shoulders. **This must be crocheted in BLO (taking the back loop)** so we can later crochet the lace ruffle over the shoulders on the remaining front loops.
* Crochet (3 sc, 1 dec) x 6.
* **Total stitches: 24 sc.**
* **Round 54: Neck preparation**
* Crochet (2 sc, 1 dec) x 6.
* **Total stitches: 18 sc.**
* *Firmly stuff the torso. If using an internal support (like the silicone stick), ensure it is centered and surrounded by stuffing.*
* **Round 55: The neck**
* Crochet (4 sc, 1 dec) x 3.
* **Total stitches: 15 sc.**
* **Rounds 56 and 57:** Crochet 15 sc in each round. (This is the visible neck seen in the photo).
Step 6: The Tenon (Internal Support)
Now we are going to crochet the section that will be “hidden” inside the head. We will continue with the same skin color.
* **Rounds 58 to 63: The 6 tenon rounds.** * Crochet 15 sc in each round.
* Upon finishing Round 63, make a slip stitch, cut the yarn (it doesn’t need to be very long), and weave in the end.
“How, When, and Where” Explanations:
* **How to stuff the tenon?** This is the secret to stability. The 15-stitch tenon must be very, very firm. Stuff it as you go up. If you used a silicone stick, the tenon should cover it. It should look like a rigid cylinder.
* **Why 15 stitches?** This is the ideal measurement for it to be thick enough to provide support, but thin enough to fit into the head cavity (which we will make with 18 stitches so it fits loosely but without wobbling).
* **When to attach the arms?** In this pattern, as we seek simplicity for beginners, we will crochet the arms separately and sew them on after finishing the torso, just below the neckline. This makes it easier to calculate symmetry.
**Structure Summary:**
Now you have a body with a “stick” of fabric coming out of the neck. Don’t be alarmed if it looks strange; this is the engineering that will make your doll durable.
Step 7: The Gala Skirt with Deep Pleats
**Base:** 36 stitches in the **Front Loops Only (FLO)** of the waist.
* **Round 1: The Pleat Base**
Crochet 36 sc (one stitch in each loop). This creates the “hinge” of the skirt so that it doesn’t lift toward the chest but falls downward.
* **Round 2: The Volume Explosion**
To create those box pleats seen in the image, we will apply a sequence of 3 increases and 1 sc repeatedly.
* **Sequence:** (1 inc, 1 inc, 1 inc, 1 sc) repeated 9 times.
* **Total stitches: 63 sc.**
* *Technical Conclusion:* By grouping three increases in a row and stopping with a single crochet, the fabric is forced to “pucker out” (the pleat), and the single crochet acts as the bottom of the fold (the valley).
* **Round 3: Defining the Pleat**
To ensure the pleat isn’t lost, in this round we will increase only in the stitches that were already increases.
* **Sequence:** [(1 sc, 1 inc) repeated 3 times, 1 sc] Repeat this entire block 9 times.
* **Total stitches: 90 sc.**
* **Rounds 4 to 8: The “Drop” Step**
This is where the single crochet will provide stiffness. We crochet straight so the pleat stretches downward and gains weight.
* **Rounds 4 to 8:** Crochet 90 sc in each round.
* **Round 9: Second Expansion Step**
To ensure the skirt isn’t a tube of pleats but opens into an “A-line” as in the photo:
* Crochet (4 sc, 1 inc) all around.
* **Total stitches: 108 sc.**
* **Rounds 10 to 15: Growth**
* Crochet 108 sc in each round.
* **Round 16: Third Expansion Step (Final Flare)**
* Crochet (5 sc, 1 inc) all around.
* **Total stitches: 126 sc.**
* **Round 17 until the end (30 cm total height):**
* Crochet 126 sc in each round until reaching the length of the shoe.
The “How and Where”:
* **Volume:** By concentrating the increases at the beginning (Rounds 2 and 3), you generate an excess of fabric that the waist diameter cannot contain flatly. The fabric folds on its own.
* **Rigidity:** Having 126 single crochets at the end makes the base of the skirt a very solid circle. This ensures that when standing, the skirt maintains the perfect spherical shape seen in the photo without the need for extra stuffing under the dress.
Step 8: The Neckline Ruffle (Lace)
**Color:** Red.
To crochet this, we will pick up the **Front Loops (FLO)** that we left ready in Round 53 of the shoulders.
* **Round 1: The ruffle base** * Attach the red yarn to the free loop from Round 53.
* Crochet 24 sc (one stitch in each loop). This gives us a clean red base over the chest.
* **Round 2: The birth of the pleat (“Lace” Effect)** In the image, the ruffle has a lot of movement but is short. To achieve this on a small surface, we need many stitches.
* Crochet 3 Double Crochets (dc) in each stitch of the previous round.
* *Why double crochets here?* Although the rest of the dress is in single crochet, for the neckline ruffle, the double crochet gives a more delicate finish, similar to lace, and allows the ruffle to drape downward covering the shoulders.
* **Total stitches: 72 dc.**
* **Round 3: Decorative finish (Waves)** To imitate that textured edge seen in the photo:
* Crochet the sequence: (1 slip stitch, ch 2, 1 slip stitch in the same stitch).
* Skip one stitch and repeat in the next.
This will create a “toothed” or very small lace edge that gives the final touch of elegance.
“How, When, and Where” Explanations:
* **How does it sit on the shoulders?** Since this 30 cm doll will have the arms sewn just below this line, the ruffle will naturally fall over the top of the arms, hiding the seam and creating that “off-the-shoulder” dress effect.
* **When to crochet it?** It is ideal to do it now that the body is finished but the head is not yet attached, giving you full visibility of the neck.
* **Where to fasten off?** Cut the yarn leaving about 10 cm, use a yarn needle to hide the end inside the doll’s body, making sure the starting knot is also well hidden.
Step 9: Structured Arms (Make 2)
**Color:** Skin.
**Technical Base:** We will start with a wider hand and work our way up with a stitch count that gives the arm “body.”
* **Round 1: Magic Ring**
Create a magic ring with 6 sc.
* **Round 2: Increases**
Crochet 6 inc (2 sc in each stitch).
**Total stitches: 12 sc.**
* **Rounds 3 to 5: The palm of the hand**
Crochet 12 sc in each round. (This creates a rounded hand, matching the doll’s facial style).
* **Round 6: Wrist decrease and shaping**
Here we narrow the piece so it doesn’t look like a straight tube.
Crochet (2 sc, 1 dec) repeated 3 times.
**Total stitches: 9 sc.**
* **Rounds 7 to 26: Length of the arm**
An arm with 9 stitches will have just the right thickness.
Crochet 9 sc in each round.
**Measurement Note:** Stop when the arm, when placed against the body, reaches a couple of rounds above the start of the skirt.
“How, When, and Where” Explanations:
* **How to shape it?**
* Stuff the hand firmly.
* Stuff the arm only halfway (the elbow area) with medium density.
* Leave the upper part without stuffing. By keeping it flat, the seam to the body will be invisible under the neckline ruffle, and the arm will have a natural drape over the dress.
* **When to close?**
When finished, flatten the upper part. You will see you have 9 stitches; to close it flat, crochet 4 sc through both sides of the piece.
Step 10: The Head (From the Crown)
**Color:** Skin.
**Technique:** Spiral in multiples of 6.
Increase Rounds (Crown)
1. **Magic Ring** of **6 sc**.
2. **6 inc** (12 sc).
3. **(1 sc, 1 inc)** x 6 (18 sc).
4. **(2 sc, 1 inc)** x 6 (24 sc).
5. **(3 sc, 1 inc)** x 6 (30 sc).
6. **(4 sc, 1 inc)** x 6 (36 sc).
7. **(5 sc, 1 inc)** x 6 (42 sc).
8. **(6 sc, 1 inc)** x 6 (48 sc).
9. **(7 sc, 1 inc)** x 6 (54 sc).
10. **(8 sc, 1 inc)** x 6 (**60 sc**).
Straight Rounds (Face)
* **Rounds 11 to 22:** Crochet **60 sc** in each round.
> **Eye Placement:** If using safety eyes, place them between rounds 17 and 18 with about 10 or 12 stitches of separation.
Decrease Rounds (Base of the Head)
Here we begin to close to form the chin and prepare the opening.
23. **(8 sc, 1 dec)** x 6 (54 sc).
24. **(7 sc, 1 dec)** x 6 (48 sc).
25. **(6 sc, 1 dec)** x 6 (42 sc).
26. **(5 sc, 1 dec)** x 6 (36 sc).
27. **(4 sc, 1 dec)** x 6 (30 sc).
28. **(3 sc, 1 dec)** x 6 (24 sc).
29. **(2 sc, 1 dec)** x 6 (**18 sc**).
Step 11: The Cavity (Internal Tube)
Now, instead of closing the head, we are going to crochet the cavity, which will be the hole where the neck will fit.
1. **Round 30:** Crochet **18 sc taking the Back Loop Only (BLO)**. This will make the fabric fold neatly toward the inside of the head.
2. **Rounds 31 to 35 (The 6 rounds of the cavity):** Crochet **18 sc** normally. You will create a 6-round tube that you will then fold into the interior of the head to create the cavity.
* *Note:* Upon finishing the last round, fasten off.
“How, When, and Where” Explanations:
* **How to stuff with the cavity in place?**
This is the critical step for beginners. You must stuff the head **around** the 18-stitch tube.
* *The trick:* Use a thick marker or the handle of a crochet hook to insert the fiberfill around the 18-stitch tube and push it into the head. The head must be very firm so it does not deform when inserting the “tenon.”
* **Why 18 stitches for a 15-stitch tenon?**
When the tenon (the neck) is stuffed, it expands. If we also made the cavity 15 stitches, it wouldn’t fit or would stretch the head stitches. Those 3 stitches of clearance allow for a mechanical fit: it enters under pressure and stays in place through friction.
* **When to join?**
Once the head and the body with its firm tenon are stuffed, insert the tenon into the cavity. Using a strand of yarn, make some invisible stitches right at the base of the neck (where the end of the head meets the start of the visible neck).
Step 12: The Ears (Make 2)
As this is a doll with delicate features, we will make simple, proportional ears.
**Color:** Skin.
**Technique:** They are crocheted in a single round inside a magic ring, but **they are not closed into a full circle**.
1. In a **Magic Ring**, crochet: **ch 1** (to start), **5 Half Double Crochets (hdc)**.
2. Pull the short tail to close the ring, but do not slip stitch to join the end to the beginning. It should look like a **”crescent moon” or a letter “C”**.
3. Cut the yarn, leaving a long tail for sewing.
“How, When, and Where” Explanations:
* **Where to position them?**
* Horizontally: They should be aligned with the eyes. Leave about **5 or 6 stitches of distance** from the outer edge of the eye toward the ear.
* Vertically: The top of the ear should roughly coincide with the center line of the eyes.
* **When to sew them?**
It is better to do this **before** permanently fixing the hair. This way, you can arrange the strands of the hair cap’s “side part” so they pass just above or behind the ear, just like on a real person.
* **How to place the earring?**
Once the ear is sewn to the head, take a small pearl and sew it right at the bottom (the lobe) of the ear. If you don’t have pearls, you can embroider a small French knot with white or cream thread.
**Expert Touch:**
When sewing the ear, do not pin it completely flat to the head. Sew only the straight part of the “C.” This will give the ear a little bit of relief and make it look more natural under the hairstyle.
Step 13: The Hair (Brown Color)
Part 1: The Hair Cap
The cap should be a “beanie” that fits perfectly over the head. We will crochet it the same way as the crown of the head to ensure the size.
1. **Magic Ring** of 6 sc.
2. **6 inc** (12 sc).
3. **(1 sc, 1 inc)** x 6 (18 sc).
4. **(2 sc, 1 inc)** x 6 (24 sc).
5. **(3 sc, 1 inc)** x 6 (30 sc).
6. **(4 sc, 1 inc)** x 6 (36 sc).
7. **(5 sc, 1 inc)** x 6 (42 sc).
8. **(6 sc, 1 inc)** x 6 (48 sc).
9. **(7 sc, 1 inc)** x 6 (54 sc).
10. **(8 sc, 1 inc)** x 6 (60 sc).
11. **Rounds 11 to 22:** Crochet 60 sc. (Measure against the head; it should cover down to the middle of the nape).
**For the side part (Hairstyle effect):**
Once you have the “beanie,” do not sew it flat. Place it sideways and, with yarn of the same color, create some long chain strands from the side part toward the edges to simulate the direction of styled hair, as seen in the image.
Part 2: The High Bun (Donut)
This bun must be voluminous. We will make it by crocheting a thick “tube” that we will then close upon itself.
1. Start with a chain of **20 ch**, join with a slip stitch to form a circle.
2. Crochet **20 sc** in a spiral for about **25 rounds**. You will have a long cylinder.
3. Stuff this cylinder with fiberfill (it should be firm yet flexible).
4. Join both ends of the cylinder with a yarn needle to form a “ring” or donut.
“How, When, and Where” Explanations:
* **How to position the bun?** Sew the donut right on the top-back part of the hair cap. Make sure it is well centered.
* **When to sew the hair to the head?** Before sewing it permanently, use pins. Move the cap until the doll’s forehead looks like the photo (a bit of a clear forehead).
* **Where to hide the seams?** When sewing the bun to the cap, do it through the inner part of the donut circle. This way, the seam stays hidden by the volume of the hairstyle itself.
**The Final Touch (The Pearl):**
In the image, the doll wears pearl earrings. For a beginner-friendly version, you can use two small craft pearls and sew them to the sides of the head where the hair ends.
Step 14: Embroidery and Facial Details
1. The Eyes (If you did not use safety eyes)
If you prefer to embroider them as in the photo, use black embroidery thread.
* **Location:** Between rounds 17 and 18.
* **Technique:** Embroider a small circle or an oval. The secret to the “kawaii” look is that the eyes are completely black and shiny.
* **Light points:** With very fine white thread, embroider a small “spark” on the top right part of each eye. This will give it life instantly.
2. The Lashes and Eyebrows
For an elegant look:
* **Lashes:** From the outer corner of the eye, make two small diagonal lines upwards. They should be very subtle.
* **Eyebrows:** Two rounds above the eyes, embroider a straight or slightly curved line about 3 stitches wide. Use a brown shade (slightly lighter than the hair) so it doesn’t look too harsh.
3. The Mouth
The smile is minimalist.
* **Color:** Red (the same as the dress).
* **Location:** Two or three rounds below the eyes, centered.
* **How:** Make a small line in an open “V” shape or a soft curve about 2 stitches wide.
4. The Blush (Cheek Effect)
* **Material:** Real blush (makeup) or a pink soft pastel.
* **How:** With a soft brush or cotton swab, apply color just under the eyes and outwards in a circular area. Blend well for a soft gradient.
Step 15: Assembly and Final Joining
* **Securing the Tenon:** Insert the body’s tenon into the head cavity. Ensure the head is facing forward (aligned with the feet and chest).
* **Sewing the Head:** Using the long yarn tail left on the head, take stitches from the base of the head and the neck. Repeat all around so it doesn’t move.
* **The Arms:** If you haven’t yet, sew them just below the neckline ruffle. Ensure they are symmetrical.
* **Dress Adjustment:** Use your fingers to arrange the skirt pleats and the shoulder ruffle.
“How, When, and Where” Explanations:
* **How to hide embroidery knots?** Insert the needle through the back of the head (where the hair will go) and bring it out where you will embroider. When finished, exit through the back again, knot it, and hide it.
* **When to apply the blush?** This is the very last step. If done earlier, you might stain the red yarn or hair while handling the doll for assembly.
**Final Touches on Your Amigurumi Doll in an Elegant Red Dress**
Congratulations on completing your **Amigurumi doll in an elegant red dress**! By following this pattern, you have transformed simple cotton yarn into a sophisticated figure brimming with personality and grace. This project is more than just a doll; it is a testament to your patience and technical growth. The combination of the structural “tenon” support and the complex pleating of the gala skirt marks a significant milestone in any crafter’s journey, resulting in a piece that stands with both physical and artistic stability.
**The Magic of Customization**
While the vibrant red dress and the classic high bun provide a timeless look, your journey doesn’t have to end here. This **Amigurumi doll in an elegant red dress** serves as a perfect canvas for your personal creativity. Consider experimenting with different fabric textures, such as adding a silk ribbon at the waist or tiny beads along the neckline ruffle. Each small adjustment allows you to infuse your unique soul into the stitches, making the final piece a true reflection of your individual style.
**A Timeless Keepsake**
Now that the final blush has been applied and the pearls are in place, take a moment to admire the silhouette of your creation. Whether she is destined to be a centerpiece in a collector’s display or a cherished companion for imaginative play, she carries the care and detail you invested in every round. We hope this pattern has inspired you to continue exploring the limitless possibilities of the amigurumi world. Happy crocheting, and may your next project be just as elegant!
**Let’s Make This Pattern Perfect Together!**
One of the most beautiful things about the crochet community is how we support each other in our creative journeys. I have put a lot of love and care into every stitch of this **Amigurumi doll in an elegant red dress**, but as any crafter knows, sometimes a tiny “yarn knot” can slip into the instructions!
**If you spot a mistake, let me know!**
If you find a typo, a stitch count that doesn’t quite add up, or a step that feels a bit confusing, please don’t hesitate to reach out. I truly value your feedback and would love for you to **share your findings in the comments section**.
By letting me know about any hiccups you encounter, you are helping me improve the pattern for everyone. I am committed to fixing any issues as quickly as possible to ensure that every maker has a smooth and joyful experience.
Thank you for being part of this creative process and for your incredible keen eyes! Happy crocheting!
Love Crochet? Learn New Skills Today 👉 Explore beginner-friendly crochet courses
Spanish version of this same pattern
Here’s a pattern for a cute little doll to knit
Video tutorial for crocheting another amigurumi doll pattern
A pattern for this adorable little amigurumi doll, available in multiple languages on Etsy
Affiliate Disclosure:
This post contains affiliate links. If you purchase through them, I may earn a small commission at no extra cost to you. Thank you for supporting my work!
Discover more crochet patterns, free downloads, and premium PDFs on Ko-fi.