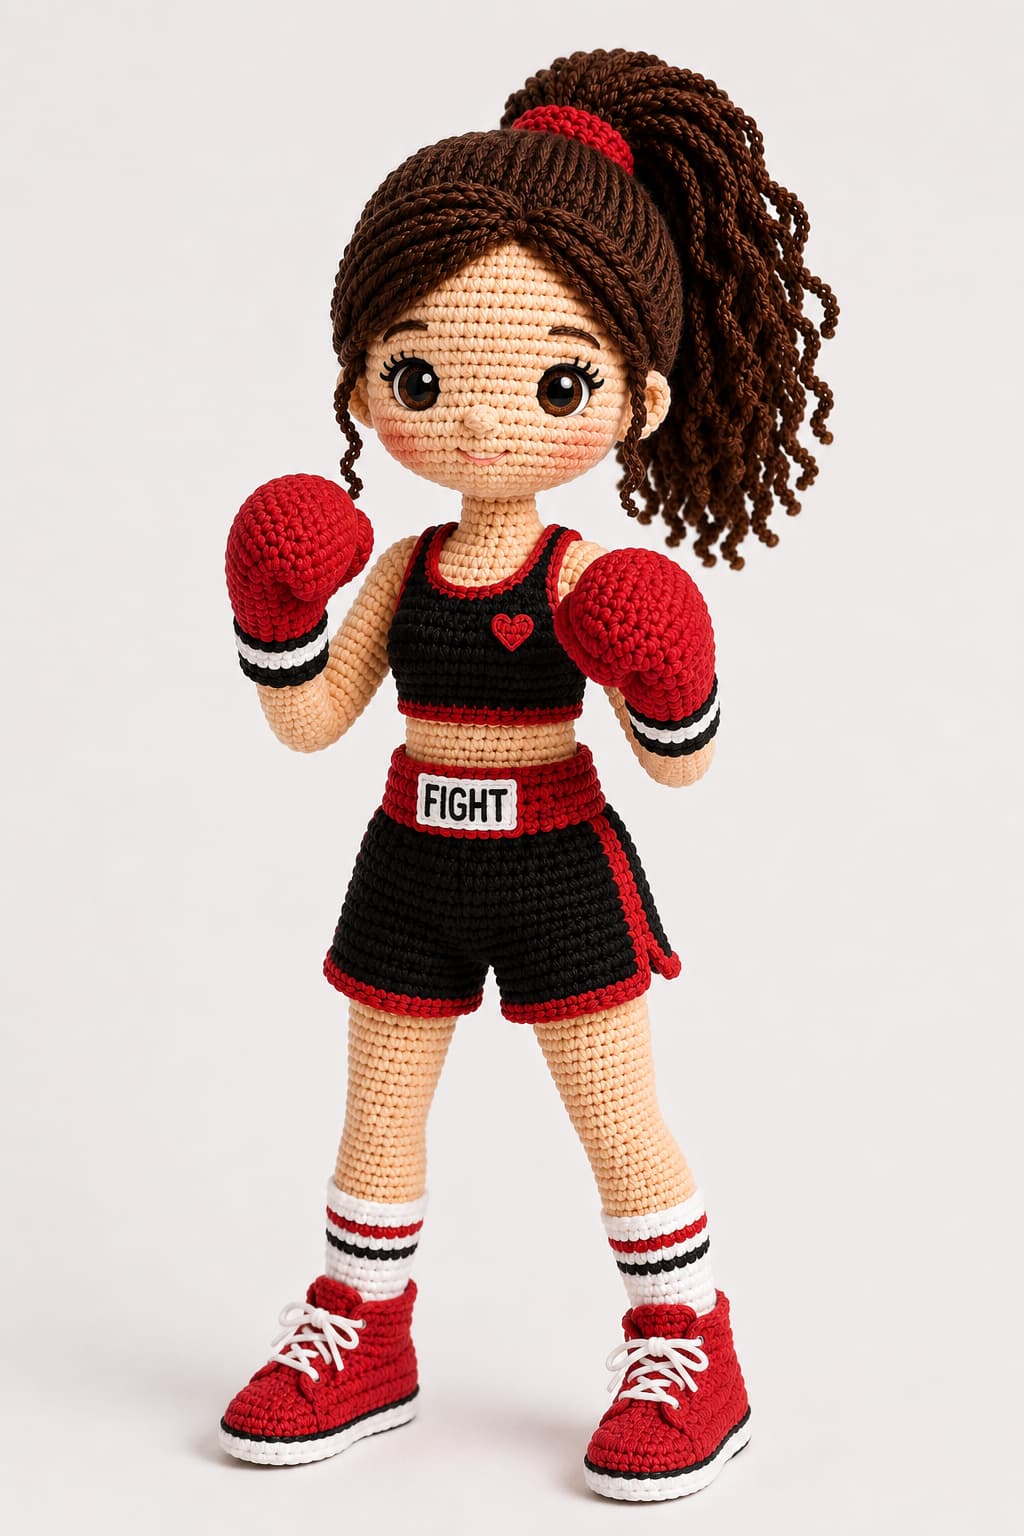
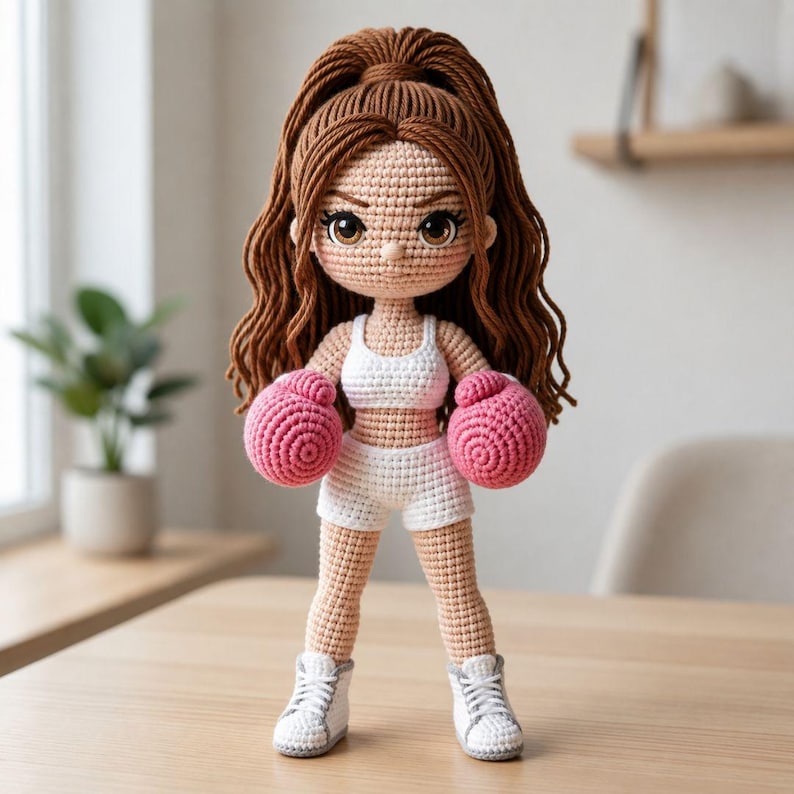
Ready to step into the ring with your next crochet project? This Female Boxer Amigurumi free pattern guides you step-by-step through creating a stunning 30 cm sports doll. Perfect for intermediate crafters, you will master unique seamless techniques, custom boxing gloves, and a clever no-wire neck support system. Grab your 2.5 mm hook and favorite acrylic yarn to bring this powerful, detailed crochet athlete to life today!
Master the Ultimate Female Boxer Amigurumi Design
Welcome to a unique crochet project that beautifully combines athletic strength with creative craftsmanship. This comprehensive pattern is carefully designed to help you bring a powerful and detailed female boxer doll to life. Beyond crafting a beautiful sports doll, you will explore innovative amigurumi construction methods that elevate your stitching skills. Throughout this project, you will learn to shape realistic boxing gloves, work clean color transitions for the socks, and implement a clever no-wire support system to hold the head perfectly firm. Grab your favorite medium weight yarn and get ready to create an unforgettable crochet masterpiece!
Project Size
**Approximate height:** 30 cm (using medium weight yarn and a 2.5 mm crochet hook). The final size may vary slightly depending on your tension, the type of yarn used, and the amount of stuffing.
Difficulty Level
**Intermediate.** This pattern is explained step-by-step and is suitable for beginners with basic knowledge of amigurumi. It includes techniques such as the magic ring, increases, invisible decreases, working in a spiral, color changes, working in BLO (back loop only), FLO (front loop only), seaming, and final assembly.
Estimated Crochet Time
Between **12 and 18 hours**, depending on individual experience, crocheting speed, and the time dedicated to assembly and final details.
Materials List
* Medium weight cotton or acrylic yarn (Sport or DK).
* Skin color.
* Red.
* Black.
* White.
* Dark brown or black for the hair.
* **2.5 mm** crochet hook.
* Silicone fiberfill for stuffing.
* Yarn needle.
* Scissors.
* Stitch marker.
* Sewing pins for assembly.
* **10 mm** safety eyes.
* Plastic tube (optional) to reinforce the neck support.
Useful tools guide for crocheting
Stitch Abbreviations
* **MR:** Magic ring.
* **ch:** Chain stitch.
* **sl st:** Slip stitch.
* **sc:** Single crochet.
* **hdc:** Half double crochet.
* **dc:** Double crochet.
* **inc:** Increase (2 single crochet stitches worked into the same stitch).
* **dec:** Invisible decrease.
* **BLO:** Work in back loops only.
* **FLO:** Work in front loops only.
* **rep:** Repeat the indicated sequence.
* **(…) × n:** Repeat the sequence the indicated number of times.
* **st(s):** Stitch(es).
Section 1: Boxing Boots
Rounds 1 through 5 are worked in a continuous spiral around a foundation chain. Use your stitch marker in the first stitch. Starting from Row 6, we will open the piece to work in rows.
Round 1: The Oval Base (White Color)
* **How:** Make a slip knot and insert your hook. **Chain 7 (ch 7)**.
* **Where:** Skip the first chain from the hook and start in the **second chain**.
* **Step-by-step:** Work 1 increase (2 single crochets in the same space). Next, work 1 single crochet (sc) in each of the next 4 chains. In the last chain, work 4 sc together (this allows you to turn and work along the opposite side of the foundation chain). Working along the bottom of the chain, work 1 sc in each of the next 4 chains, and finish with 1 increase in the same space where you made the first one.
* **Final count:** 16 sc.
Round 2: Expanding the Sole (White Color)
* **Step-by-step:** Work 2 increases in a row. Next, work 4 sc. Then, work 4 increases in a row (this forms the toe area). Work 4 sc and finish the round with 2 increases in a row.
* **Final count:** 24 sc.
Round 3: Final Sole Perimeter (White Color)
* **Why:** This round gives the definitive width and stability to the base of the shoe.
* **Step-by-step:** Work the sequence of [3 sc, 1 increase] a total of 6 times all the way around.
* **Final count:** 30 sc.
Round 4: The Sole Ridge (White Color)
* **How (BLO Technique):** Insert the hook working in the **back loop only** of each stitch.
* **Step-by-step:** Work 1 sc in the back loop only (BLO) of each of the 30 stitches from the previous round, straight around, without increases.
* **Why:** It creates a ridge that makes the shoe start to come up vertically and cleanly.
* **Final count:** 30 BLO sc.
Round 5: Initial Shoe Height and Color Change (Change to Red Color)
* **When and How:** When working the last stitch of the previous round (stitch number 30), hold the last two white loops on your hook and **close the stitch using the Red Color yarn**. Cut the white yarn and tie a knot on the inside.
* **Step-by-step:** Using the red color, work 1 normal sc (taking both loops) in each of the 30 stitches from the previous round.
* **Final count:** 30 sc.
BOOT SIDES CONSTRUCTION (Back and forth Rows – Red Color)
From this point on, we stop working in a spiral. We are going to form the front opening of the boot, where the tongue will be worked later and where the laces will go.
**Important:** Flatten the shoe using the toe as a guide. Identify the **8 central front stitches** and leave them unworked. The stitches will begin immediately after those stitches.
Row 6: Front Opening
* **How:** Flatten the shoe using the toe as a guide to identify the front center. Locate the **8 central stitches** that will form the opening where the tongue will go.
* **Step-by-step:** Starting in the first stitch located to the right of the opening, work **11 sc**, leave the **8 central stitches unworked**, and continue working **11 sc** on the opposite side of the shoe. At the end of the row, **chain 1 (ch 1)** and turn your work.
* **Final count:** **22 sc**.
Row 7: First Instep Adjustment
* **How:** We begin to gently shape the instep using decreases at both ends.
* **Step-by-step:** Work **1 decrease**, then **18 sc**, finish with **1 decrease**. **Ch 1** and turn.
* **Final count:** **20 sc**.
Row 8: Boot Height
* **Step-by-step:** Work **20 sc** without increases or decreases. **Ch 1** and turn.
* **Final count:** **20 sc**.
Row 9: Final Adjustment
* **Step-by-step:** Work **1 decrease**, then **16 sc**, finish with **1 decrease**. **Ch 1** and turn.
* **Final count:** **18 sc**.
Rows 10 to 16: Flap Height
* **How:** We have reached the diameter that the leg will use later. Now we will construct the high flaps characteristic of boxing boots.
* **Step-by-step:** Work **18 sc** in each row. At the end of each row, **ch 1** and turn your work.
* **Repeat:** From **Row 10 to Row 16**, obtaining a total of **7 straight rows**.
TONGUE CONSTRUCTION (Red Color)
Go back to the **8 front stitches** that were left unworked when forming the boot opening.
Row 1
* Join the red yarn with **ch 1** (does not count as a stitch).
* Work **8 sc** across the 8 unworked stitches.
* **Ch 1** and turn.
* **Final count:** **8 sc**.
Rows 2 to 8
* Work **1 sc** across each of the **8 stitches**.
* At the end of each row, **ch 1** and turn.
* Repeat until completing **Row 8**. The tongue should stand out slightly above the flaps to replicate the look of an authentic boxing boot.
Cut the yarn and weave in the ends.
SECTION 2: SOCKS AND LEGS (Make 2 pieces)
From this section onward, we will return to working in a continuous spiral. The leg will maintain a constant diameter of **18 stitches** from the ankle to the thigh. To achieve cleaner color changes on the socks, the first round of each new color will be worked using the **BLO** technique (back loop only), and the following round will be worked **Normally**.
Round 1: Sock Start (White Color)
* **How:** With the boot finished and the tongue already worked, join the **White Color** yarn at the back of the upper edge of the boot with 1 chain (does not count as a stitch).
* **Step-by-step:** Work **18 single crochets (sc)** evenly distributed around the upper opening of the boot to resume working in a spiral.
* **Final count:** **18 sc**.
Rounds 2 to 5: Lower Section of the Sock (White Color)
* **Step-by-step:** Work **1 sc** in each of the **18 stitches**. At the end of Round 5, leave the last two loops of the last stitch on the hook to perform the color change.
* **Final count:** **18 sc**.
Round 6: First Stripe – Clean Line (Black Color – BLO)
* **How:** Complete the last white stitch using the **Black Color** yarn. Cut the white yarn and secure the tail on the inside.
* **Step-by-step:** Work **18 sc** in the **back loop only (BLO)**.
* **Final count:** **18 BLO sc**.
Round 7: First Stripe – Adding Body (Black Color)
* **Step-by-step:** Work **18 normal sc**. In the last stitch, leave the two loops on the hook for the next color change.
* **Final count:** **18 sc**.
Round 8: Separation Stripe – Clean Line (White Color – BLO)
* **How:** Change back to the **White Color** yarn.
* **Step-by-step:** Work **18 sc in BLO**.
* **Final count:** **18 BLO sc**.
Round 9: Separation Stripe – Adding Body (White Color)
* **Step-by-step:** Work **18 normal sc**.
* **Final count:** **18 sc**.
Round 10: Second Stripe – Clean Line (Red Color – BLO)
* **How:** Change to the **Red Color** yarn by closing the last white stitch.
* **Step-by-step:** Work **18 sc in BLO**.
* **Final count:** **18 BLO sc**.
Round 11: Second Stripe – Adding Body (Red Color)
* **Step-by-step:** Work **18 normal sc**.
* **Final count:** **18 sc**.
Round 12: Upper Edge of the Sock – Clean Line (White Color – BLO)
* **How:** Change back to the **White Color** yarn.
* **Step-by-step:** Work **18 sc in BLO**.
* **Final count:** **18 BLO sc**.
Round 13: Upper Edge of the Sock (White Color)
* **Step-by-step:** Work **18 normal sc**. At the end of the round, leave the last two loops on the hook to change to the skin color.
* **Final count:** **18 sc**.
TRANSITION TO SKIN
Round 14: Change to Skin Color
* **How:** Complete the last stitch using the **Skin Color** yarn. Cut the white yarn and secure the tail on the inside.
* **Step-by-step:** Work **18 normal sc**.
* **Final count:** **18 sc**.
Rounds 15 to 19: Calf (Skin Color)
* **Step-by-step:** Work **1 sc** in each of the **18 stitches**.
* **Final count:** **18 sc**.
**Before continuing**
* **Stuffing:** Stuff the foot, ankle, and the entire calf firmly with silicone fiberfill. Continue adding stuffing as you go to maintain a firm and uniform leg.
Rounds 20 to 28: Thigh (Skin Color)
* **Step-by-step:** Work **1 sc** in each of the **18 stitches**, maintaining the same diameter throughout the thigh.
* **Final count:** **18 sc**.
End of Legs
* **Left Leg:** At the end of **Round 28**, work **1 slip stitch (sl st)**, cut the yarn leaving approximately **10 cm**, and fasten off.
* **Right Leg:** At the end of **Round 28**, **do not cut the yarn**. Leave it attached to perform the joining of both legs and begin the body in the next section.
SECTION 3: SHIRT LEGS AND SHORTS JOINING (Black and Red Color)
To replicate the look of the boxing shorts from the image, the short legs are crocheted slightly wider than the legs and then attached directly over them. This creates a loose fabric effect without the need to sew additional pieces.
SHORTS LEGS (Make 2 identical pieces in Black Color)
Round 1
* **How:** Using **Black Color** yarn, **chain 24 (ch 24)** and join with **1 slip stitch (sl st)** to form a ring, being careful not to twist.
Round 2: Trim Base (BLO Technique)
* **Step-by-step:** Work **1 single crochet (sc)** in the **back loop only (BLO)** of each of the **24 stitches**. The front loops (FLO) will be left unworked to crochet the red trim later.
* **Final count:** **24 BLO sc.**
Rounds 3 to 5
* **Step-by-step:** Work **1 sc** in each of the **24 stitches**.
* **Final count:** **24 sc.**
ATTACHING THE SHORT LEGS TO THE LEGS
Left Leg
* Slide the **Left Leg** completely inside one short leg, aligning the top of the leg with the last round of the shorts.
* Align both pieces using stitch markers.
* Crocheting through one stitch of the leg and one stitch of the short leg at the same time, work **18 sc**, evenly distributing the 6 extra stitches of the short leg by making **6 invisible decreases**.
* When finished, the short leg will be attached to the leg seamlessly.
* Fasten off and cut the yarn.
Right Leg
* Repeat exactly the same procedure for the **Right Leg**.
* At the end of the **18 sc**, **DO NOT cut the yarn**.
* Work **3 additional sc** to position the start of the next round on the inner side of the leg.
JOINING THE LEGS AND BEGINNING THE BODY
Round 6
* **Step-by-step:** From the Right Leg, **chain 2**.
* Join the Left Leg by working **1 sc** into the first stitch.
* Continue working the remaining **17 sc** of the Left Leg.
* Work **2 sc** along the central chains.
* Continue with the **18 sc** of the Right Leg.
* Finish by working **2 sc** along the opposite side of the chains.
* **Final count:** **40 sc.**
Round 7
* **Step-by-step:** To begin forming the volume of the shorts, work **1 increase** at the start of each side and **1 increase** at the end of each side (4 increases evenly distributed).
* **Final count:** **44 sc.**
Round 8
* **Step-by-step:** Repeat the **4 increases** again, distributing them evenly.
* **Final count:** **48 sc.**
Round 9
* **Step-by-step:** Work **4 increases** again, distributed evenly around the round.
* **Final count:** **52 sc.**
Round 10
* **Step-by-step:** Work **1 sc** in each of the **52 stitches**.
* **Final count:** **52 sc.**
Round 11
* **Step-by-step:** Work the sequence of **(11 sc, 1 invisible decrease)** repeated **4 times**.
* **Final count:** **48 sc.**
Round 12
* **Step-by-step:** Work the sequence of **(6 sc, 1 invisible decrease)** repeated **6 times**.
* **Final count:** **42 sc.**
Round 13
* **Step-by-step:** Work the sequence of **(5 sc, 1 invisible decrease)** repeated **6 times**.
* In the last stitch, change to **Red Color** yarn.
* **Final count:** **36 sc.**
THE BOXER’S WAISTBAND
Round 14 (Red Color – BLO)
* **Step-by-step:** Work **1 sc** in the **back loop only (BLO)** of the **36 stitches**.
* **Final count:** **36 BLO sc.**
Rounds 15 to 18
* **Step-by-step:** Work **1 sc** in each of the **36 stitches**.
* **Final count:** **36 sc.**
SHORTS BOTTOM TRIM
* **How:** Turn your work upside down and go back to the **front loops (FLO)** that were left unworked in **Round 2** of each short leg.
* **Step-by-step:** Join the **Red Color** yarn and work **1 sc** into each of the **24 FLO loops**.
* Close with **1 slip stitch (sl st)**.
* Cut the yarn and weave in the ends.
* Repeat exactly the same procedure on the second short leg.
SECTION 4: THE TORSO AND SPORTS BRA
From this section onward, we will continue crocheting directly over the **36 stitches** with which the red waistband of the shorts ended.
TORSO CONSTRUCTION
Round 1: Torso Start (Skin Color)
* **How:** In the last stitch of the red waistband, hold the last two loops on your hook and join the **Skin Color** yarn to make a clean color change.
* **Step-by-step:** Work **1 single crochet (sc)** in each of the **36 stitches**.
* **Final count:** **36 sc**.
Rounds 2 to 5: Waist and Abdomen (Skin Color)
* **Step-by-step:** Work **1 sc** in each of the **36 stitches** for all four rounds.
* **Why:** These rounds form the high waist and the abdomen before starting the sports bra.
* **Final count:** **36 sc**.
SPORTS BRA CONSTRUCTION
Round 6: Sports Bra Bottom Edge (Black Color – BLO Technique)
* **How:** In the last stitch of the previous round, join the **Black Color** yarn. Cut the skin color yarn and secure the tail on the inside.
* **Step-by-step:** Work **1 sc** in the **back loop only (BLO)** of the **36 stitches**. The front loops (FLO) will be left unworked to add the lower red trim later.
* **Final count:** **36 BLO sc**.
Rounds 7 and 8: Sports Bra Height (Black Color)
* **Step-by-step:** Work **1 sc** in each of the **36 stitches**.
* **Final count:** **36 sc**.
Round 9: Waist Shaping
* **How:** We begin to shape the torso by reducing the diameter evenly.
* **Step-by-step:** Repeat the sequence of **(4 sc, 1 invisible decrease)** a total of **6 times**.
* **Final count:** **30 sc**.
Rounds 10 and 11: Bust Area
* **Step-by-step:** Work **1 sc** in each of the **30 stitches**.
* **Stuffing:** Take advantage of these rounds to firmly stuff the torso, keeping the body perfectly straight and aligned.
* **Final count:** **30 sc**.
Round 12: Neckline Start
* **Step-by-step:** Repeat the sequence of **(3 sc, 1 invisible decrease)** a total of **6 times**.
* **How:** In the last stitch, leave the last two loops on the hook to perform the change to skin color.
* **Final count:** **24 sc**.
TRANSITION TO THE NECK
Round 13: Clean Neckline (Skin Color – BLO Technique)
* **How:** Complete the last stitch using the **Skin Color** yarn.
* **Step-by-step:** Work **1 sc** in the **back loop only (BLO)** of each of the **24 stitches**. The front loops (FLO) will be left unworked to add the red neckline trim later.
* **Final count:** **24 BLO sc**.
Round 14: Base of the Neck
* **Step-by-step:** Repeat the sequence of **(2 sc, 1 invisible decrease)** a total of **6 times**.
* **Final count:** **18 sc**.
Round 15: Final Neck Adjustment
* **Step-by-step:** Repeat the sequence of **(4 sc, 1 invisible decrease)** a total of **3 times**.
* **Final count:** **15 sc**.
Rounds 16 to 18: Neck Height
* **Step-by-step:** Work **1 sc** in each of the **15 stitches**.
* **Stuffing:** Stuff the neck very firmly so it can correctly support the head.
* **Final count:** **15 sc**.
SPORTS BRA FINISHING DETAILS
Bottom Trim (Red Color)
* Go back to the **front loops (FLO)** that were left unworked in **Round 6**.
* Join the red yarn and work **1 sc** into each of the **36 loops**.
* Close with **1 slip stitch (sl st)**.
* Cut the yarn and weave in the ends.
Upper Neckline Trim (Red Color)
* Go back to the **front loops (FLO)** that were left unworked in **Round 13**.
* Join the red yarn and work **1 slip stitch (sl st)** into each of the **24 loops**.
* Fasten off and weave in all ends.
SECTION 5: THE NECK SUPPORT (CAVITY / DOWEL SYSTEM)
The neck support functions as an internal structural post for the head. It must be extremely firm. If desired, you can insert a small plastic tube inside to increase rigidity.
Rounds 1 to 7
* **Where:** Continue crocheting directly over the **15 stitches** with which the neck ended.
* **Step-by-step:** Work **1 single crochet (sc)** in each of the **15 stitches** for **7 consecutive rounds**.
* **Stuffing:** Insert very compact silicone fiberfill as you progress, using the end of your hook or tweezers to compress it completely.
* **Final count:** **15 sc** in each round.
Finishing
* At the end of **Round 7**, work **1 slip stitch (sl st)**.
* Cut the yarn leaving a short tail and fasten off carefully.
SECTION 6: ARMS AND BOXING GLOVES (Make 2 pieces)
Unlike a traditional spherical glove, this model begins as an **oval mitten**, similar to the palm of a hand. It is later stuffed, shaped, and slightly folded to achieve the characteristic shape of a boxing glove. The thumb is crafted separately as a small flat piece and is sewn on at the end.
THE BOXING GLOVE (Red Color)
Round 1: Oval Base of the Mitten
* **How:** Make a slip knot and insert your hook. **Chain 5 (ch 5)**.
* **Where:** Start in the **second chain** from the hook.
* **Step-by-step:** Work **1 increase**, then **2 sc**, in the last chain work **3 sc** to turn and work along the opposite side of the foundation chain. Working along the bottom of the chain, work **2 sc** and finish with **1 increase**.
* **Final count:** **12 sc**.
Round 2
* **Step-by-step:** Work **2 increases**, then **2 sc**, work **3 increases** in the curve of the tip, continue with **2 sc**, and finish with **2 increases**.
* **Final count:** **18 sc**.
Round 3
* **Step-by-step:** Distribute **6 increases** evenly around the round until you reach **24 stitches**.
* **Final count:** **24 sc**.
Rounds 4 to 6
* **Step-by-step:** Work **1 sc** in each of the **24 stitches**.
* **Final count:** **24 sc** per round.
Round 7: Beginning of the Closure Toward the Wrist
* **Step-by-step:** Repeat the sequence of **(2 sc, 1 invisible decrease)** a total of **6 times**.
* **Final count:** **18 sc**.
THE ELASTIC WRISTBAND
Round 8 (Black Color – BLO)
* **How:** Change to **Black Color** yarn.
* **Step-by-step:** Work **1 sc** in the **back loop only (BLO)** of the **18 stitches**.
* **Final count:** **18 BLO sc**.
Round 9 (Black Color)
* Work **18 normal sc**.
* Change to **White Color**.
* **Final count:** **18 sc**.
Round 10 (White Color – BLO)
* Work **18 sc in BLO**.
* **Final count:** **18 BLO sc**.
Round 11 (White Color)
* Work **18 normal sc**.
* Change back to **Black Color**.
* **Final count:** **18 sc**.
Round 12 (Black Color – BLO)
* Work **18 sc in BLO**.
* **Final count:** **18 BLO sc**.
Round 13 (Black Color)
* Work **18 normal sc**.
* Change to **Skin Color**.
* **Final count:** **18 sc**.
ARM CONSTRUCTION
Round 14
* **Step-by-step:** Working in **BLO**, repeat the sequence of **(1 sc, 1 invisible decrease)** six times.
* **Final count:** **12 BLO sc**.
Rounds 15 to 29
* **Step-by-step:** Work **1 sc** in each of the **12 stitches** for **15 rounds**.
* **Final count:** **12 sc**.
THE THUMB (Make 2 pieces)
The thumb does not take any stuffing. It is a small flat piece that is later sewn onto the side of the glove.
Row 1
* **Chain 3**.
* In the second chain from the hook, work **2 sc**.
* Turn.
Row 2
* Work **2 increases**.
* **Final count:** **4 sc**.
Rows 3 and 4
* Work **1 sc** across each stitch.
* **Final count:** **4 sc**.
Cut the yarn leaving a long tail for sewing.
GLOVE ASSEMBLY
Stuffing
* Stuff the body of the glove with plenty of silicone fiberfill to obtain a firm and rounded volume.
* Lightly shape the front with your fingers so that it takes on the appearance of a mitten, without leaving it completely spherical.
Once stuffed, gently press the bottom part (palm) toward the inside of the glove, forming a slight crease. This fold will be hidden when sewing the thumb and will help reproduce the characteristic silhouette of a boxing glove.
Placing the thumb
* Position the thumb on one of the sides of the glove, approximately between **Rounds 4 and 6**, tilted slightly toward the front.
* Sew only the base of the thumb and one of its sides, leaving the outer edge free to preserve its flat appearance.
* On the second arm, sew the thumb on the opposite side to get a symmetrical pair of gloves.
SHOULDER CLOSURE
Round 30
* Before closing, stuff the arm moderately so that it retains some flexibility.
* Flatten the top of the arm, aligning the thumb toward the front.
* Work **6 sc** through both layers of the fabric to completely close the shoulder.
* Cut the yarn leaving a long tail to sew the arm to the torso.
SECTION 7: THE HEAD WITH INTERNAL CAVITY (Skin Color)
The head is worked from the crown down in a continuous spiral. First, we will construct the entire head until reaching its maximum diameter of **60 stitches**. Then, we will make the normal decreases and, before closing the base, we will crochet an internal cavity that will receive the neck support. This system allows the head to fit firmly onto the body without the need to use wires.
HEAD CONSTRUCTION
Round 1
* Make a **magic ring**.
* Work **6 single crochets (sc)**.
* **Final count:** **6 sc**.
Round 2
* Work **6 increases**.
* **Final count:** **12 sc**.
Round 3
* Repeat **(1 sc, 1 increase)** × 6.
* **Final count:** **18 sc**.
Round 4
* Repeat **(2 sc, 1 increase)** × 6.
* **Final count:** **24 sc**.
Round 5
* Repeat **(3 sc, 1 increase)** × 6.
* **Final count:** **30 sc**.
Round 6
* Repeat **(4 sc, 1 increase)** × 6.
* **Final count:** **36 sc**.
Round 7
* Repeat **(5 sc, 1 increase)** × 6.
* **Final count:** **42 sc**.
Round 8
* Repeat **(6 sc, 1 increase)** × 6.
* **Final count:** **48 sc**.
Round 9
* Repeat **(7 sc, 1 increase)** × 6.
* **Final count:** **54 sc**.
Round 10
* Repeat **(8 sc, 1 increase)** × 6.
* **Final count:** **60 sc**.
Rounds 11 to 18
* Work **1 sc** in each of the **60 stitches**.
* **Final count:** **60 sc**.
BEGINNING OF THE HEAD CLOSURE
Round 19
* Repeat **(8 sc, 1 invisible decrease)** × 6.
* **Final count:** **54 sc**.
Round 20
* Repeat **(7 sc, 1 invisible decrease)** × 6.
* **Final count:** **48 sc**.
Round 21
* Repeat **(6 sc, 1 invisible decrease)** × 6.
* **Final count:** **42 sc**.
Round 22
* Repeat **(5 sc, 1 invisible decrease)** × 6.
* **Final count:** **36 sc**.
Round 23
* Repeat **(4 sc, 1 invisible decrease)** × 6.
* **Final count:** **30 sc**.
Round 24
* Repeat **(3 sc, 1 invisible decrease)** × 6.
* **Final count:** **24 sc**.
Round 25
* Repeat **(2 sc, 1 invisible decrease)** × 6.
* **Final count:** **18 sc**.
INTERNAL CAVITY CONSTRUCTION
From this point on, we will stop closing the head. Instead of continuing to decrease, we will build an internal cavity that will allow the neck support to fit inside.
Rounds 26 to 32
* Work **1 sc** in each of the **18 stitches** for **7 rounds**.
* As you progress, stuff only the outer walls of the head with silicone fiberfill.
* **Do not place stuffing inside the central cylinder**, as that space will be the cavity where the neck support will fit.
* **Final count:** **18 sc**.
FINISHING
* Work **1 slip stitch (sl st)**.
* Cut the yarn leaving a tail of about **15 cm**.
* Carefully weave in the tail on the inside of the piece.
* Check that the cavity remains completely clear and that the neck support can be inserted without difficulty, but with a firm fit.
Why does the cavity have 18 stitches and the support only 15?
Even though the neck support is worked with fewer stitches, when stuffed very firmly, the fabric expands and slightly increases its diameter. The cavity, by remaining hollow with 18 stitches, provides the necessary clearance for both pieces to fit together firmly, without distorting the head or requiring excessive effort during assembly.
SECTION 8: EARS AND HAIR
PART 1: THE EARS (Make 2 pieces)
**Color:** Skin color.
The ears are small half-moon-shaped pieces that will later be sewn to both sides of the head.
Row 1
* **How:** Make a magic ring.
* **Step-by-step:** Work **4 single crochets (sc)** into the ring. Pull the tail to close it completely, but **do not join the first and last stitches**. The piece must retain a slight curvature.
* **Finishing:** **Chain 1**, cut the yarn leaving approximately **15 cm** for sewing.
* **Final count:** **4 sc.**
PART 2: THE HAIR BASE CAP
**Color:** Dark brown or Black.
The cap functions as a hat that will cover the entire upper part of the head. Later, we will add the curly strands in specific areas to form the hairstyle.
Round 1
* Magic ring of **6 sc**.
* **Final count:** **6 sc.**
Round 2
* **6 increases.**
* **Final count:** **12 sc.**
Round 3
* Repeat **(1 sc, 1 increase)** × 6.
* **Final count:** **18 sc.**
Round 4
* Repeat **(2 sc, 1 increase)** × 6.
* **Final count:** **24 sc.**
Round 5
* Repeat **(3 sc, 1 increase)** × 6.
* **Final count:** **30 sc.**
Round 6
* Repeat **(4 sc, 1 increase)** × 6.
* **Final count:** **36 sc.**
Round 7
* Repeat **(5 sc, 1 increase)** × 6.
* **Final count:** **42 sc.**
Round 8
* Repeat **(6 sc, 1 increase)** × 6.
* **Final count:** **48 sc.**
Round 9
* Repeat **(7 sc, 1 increase)** × 6.
* **Final count:** **54 sc.**
Round 10
* Repeat **(8 sc, 1 increase)** × 6.
* **Final count:** **60 sc.**
Rounds 11 and 12
* Work **1 sc** in each of the **60 stitches**.
* **Final count:** **60 sc.**
Fasten off leaving a long tail to sew the cap to the head later.
PART 3: THE CORKSCREW STRANDS
**How the curl is formed:** Each strand is constructed by crocheting a long chain and working back with **3 half double crochets (hdc)** in each chain. The excess stitches cause the strand to curl automatically, forming a corkscrew.
Basic strand
* **Step 1:** **Chain 30**.
* **Step 2:** Skip the first chain from the hook.
* **Step 3:** Work **3 half double crochets (hdc)** in each of the chains until you reach the beginning.
* The strand will curl on its own.
STRAND DISTRIBUTION
To replicate the female boxer’s hairstyle, the corkscrews are not distributed evenly.
Bangs
Crochet and sew **6 strands** on the front of the cap, distributing them evenly to cover the forehead.
Sides
Crochet and sew **8 strands on each side** of the cap.
Total:
**16 side strands.**
Nape of the neck
Crochet and sew **6 strands** on the lower back part of the cap.
Crown
Crochet and sew **8 strands** around the upper center of the cap.
These strands will serve to form the ponytail.
THE PONYTAIL
Once all the strands are sewn:
* Gather the **8 upper strands** at the center of the crown.
* Tie them firmly with a small strand of the same hair color.
* Wrap that strand several times around the base of the ponytail to form the hair band.
* Hide the ends beneath the strands.
FINAL ASSEMBLY
1. Sew the two ears to both sides of the head, approximately between Rounds **13 and 15**.
2. Place the cap on the head, verifying that it is centered.
3. Sew the cap using the long tail you left when finishing the piece.
4. Distribute the corkscrews with your fingers to give volume to the hairstyle before permanently sewing the head to the body.
5. Partial fixation of the corkscrews: To prevent the strands from constantly covering the face, you can discretely secure a few side and top curls to the cap with one or two invisible stitches of the same hair color.
SECTION 9: ASSEMBLY AND FINAL DETAILS
Before making any permanent stitches, pin all the pieces together. Observe the doll from the front, both sides, and the back to verify that all pieces are perfectly aligned and symmetrical.
STEP 1: FITTING AND SEWING THE HEAD
The **Cavity + Dowel** system provides a very firm joint between the head and the body.
How to assemble
1. Check that the **neck support** is completely stuffed and firm. If you decided to use a plastic tube as reinforcement, verify that it has been totally covered by the silicone fiberfill.
2. Check that the **internal cavity** of the head remains completely free of stuffing.
3. Align the head looking exactly toward the front, using the boots and the center of the torso as a reference.
4. Slowly insert the support into the cavity until the neck rests completely against the base of the head.
5. Check that the head rotates freely without tilting to either side.
6. Using the long yarn tail from the neck, sew all the way around the circumference, joining the base of the head to the neck using small and firm stitches.
STEP 2: PLACING THE EARS
Location
The ears should be placed at approximately the same height as the safety eyes.
How to sew them
* Pin both ears in place.
* Check for symmetry by observing the head from the front.
* Sew only the straight base of each ear using the long tail you left when finishing the piece.
* Hide the yarn inside the head.
STEP 3: PLACING THE HAIR BASE CAP
How to
1. Place the center of the cap exactly over the crown.
2. Stretch the cap until it covers the top, the sides, and the nape of the neck.
3. Check that the ears remain partially visible.
4. Secure the cap with pins.
5. Sew all along the edge using small invisible stitches.
STEP 4: DISTRIBUITING THE CORKSCREW STRANDS
Once the cap is fixed:
* Distribute the front corkscrews to form the bangs.
* Position the side strands behind the ears.
* Distribute the strands on the nape of the neck evenly.
* Gather the top strands to form the ponytail.
If any strand tends to constantly shift toward the face, you can fix it with one or two invisible stitches using yarn of the same color.
STEP 5: FORMING THE PONYTAIL
* Gather the top strands at the center of the crown.
* Tie all the strands together with a strand of the same hair color.
* Wrap that strand several times around the base to form the band that secures the ponytail.
* Carefully hide the knot between the strands.
STEP 6: SEWING THE ARMS
Location
The arms are sewn to both sides of the torso, immediately below the neck.
How to
1. Pin both arms in place.
2. Check that the thumbs of the gloves are facing toward the body.
3. Tilt both arms forward to form the classic guard position.
4. Observe the doll from the front, verifying that both gloves are at the same height.
5. Sew the shoulder using the **6 stitches** from the upper closure of the arm.
Before making the final stitches on each arm, temporarily place the doll on a table and observe the posture from all angles. A small change of just one or two stitches in the position of an arm can completely modify the expression and attitude of the doll.
STEP 7: FINAL SHAPING
Once the doll is finished:
* Gently shape the head with your hands to evenly distribute the stuffing.
* Adjust the orientation of the gloves so that they face each other.
* Style the corkscrews, separating them with your fingers to increase the volume of the hairstyle.
* Check that the doll stands on its own and that the head is perfectly aligned with the body.
STEP 8: EMBROIDERING THE FACIAL FEATURES
The embroidery defines the personality of the female boxer. Use fine threads (such as sewing thread or embroidery floss split in half) to prevent the lines from looking too coarse.
* **The Eyebrows (Black or Brown Thread):** Thread your needle and insert it through the back of the head, coming out one stitch above the safety eye. Embroider a straight diagonal line that rises slightly toward the center of the forehead (spanning 2 stitches in length) to give her that determined and focused athlete look. Repeat for the other eye.
* **The Nose (Skin Color Thread):** Make 3 or 4 horizontal passes with the skin color thread just on the round immediately below the eyes, spanning 2 central stitches in width. Wrap those passes with the same thread to give it relief and a rounded volume.
* **The Eye Highlights (White Thread):** Insert the needle with white thread and embroider a small half-moon line bordering the lower and outer contour of each safety eye to bring light and a softer look.
Bring Your Crochet Athlete to Life
Congratulations on completing your very own boxing champ! By finishing this project, you have not only created a beautiful, detailed sports doll but also mastered advanced amigurumi techniques. From the continuous spiral on the oval-based boots to the seamless shorts attachment and the innovative no-wire neck cavity system, your stitching skills have truly stepped up to the next level. Now, it is time to share your powerful creation with the world. We would love to see your finished doll, so please share your photos, tag us on social media, and keep crafting amazing, creative projects!

Spanish version of this pattern
Here’s the pattern for another tennis player doll

Video tutorial for knitting a basic body to adapt to any doll
pattern of another boxer jacket design found on Etsy
Affiliate Disclosure:
This post contains affiliate links. If you purchase through them, I may earn a small commission at no extra cost to you. Thank you for supporting my work!
Este artículo contiene enlaces de afiliado, lo que significa que si comprás desde aquí, recibimos una pequeña comisión sin costo extra para vos. ¡Gracias por apoyar nuestro trabajo!
Discover more crochet patterns, free downloads, and premium PDFs on Ko-fi.